Educational software/hardware/toolkit review: Hummingbird Robotics Kit
BB&A 2016 Winter Week 7 – Camila Pereira & Lucas Longo
Design review
The Hummingbird Robotics Kit is a comprehensive package which includes a microcontroller, sensors, motors, and LEDs on the hardware side along with software and plugins for third party software that allows for controlling and programming of the hardware. Blikstein (2015) would categorize this kit as a third generation kit in so far as it is “specifically designed to target new classes of users, such as very young children, non-technical designers, and children in the developing world.” The website specifically states: “Our focus is on bringing robotics (and programming, engineering, and making) to as many kids possible.” (hummingbird.com, 2016) To achieve this, they offer a series of online tutorials, guides, curriculum/lesson plans, worksheets, and even how these activities match to Common Core (CC) and Next Generation Science Standards (NGSS). Teacher professional development workshops are also offered along with publicizing related conferences and maker fairs they participate in.
The microcontroller itself is very similar to the ‘industry standard’ Arduino board with the main difference of having color coded plastic connectors instead of exposed pins to facilitate connecting with the sensors, motors, and LEDs. Some of these ‘appendages’ come pre-wired to these connectors allowing for easy assembly as we can see on the image below:
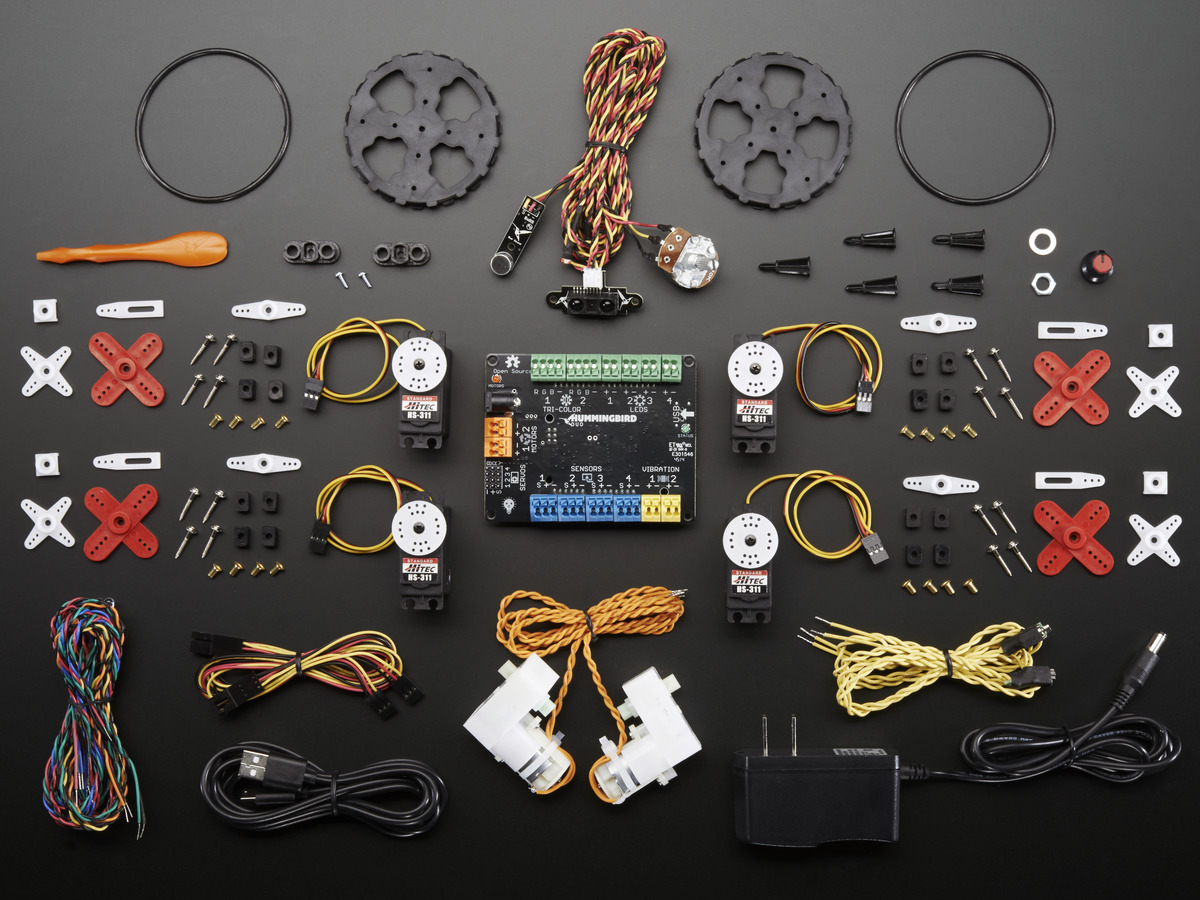 Hummingbird Robotics Kit
On the software side, you must download a driver software that handles the USB-microcontroller communication and the programming software. On top of that, you can use an array of programming packages starting with their own storyboard programming software called “CMU Create Lab”. You can also use third party tile-based programming software for beginners such as “Scratch” and “Snap!” as well as an intermediate level package called “Ardublock”. For more advanced users who are ready to use full programming languages, they offer integration to “Arduino Coding” and specific programming languages/frameworks: Python, Java, and Processing.
The educational philosophy of the Hummingbird Kit and its resources draw from Papert’s Constructionist approach where children learn by actively engaging the process of making and showing their results to an audience.
“Constructionism—the N word as opposed to the V word— shares constructivism’s view of learning as “building knowledge structures” through progressive internalization of actions… It then adds the idea that this happens especially felicitously in a context where the learner is consciously engaged in constructing a public entity, whether it’s a sand castle on the beach or a theory of the universe” ( Papert, 1991, p.1)
A common theme across the proposed curriculum, lesson plans, and tutorials is one of building a robot or device that performs actions (outputs) based on sensor readings and/or instructions created in the programing environment (inputs). The several project examples offered on the site provide ideas that teachers can readily deploy as challenges or suggestion for their students.
An important affordance of this approach where students are building their own artifacts is that they must engage deeply with the content. One good example project is the “Measuring the Hypotenuse”. It consists of a distance sensor mounted on a servo motor along with a program that controls the motor to point the sensor towards a first barrier, take a distance measurement, rotate 90 degrees to point to a second barrier where another distance is measured and finally output the result on the screen with the distance between the two barriers. To do so, the student will learn about creating the correct sequence of commands, gathering the data collected, and finally program a mathematical formula (hypotenuse) to display the result.

The Hummingbird kit, software tools, tutorials, and curriculum attend to several ages having a low threshold for entry yet offering very high ceilings. The board can be attached to a Raspberry Pi and programmed with Processing for example, making it limited only by the creator’s imagination, expertise, and budget. You can use the board and its sensors safely in a classroom environment since there is no soldering required. It also comes with manuals and instructions so that you can unpack and literally start building your project.
Following Blikstein’s framework for analysis of such platforms we find that in terms of “Selective Exposure”, the microcontroller has abstraction layers such as labels and color-coded connectors used to lower the exposure. Separate connectors are offered for motors, step-motors, LEDs, TriColor LEDs, and even vibrating motors. Direct access to microcontroller is also possible as is adding other breakout boards and a Raspberry Pi for example. As far as the embedded electronics go, they come pre-wired and ready to be used – no need for adding resistors or perform any soldering, for example. Again, higher level of exposure can be achieved if desired by adding external or non-kit components.
The “Selective Exposure” of the software will depend on the package you choose to use. Scratch will offer you block-based programming where you can easily identify the function of each of them. On the other end of the spectrum Java will require you to configure serial ports and write setup code just to get started for example. Here’s the list of software packages offered, ordered from low to high exposure levels: Scratch, Snap!, CMU Create Lab, Ardublock, Arduino Coding, Processing, Python, and Java.
In terms of “Selective Exposure for Usability: Embedded error correction”, even though the board has color-coded connectors, it seems to be possible to physically connect an LED on the Motor port for example. Yet compared to microcontrollers from previous generations, it attempts to provide some level of orientation for the user, but it is certainly intimidating at first for a novice we imagine. There is room for wrong connections or even failure if wires are stuck directly into it causing a short-circuit.
If we look at the “Selective exposure for power: Tangibility mapping” the kit offers little other than the connectors that have snap-on capabilities. There are no physical traits or affordances that help the user with learning or figuring out how the kit works. In this sense, the hardware is still more of adults’ technology for children than a children’s technology for children. On the other hand, the entry level software packages such as Scratch were designed specifically for children, and the Hummingbird add-on blocks make it simple enough to be integrated. We also classified the product according to additional dimensions, charted on the following link: https://goo.gl/1aS0mY
The Hummingbird Robotics Kit is extremely similar to other products such as the Gogo board but distinguishes itself by having a well organized and content-rich website that includes curricula, tutorials, data sheets, example projects, FAQs, and a store, among other things. Their integration with several software packages is also very attractive since it gives it a very high-ceiling for those who desire to explore deeper and a very low barrier to start. This progression does not require any upgrades to the hardware kits sold, it is only a matter of learning and transitioning to next software – which are all free, as is all the content on their website.
The cost of the kits is on par with other similar packages, which are still relatively high if you consider that you have some ‘hidden’ or ‘implementation’ costs. One must still purchase material to build whatever these electronics are going to be embedded in, even if it is simply cardboard, glue, and scissors. Teachers must learn the basics themselves, become comfortable, and prepare lessons to use these kits. Furthermore, the classroom must be equipped with computers and in the Hummingbird’s kit case specifically, power outlets for the motors. This is one of the main disappointments with this kit – the motors require external power. Understandably this allows for a higher powered motor yet why not use lower powered motors, which are cheaper and has the same educational function.
Finally, the kit as a whole package of the microcontroller, the input and output hardware, content, curricula, and software offers a solid base for schools to use. It allows for starters to quickly engage with the electronics and program their own sequences. It also allows for students to reach advanced levels and create much more complex projects and code using it as a base. That said, it does not offer any compelling innovation at this point in time, other than than the richness and organization of the content of their web-site. Yet one can argue that this is a wide enough base platform that is actually encouraging the students to be innovative using it, instead of it being what is innovative.
Redesign
We addressed two dimensions of the tool to be redesigned: software and hardware. Our goal is to avoid errors and make it less intimidating for novices, or even teachers who don’t have electronics knowledge.
- Hardware
We designed a case for the the Hummingbird board, where all the ports are connected to entries that allow only one kind of connector. The shape also only allows for the correct configuration of entries for “+”, “-” and “s” (signal). Besides avoiding errors, it reduces the initial time required to start using the kit to build projects, focusing in the problem-solving. Avoiding errors also makes the process less frustrating.
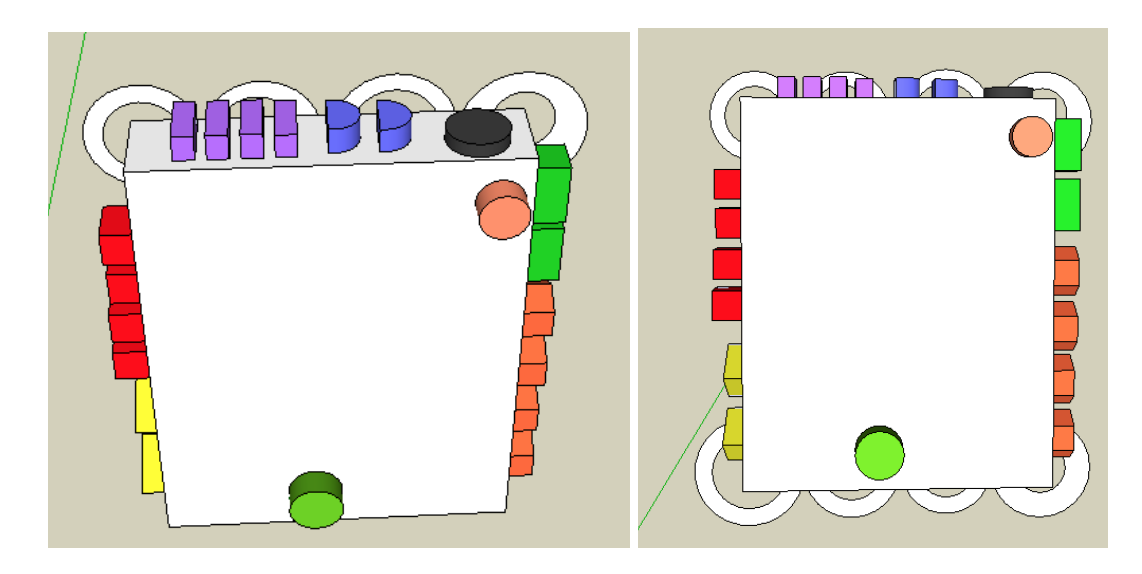
Another aspect of the Hummingbird kit is the purpose of being integrated in craft projects, being attractive for publics that are usualLy not interested in robotics. Therefore, we designed the case in a way that it would allow to be integrated in craft projects more easily: it has appendages that can be used to sew or stick in the project, given more freedom to use the board.
We also recommend to add to the kit items for mounting projects: velcro; double-sided tape; sewing kit; stickers for decoration. It would make it easier for the users to understand the purposes
- Software: plugin for Scratch
Our second recommendation is a plugin that simulates the reactions on the board for scratch program, like the input and output effects on the ports. It will have a format that simulates the actual board – applying the UI principle of matching the system and the real world.
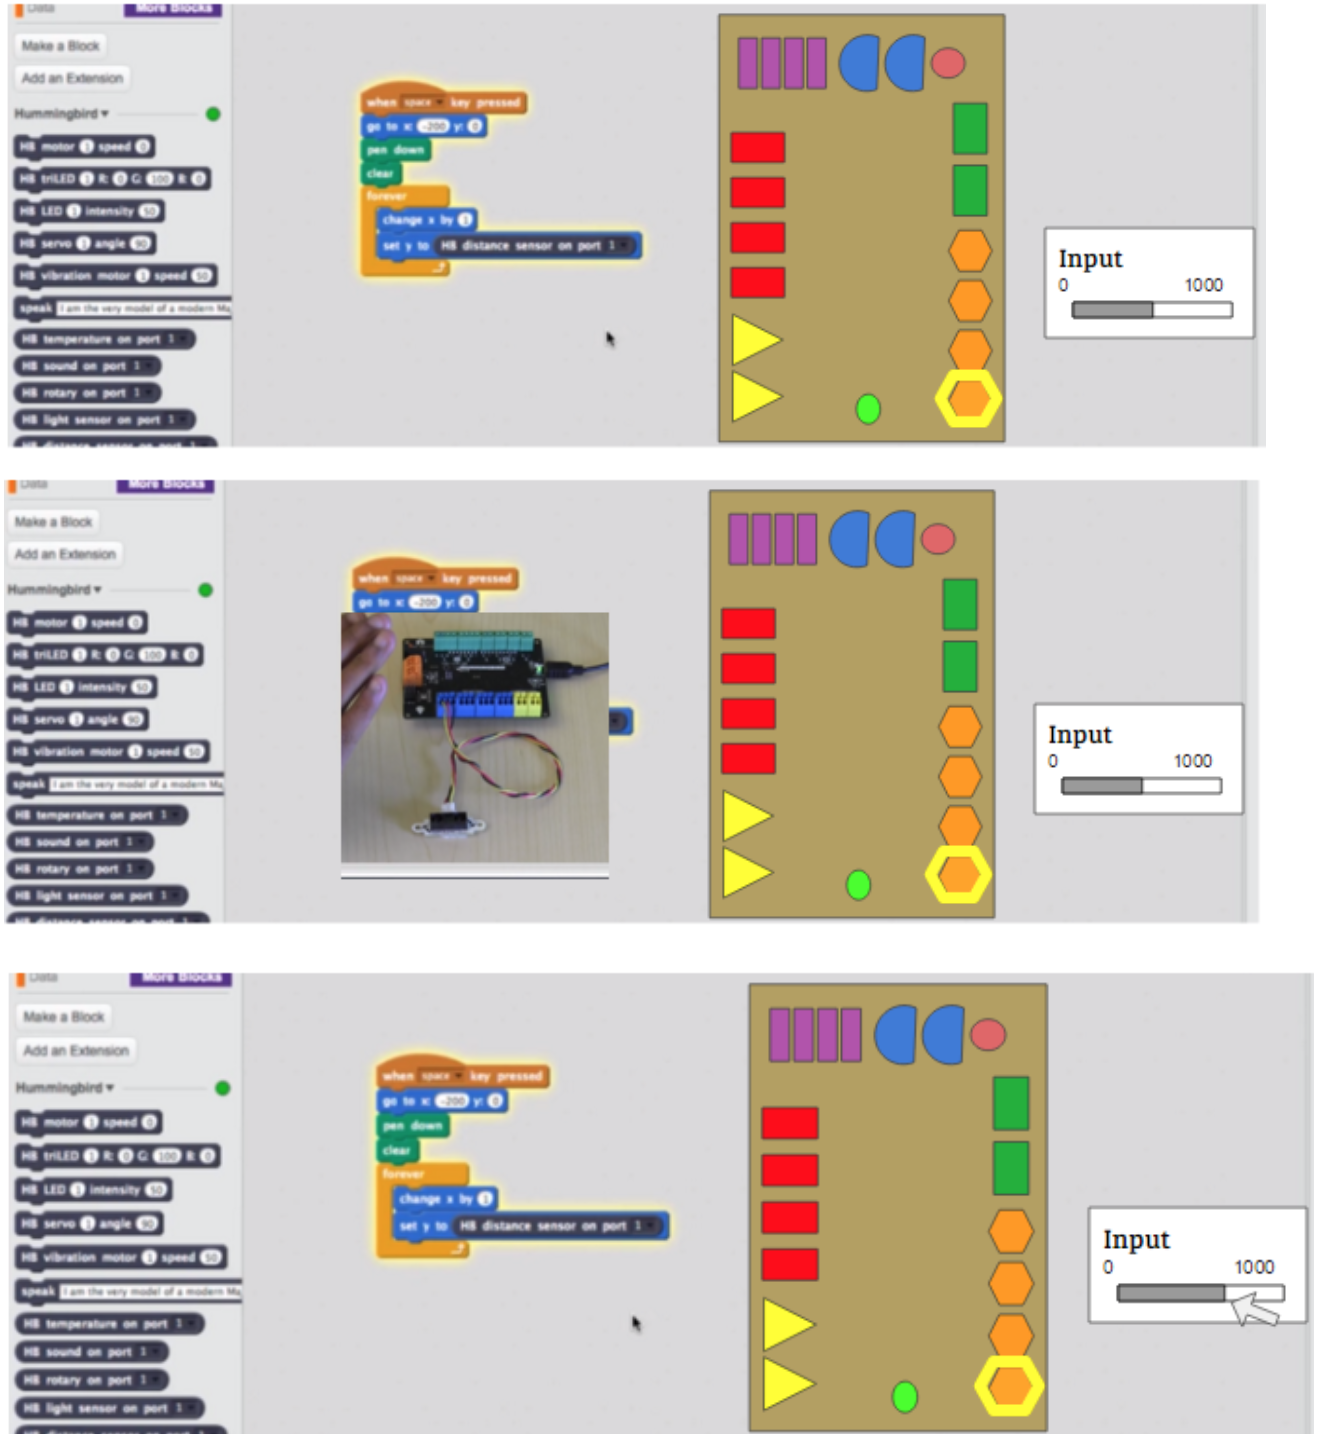
A monitor also is displayed in the screen, showing the quantitative effects of the program on the system, like the voltage being applied to an output. It could be manipulated to test the results of different values, besides simulate the code without the physical devices. It would make prototyping easier, reducing the cost of errors and allowing the students to be more creative.
References
Blikstein, P. (2013, June). Gears of our childhood: constructionist toolkits, robotics, and physical computing, past and future. In Proceedings of the 12th International Conference on Interaction Design and Children (pp. 173-182). ACM.
Blikstein, P. (2015). Computationally Enhanced Toolkits for Children: Historical Review and a Framework for Future Design, Stanford University, USA