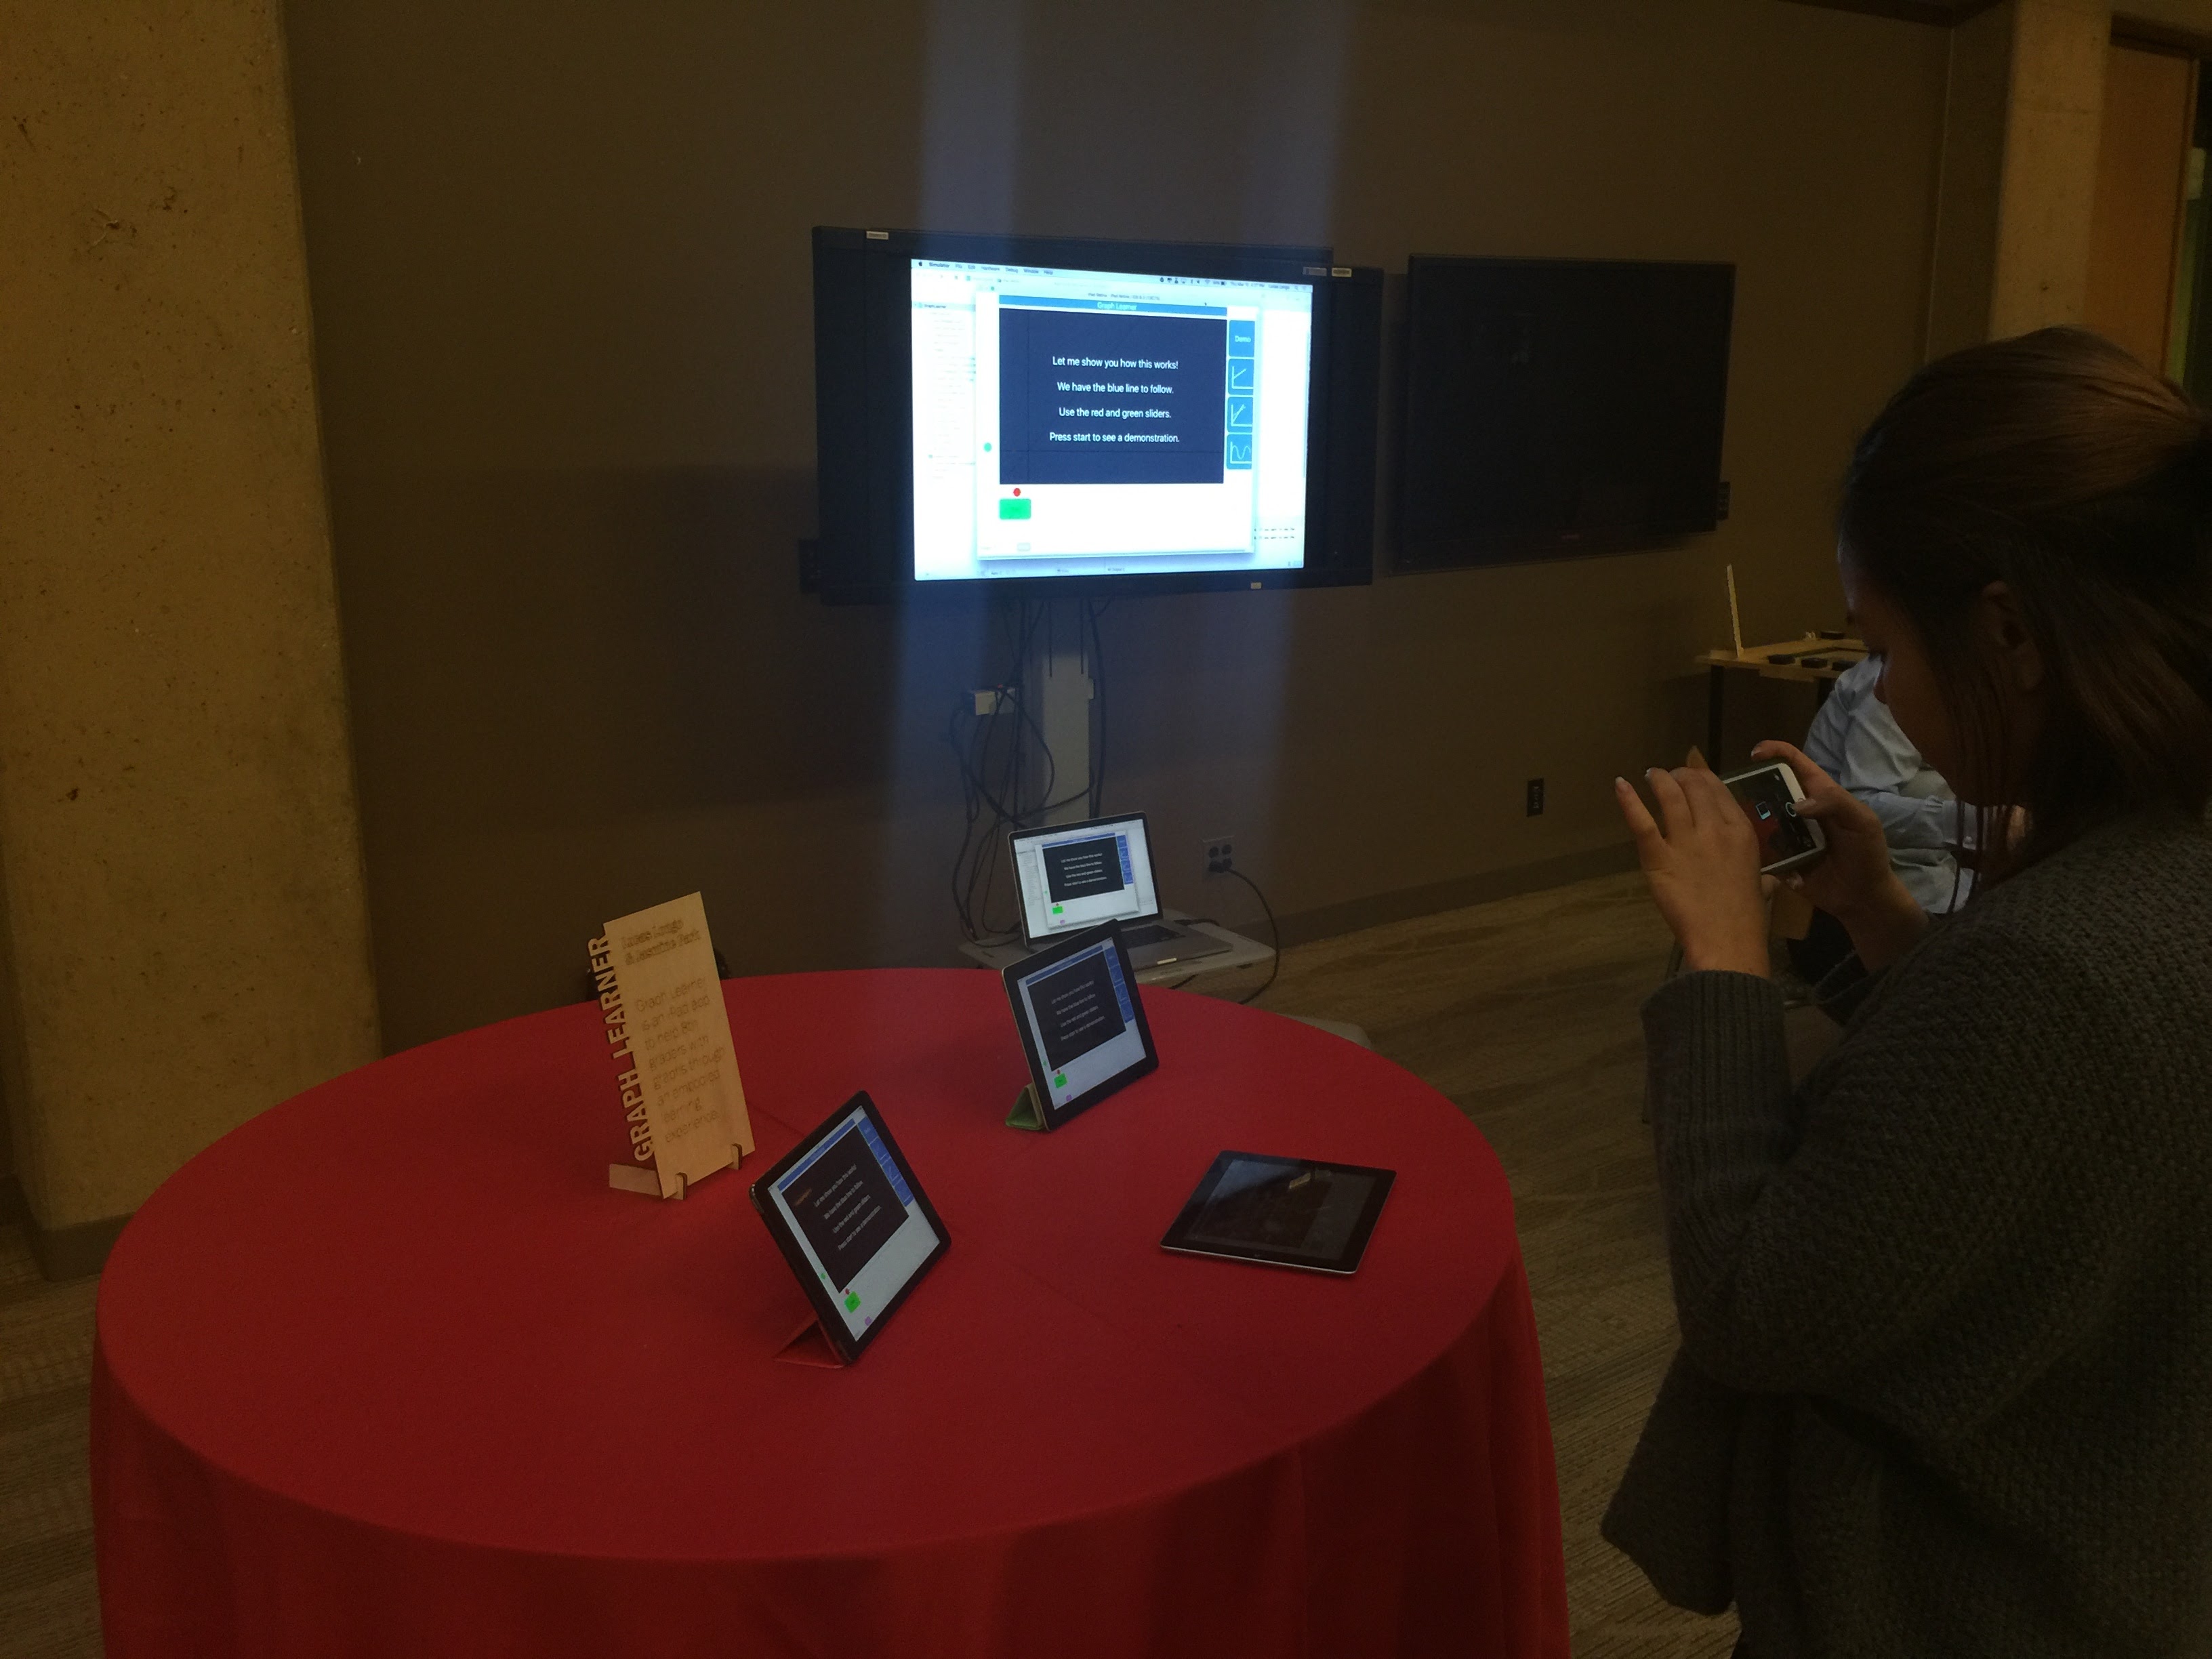
Graph Learner is ready… we show cased it at the BBA Expo… se the presentation below
And so it the report!
Graph Learner is ready… we show cased it at the BBA Expo… se the presentation below
And so it the report!
Our “Graph Learner” has been getting very positive results and the app development has been coming along nicely.
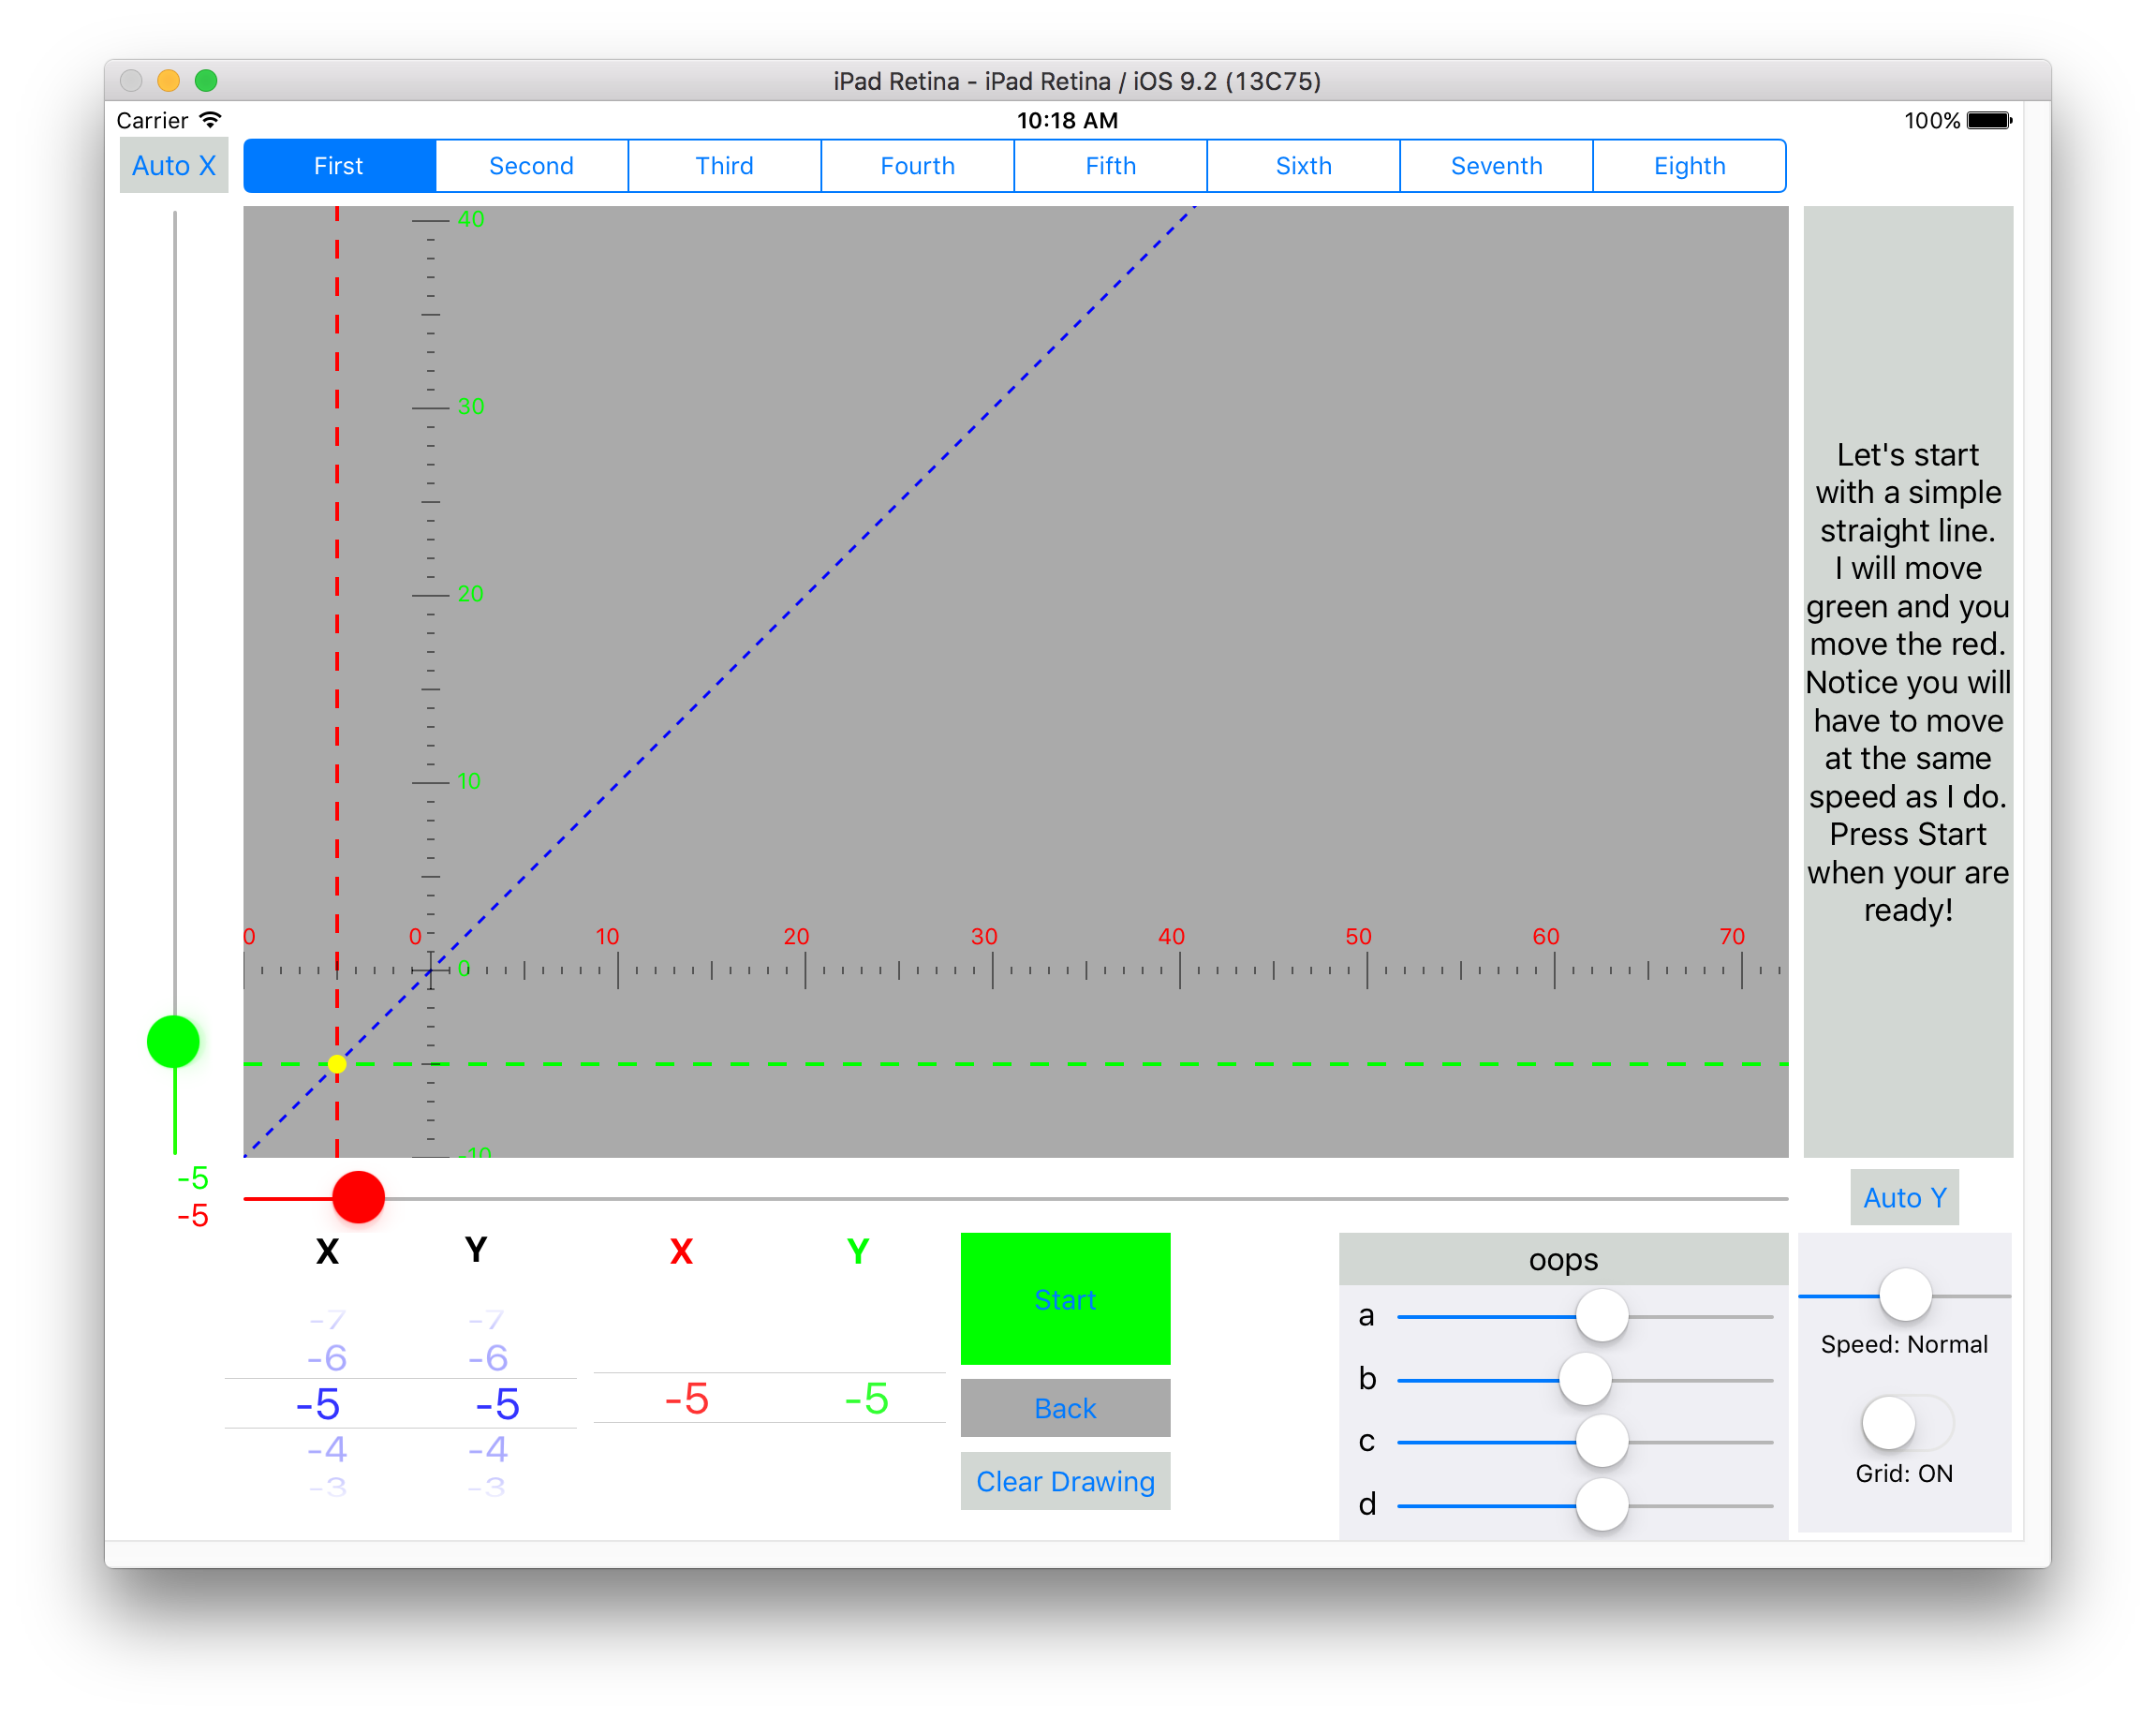
TO DO
DONE
Partnered up with Jasmine Park for the final project – great teamwork 🙂
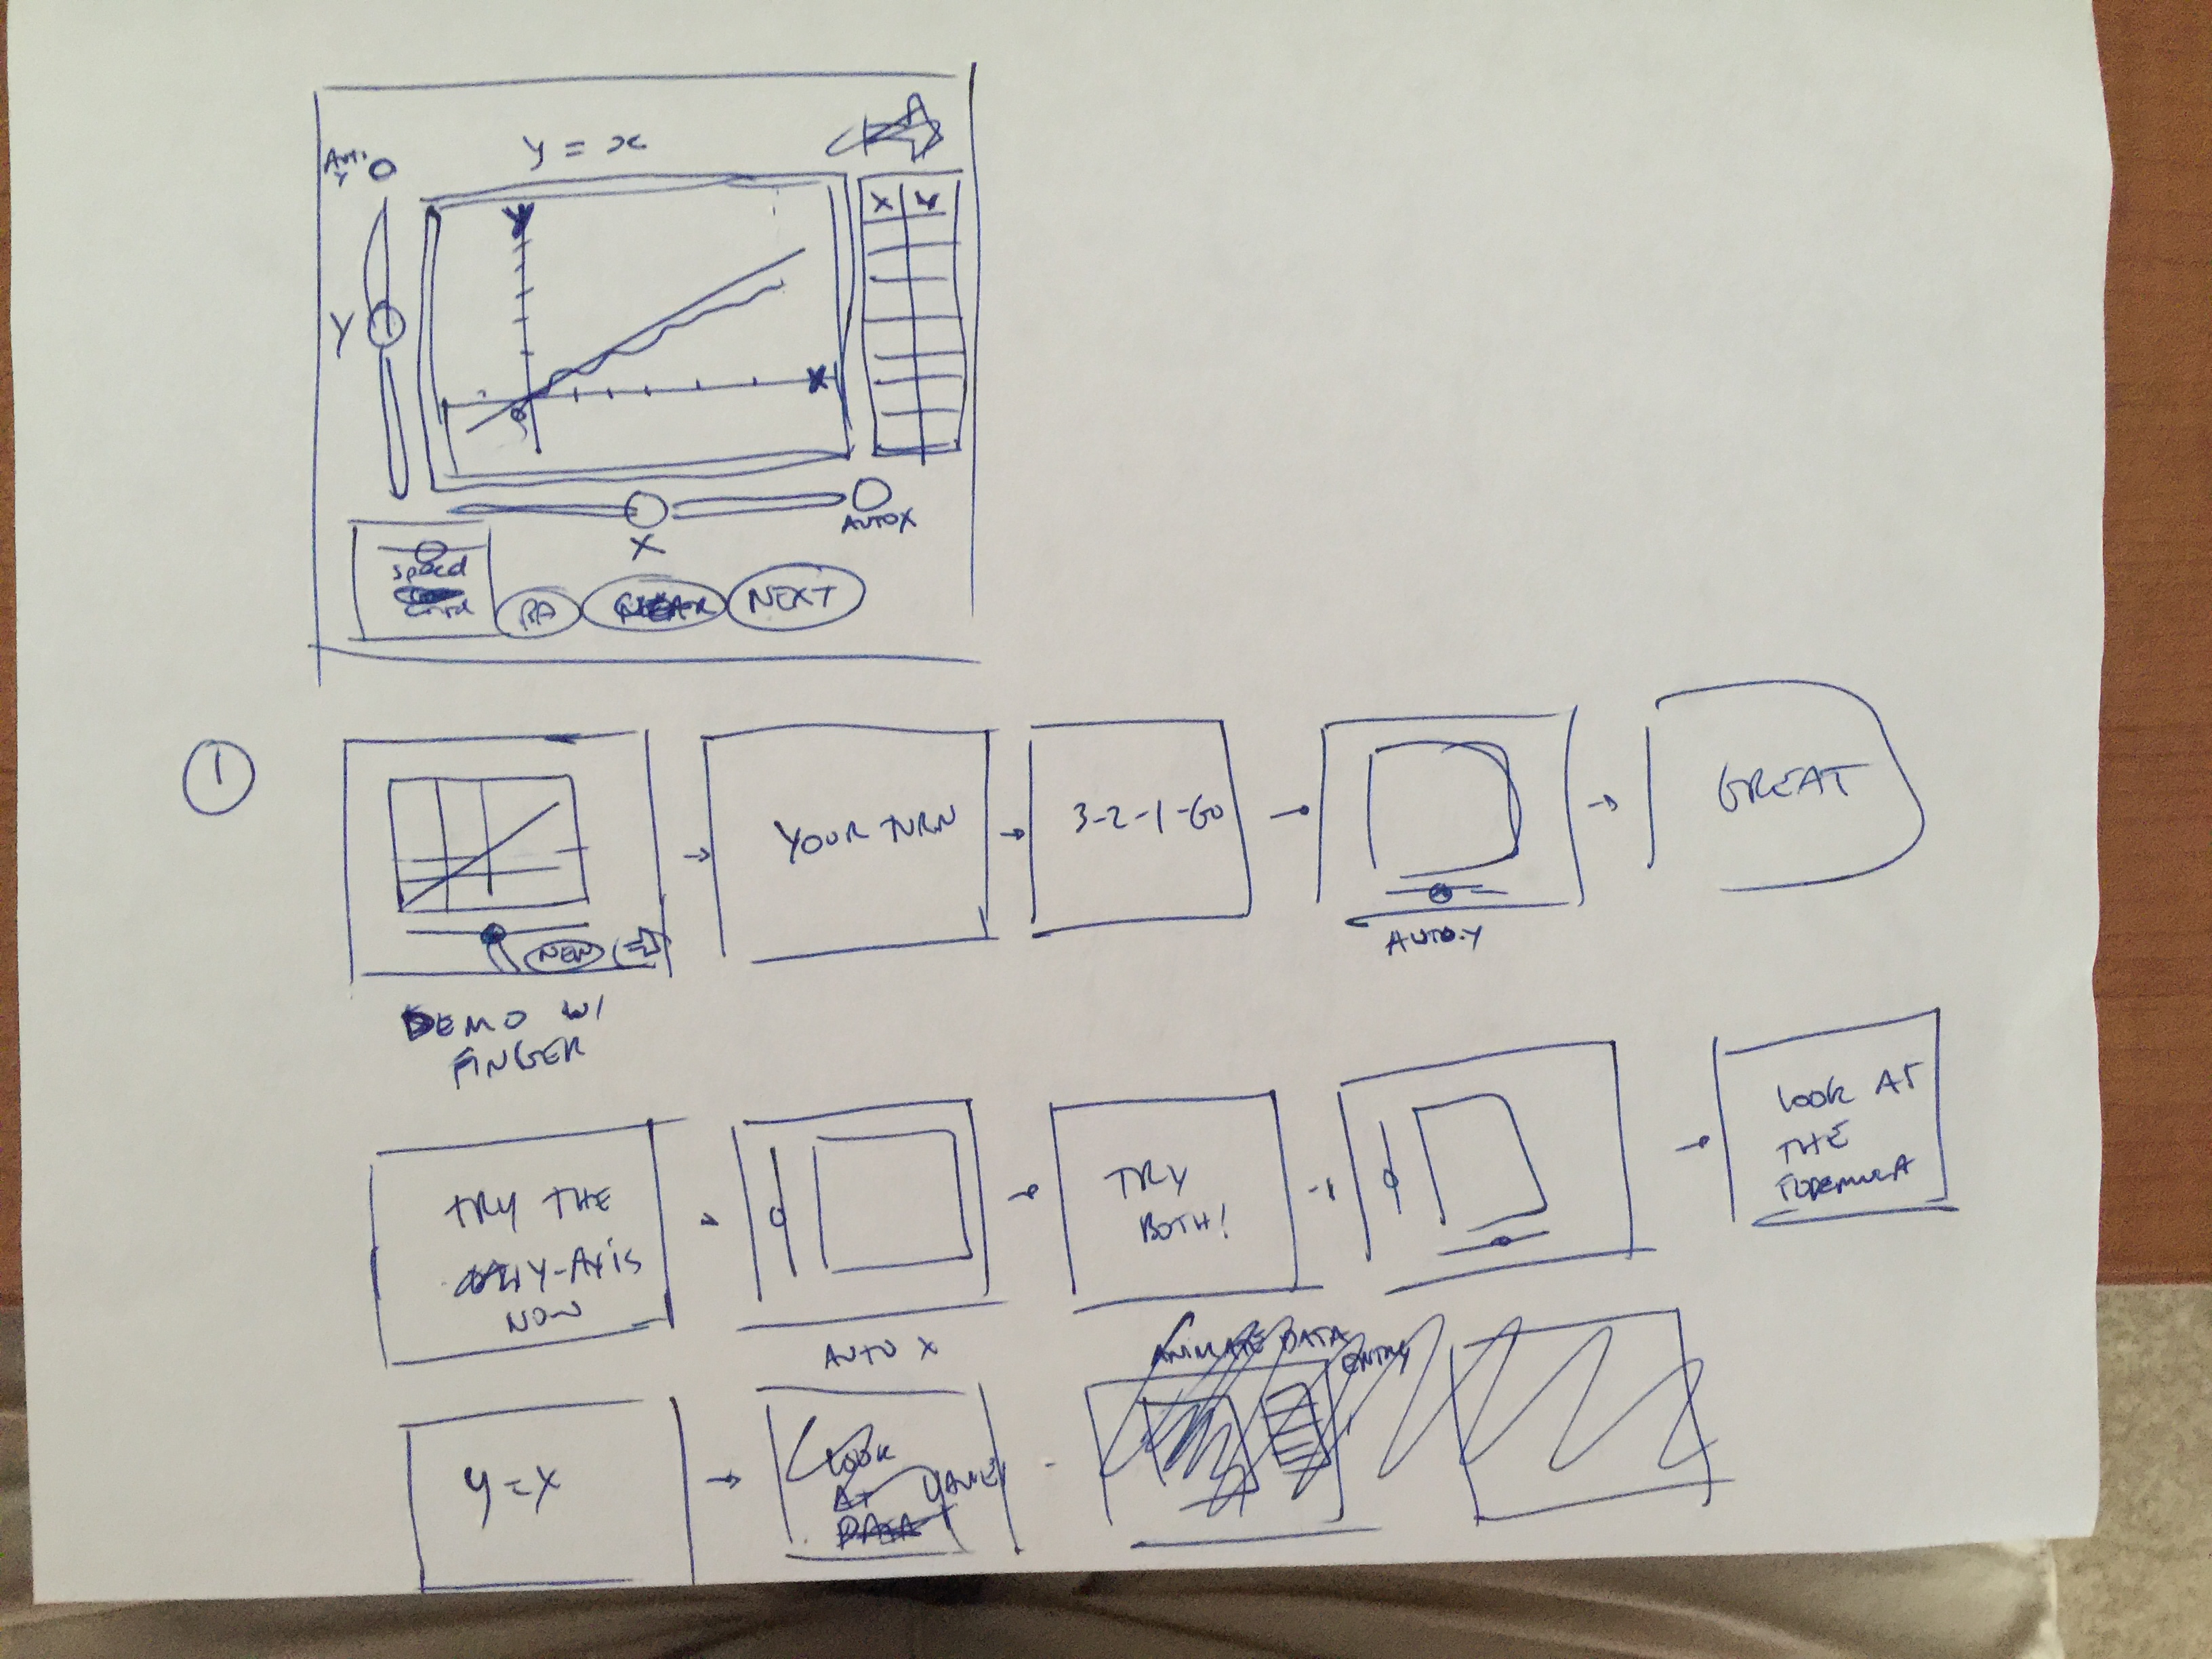
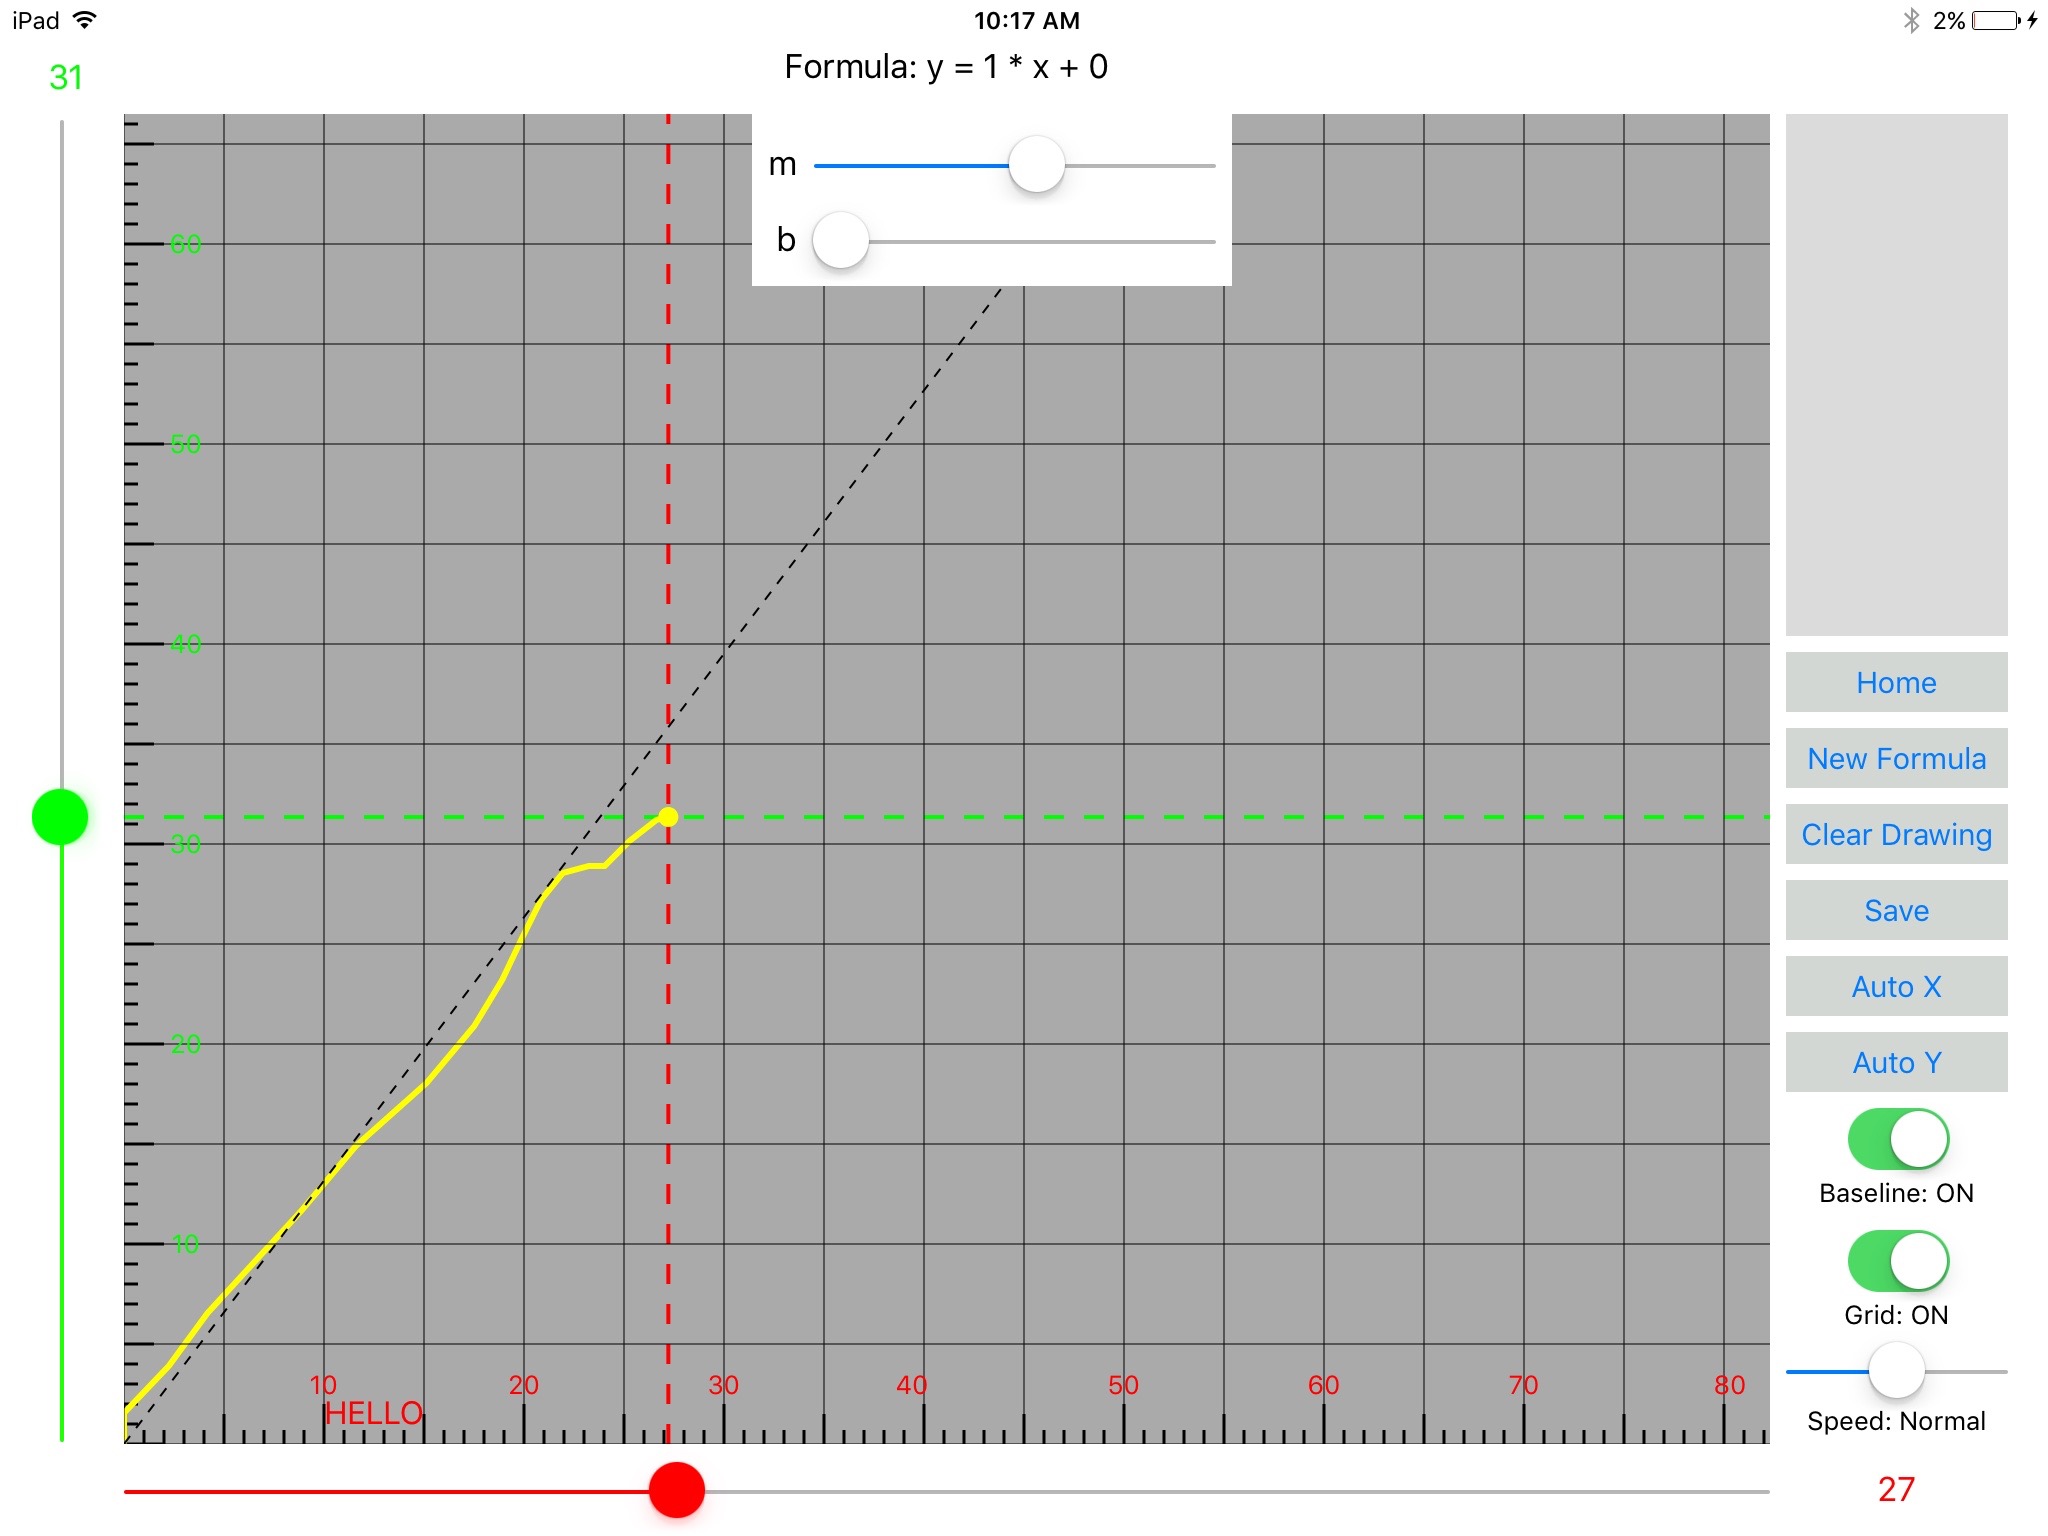
Here’s what we presented:
And the report:
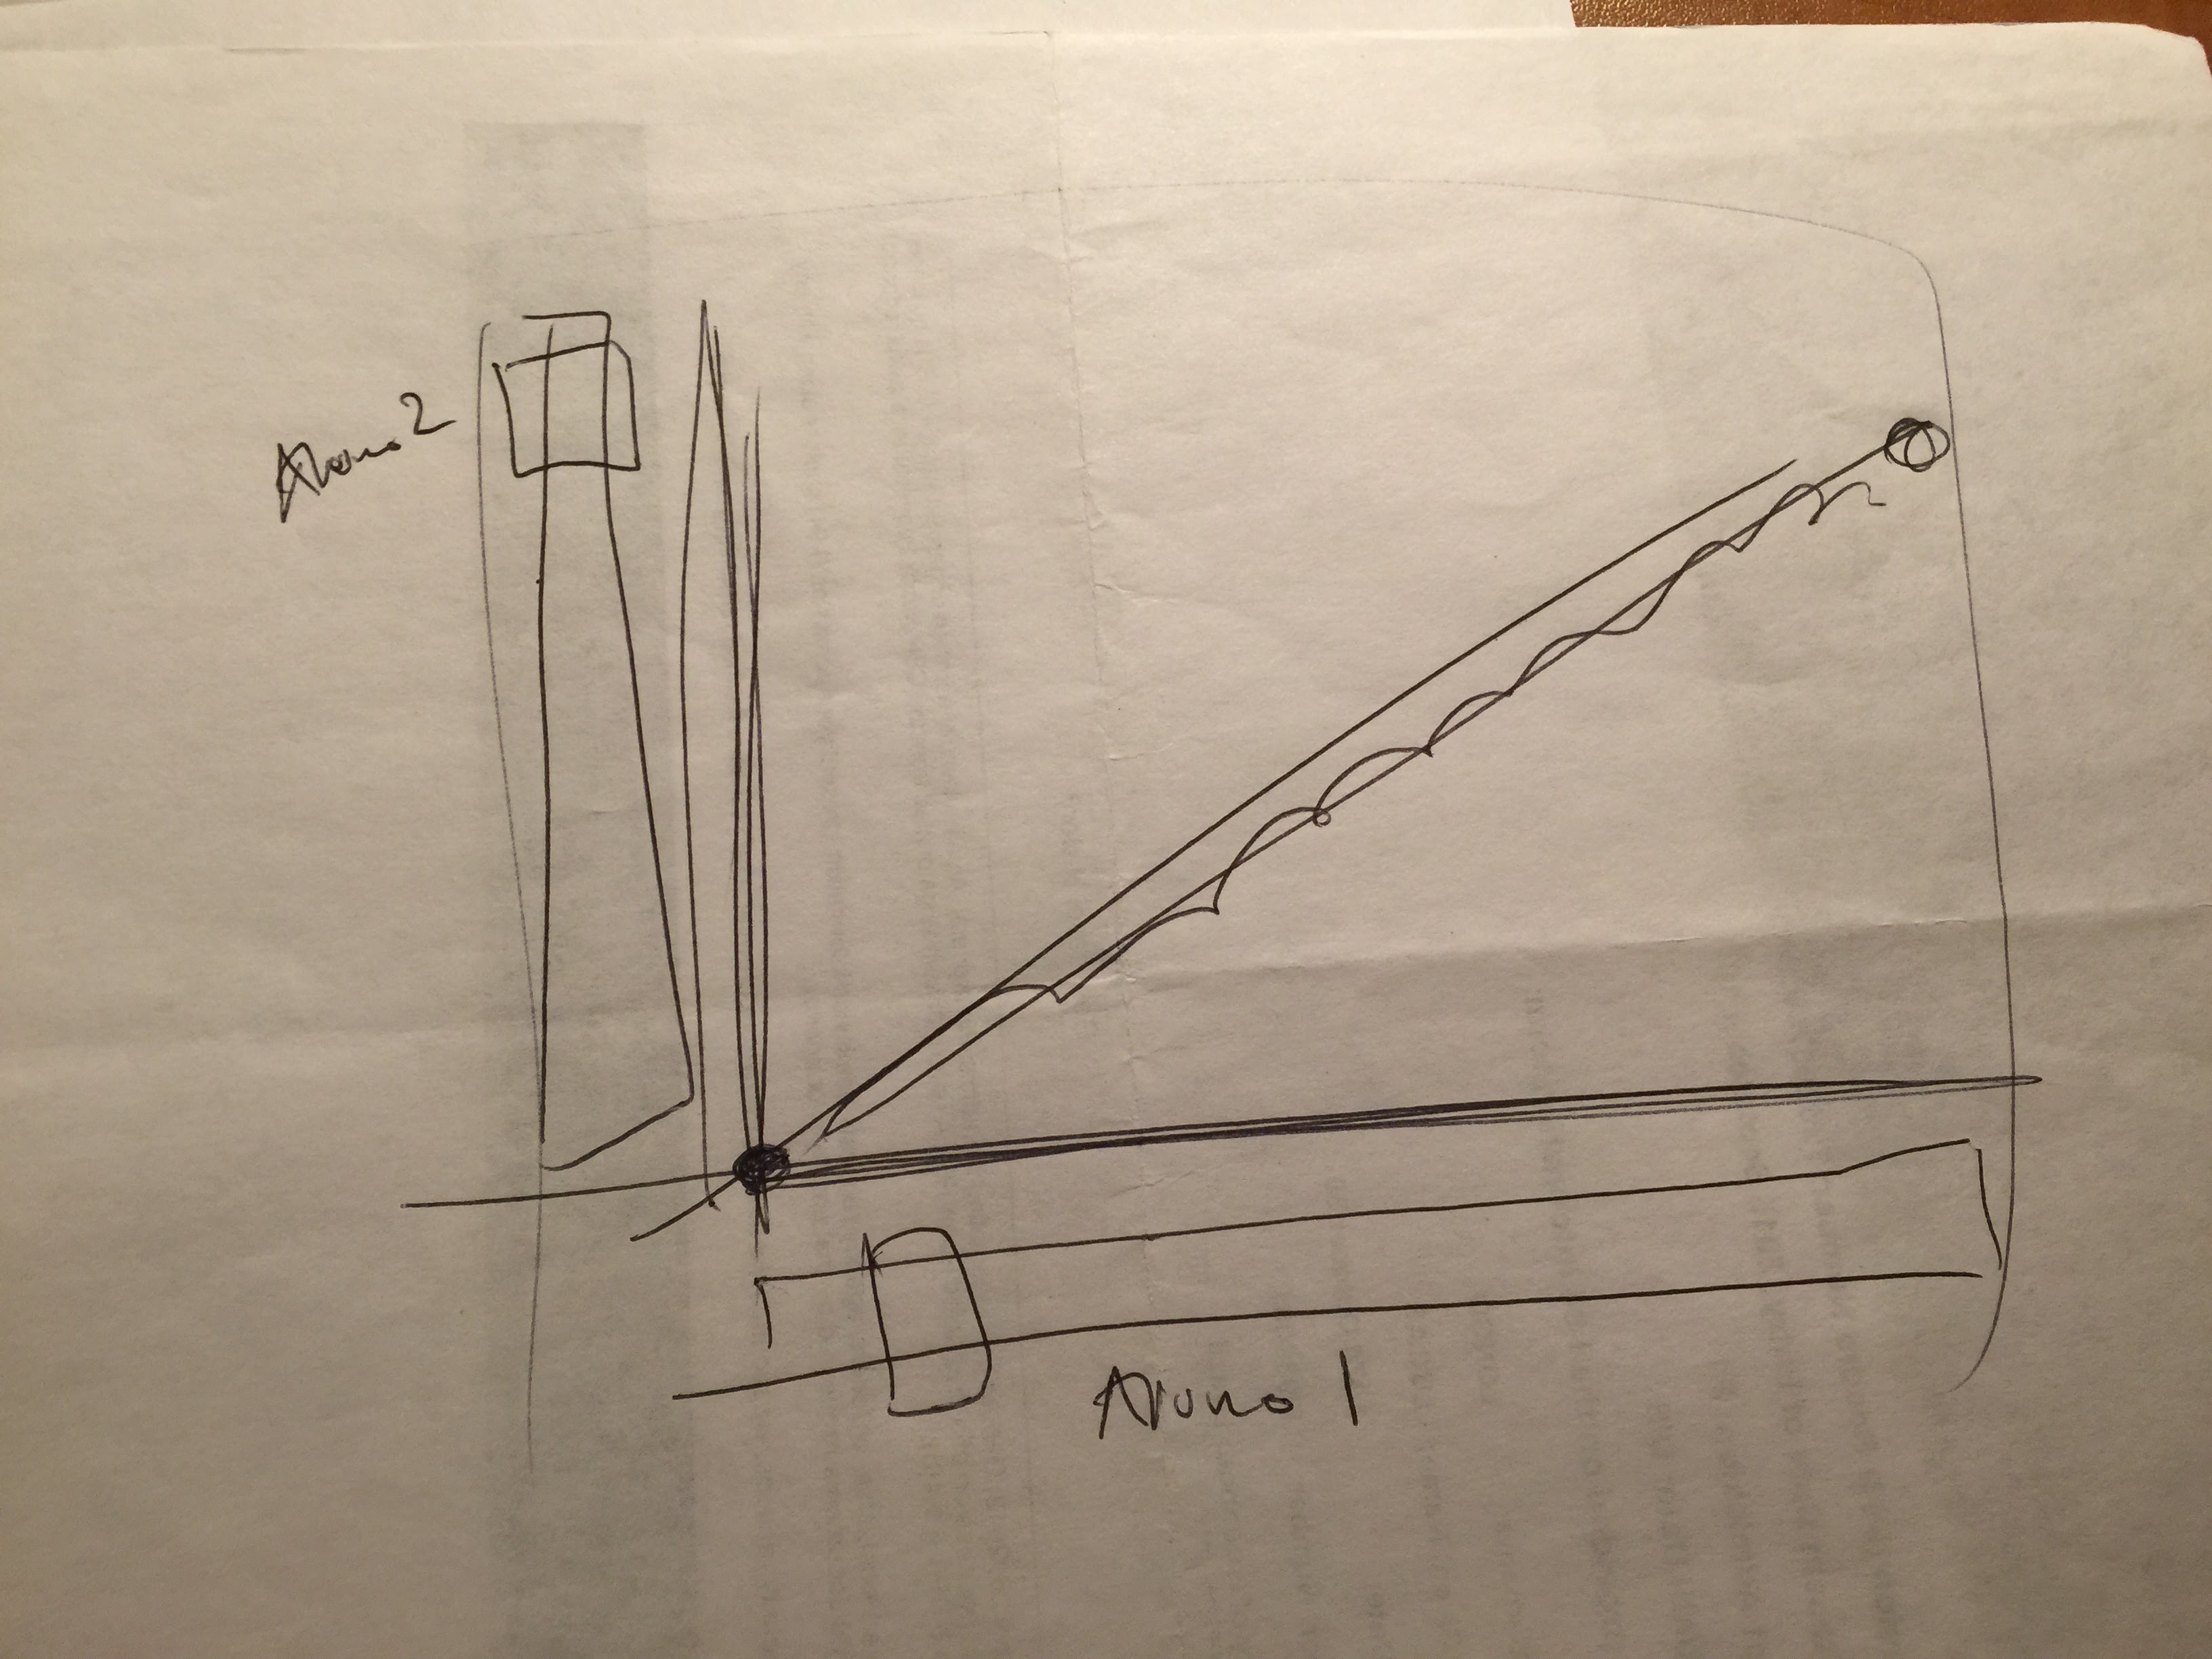
Also took a lot of notes on paper… no time to type them up now…
Eyeo 2014 – Leah Buechley
Eyeo 2014 – Leah Buechley from Eyeo Festival // INSTINT on Vimeo.
Turkle, S., & Papert, S. (1992). Epistemological pluralism and the revaluation of the concrete. Journal of Mathematical Behavior, 11(1), 3-33.
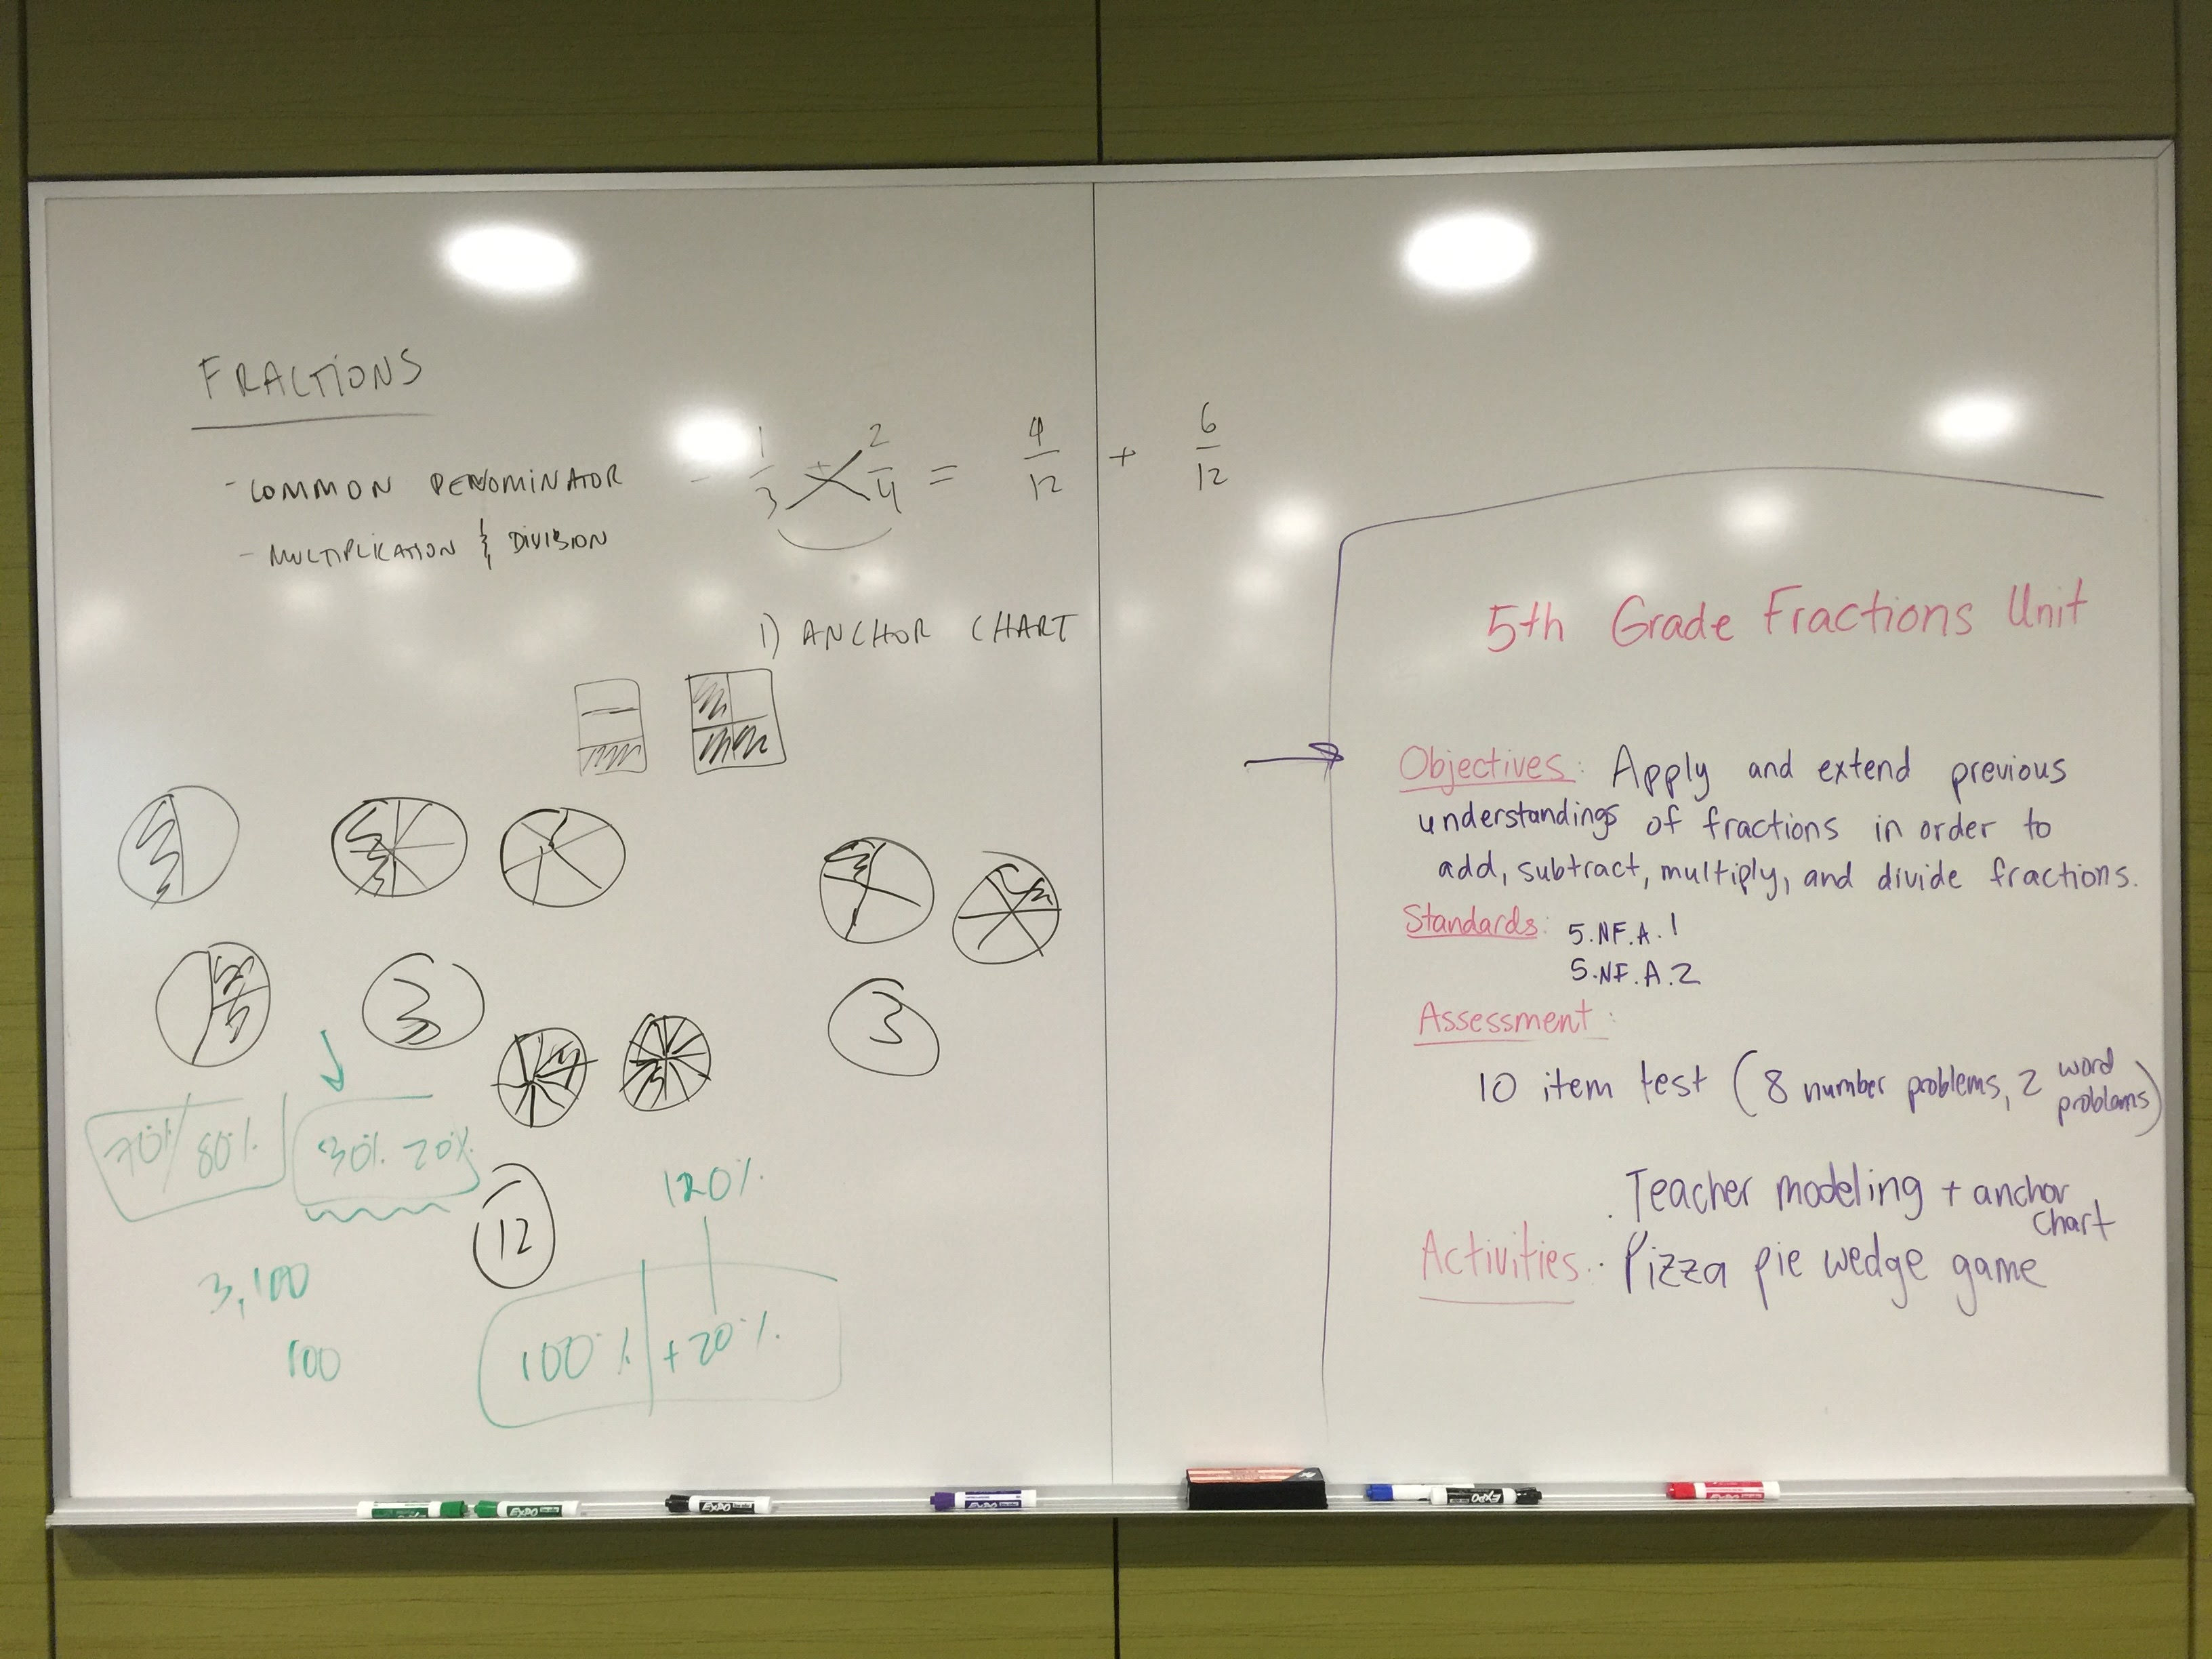
Based on our reading, class was split into the ‘minimal instruction’ group and the ‘constructionism’ group. We had to come up with a Lesson Plan for teaching fractions to 5th graders… interesting exercise but dichotomy between the two stances were not as clear.
We also did not have the student’s presentations about the readings which made the lesson less engaging.
Second half of class we heard Michelle Wilkerson from Northwestern University talk about here educational simulation softwares – DataSketch very interesting and powerful tools – but as Papert would say – you still need a skilled teacher to be able to engage and scaffold students in the process as well as debrief with meaningful discussions and displays of learning.
During the lab session we showed our redesigns:
Link to the paper, presentation and photos of prototype below:
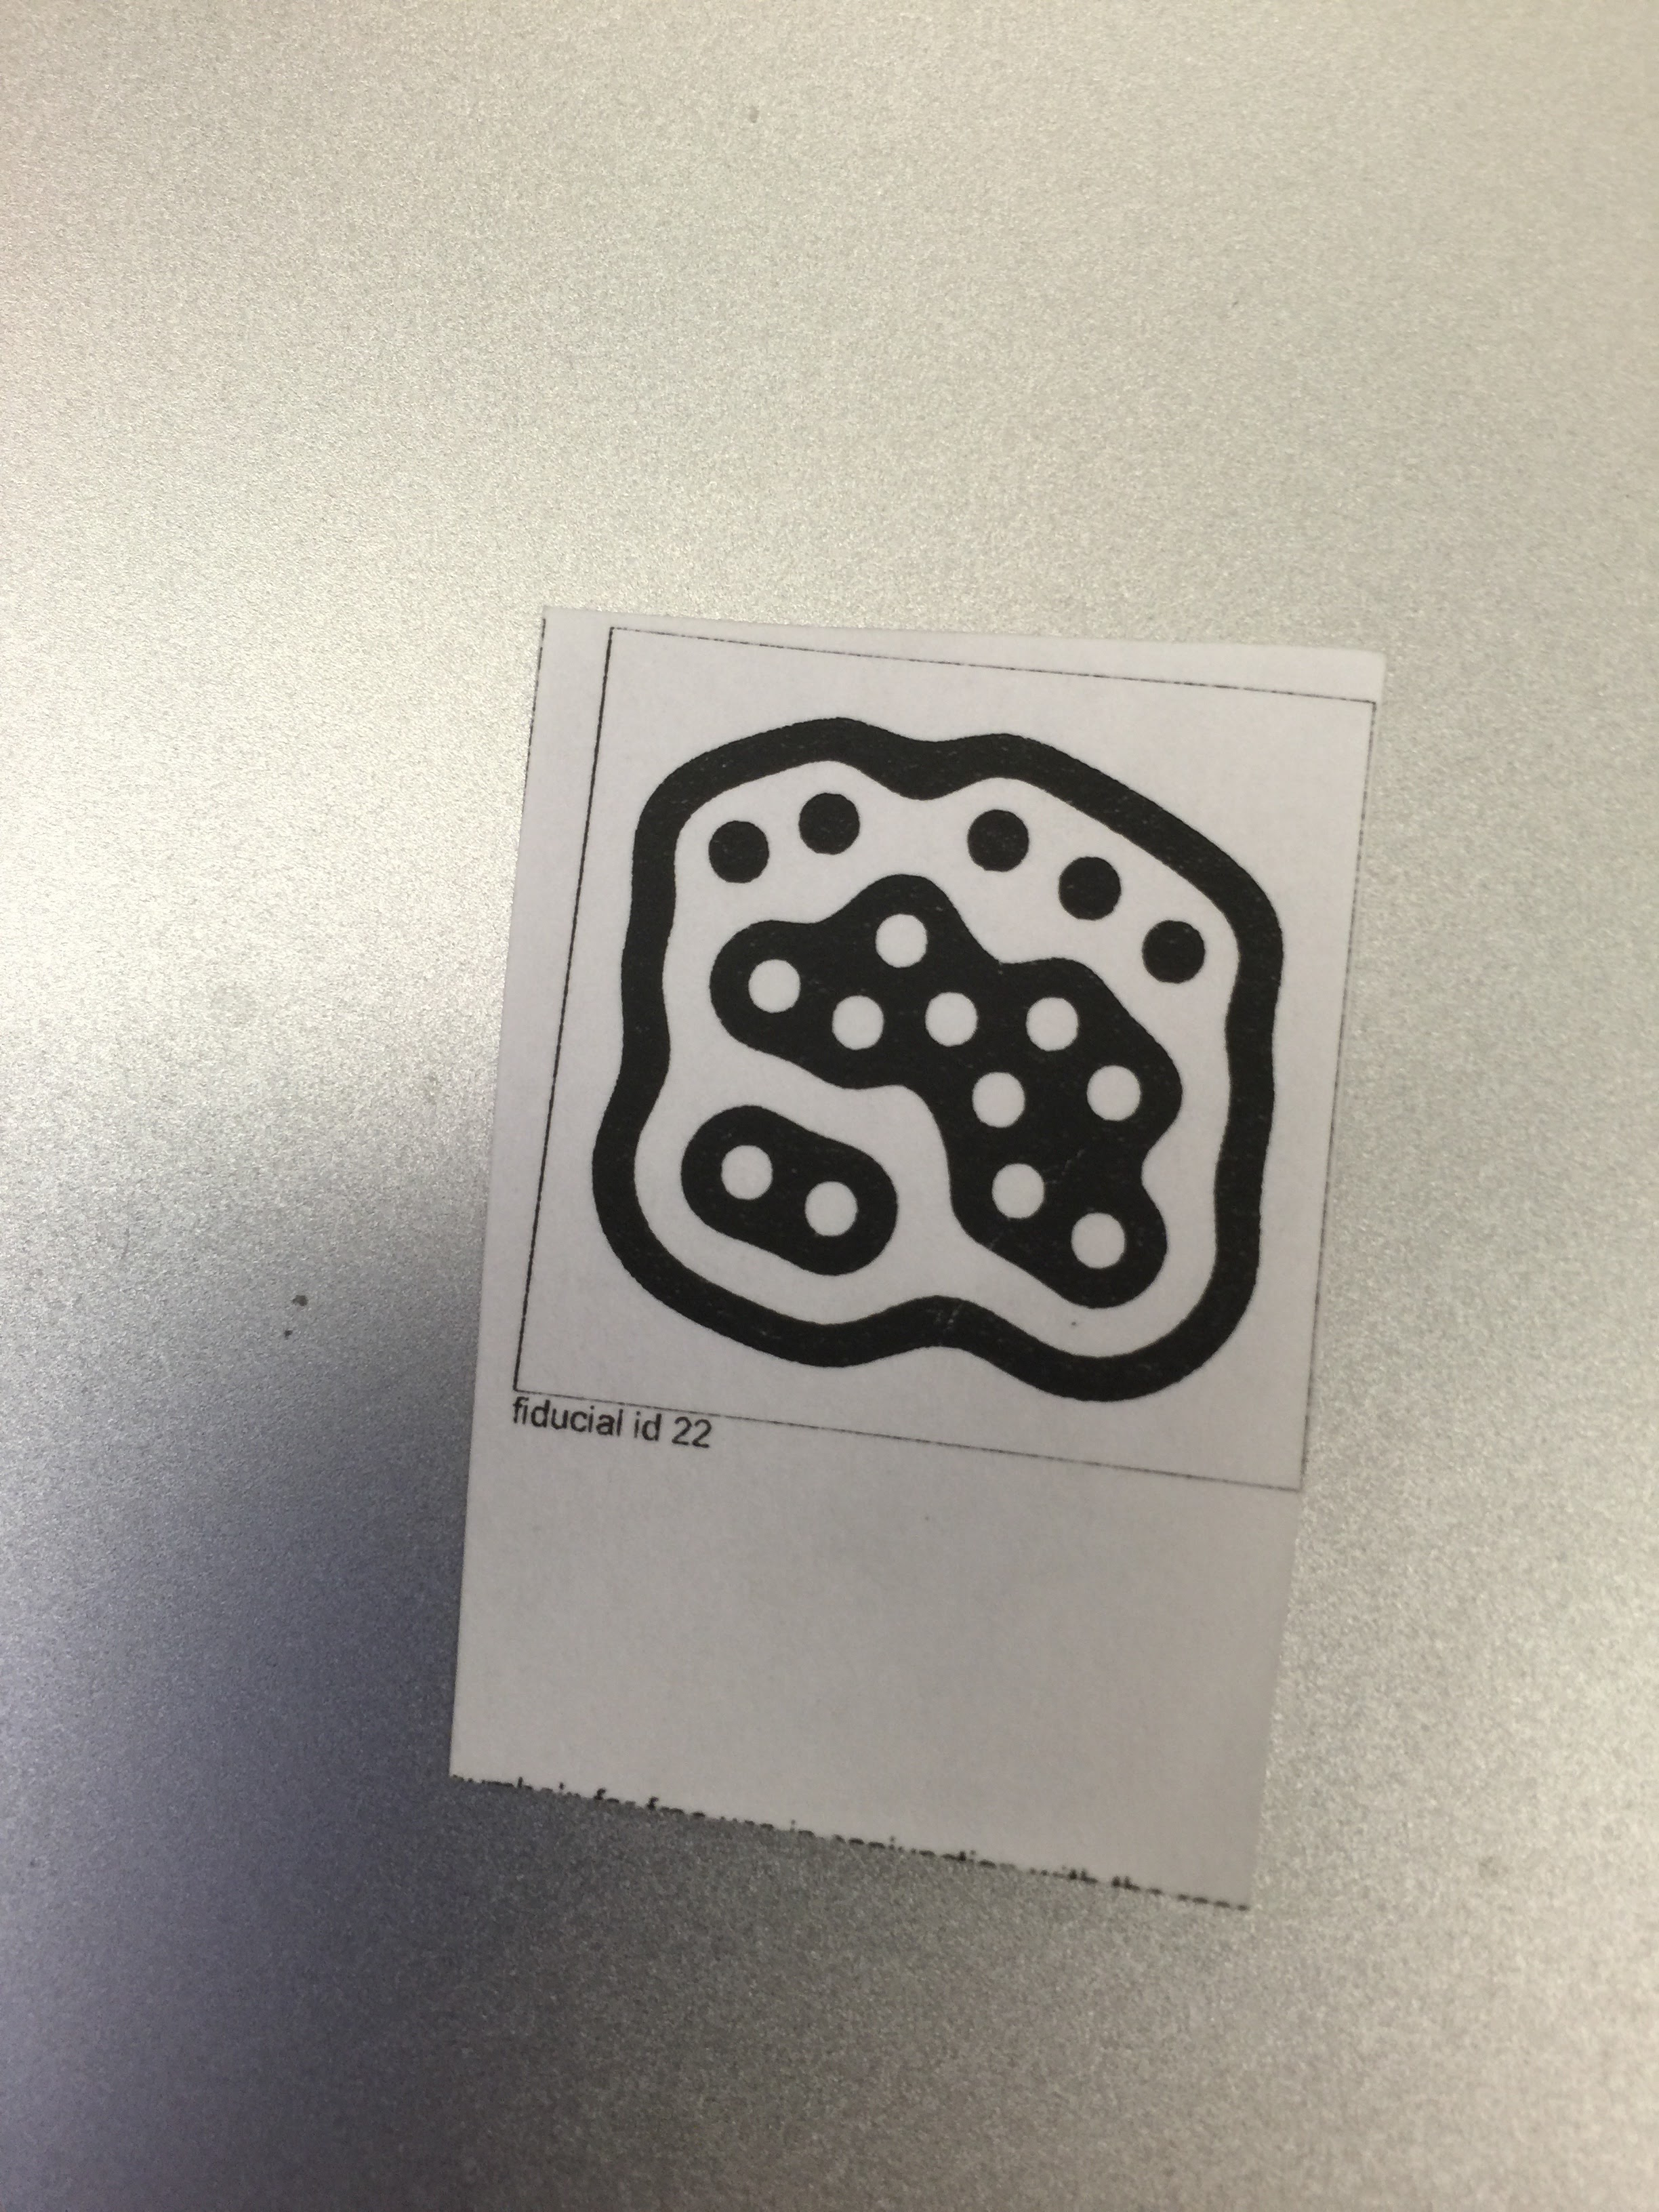
Finally we looked more at ReactiVision and Processing – how to track fiducial markers.
Kirschner, P. A., Sweller, J., & Clark, R. E. (2006). Why minimal guidance during instruction does not work: An analysis of the failure of constructivist, discovery, problem-based, experiential, and inquiry-based teaching. Educational psychologist,41(2), 75-86.
Papert, S. (1987). Computer criticism vs. technocentric thinking. Educational researcher,16(1), 22-30.
Pea, R. D. (1983). Logo Programming and Problem Solving.[Technical Report No. 12.].
Educational software/hardware/toolkit review: Hummingbird Robotics Kit
BB&A 2016 Winter Week 7 – Camila Pereira & Lucas Longo
The Hummingbird Robotics Kit is a comprehensive package which includes a microcontroller, sensors, motors, and LEDs on the hardware side along with software and plugins for third party software that allows for controlling and programming of the hardware. Blikstein (2015) would categorize this kit as a third generation kit in so far as it is “specifically designed to target new classes of users, such as very young children, non-technical designers, and children in the developing world.” The website specifically states: “Our focus is on bringing robotics (and programming, engineering, and making) to as many kids possible.” (hummingbird.com, 2016) To achieve this, they offer a series of online tutorials, guides, curriculum/lesson plans, worksheets, and even how these activities match to Common Core (CC) and Next Generation Science Standards (NGSS). Teacher professional development workshops are also offered along with publicizing related conferences and maker fairs they participate in.
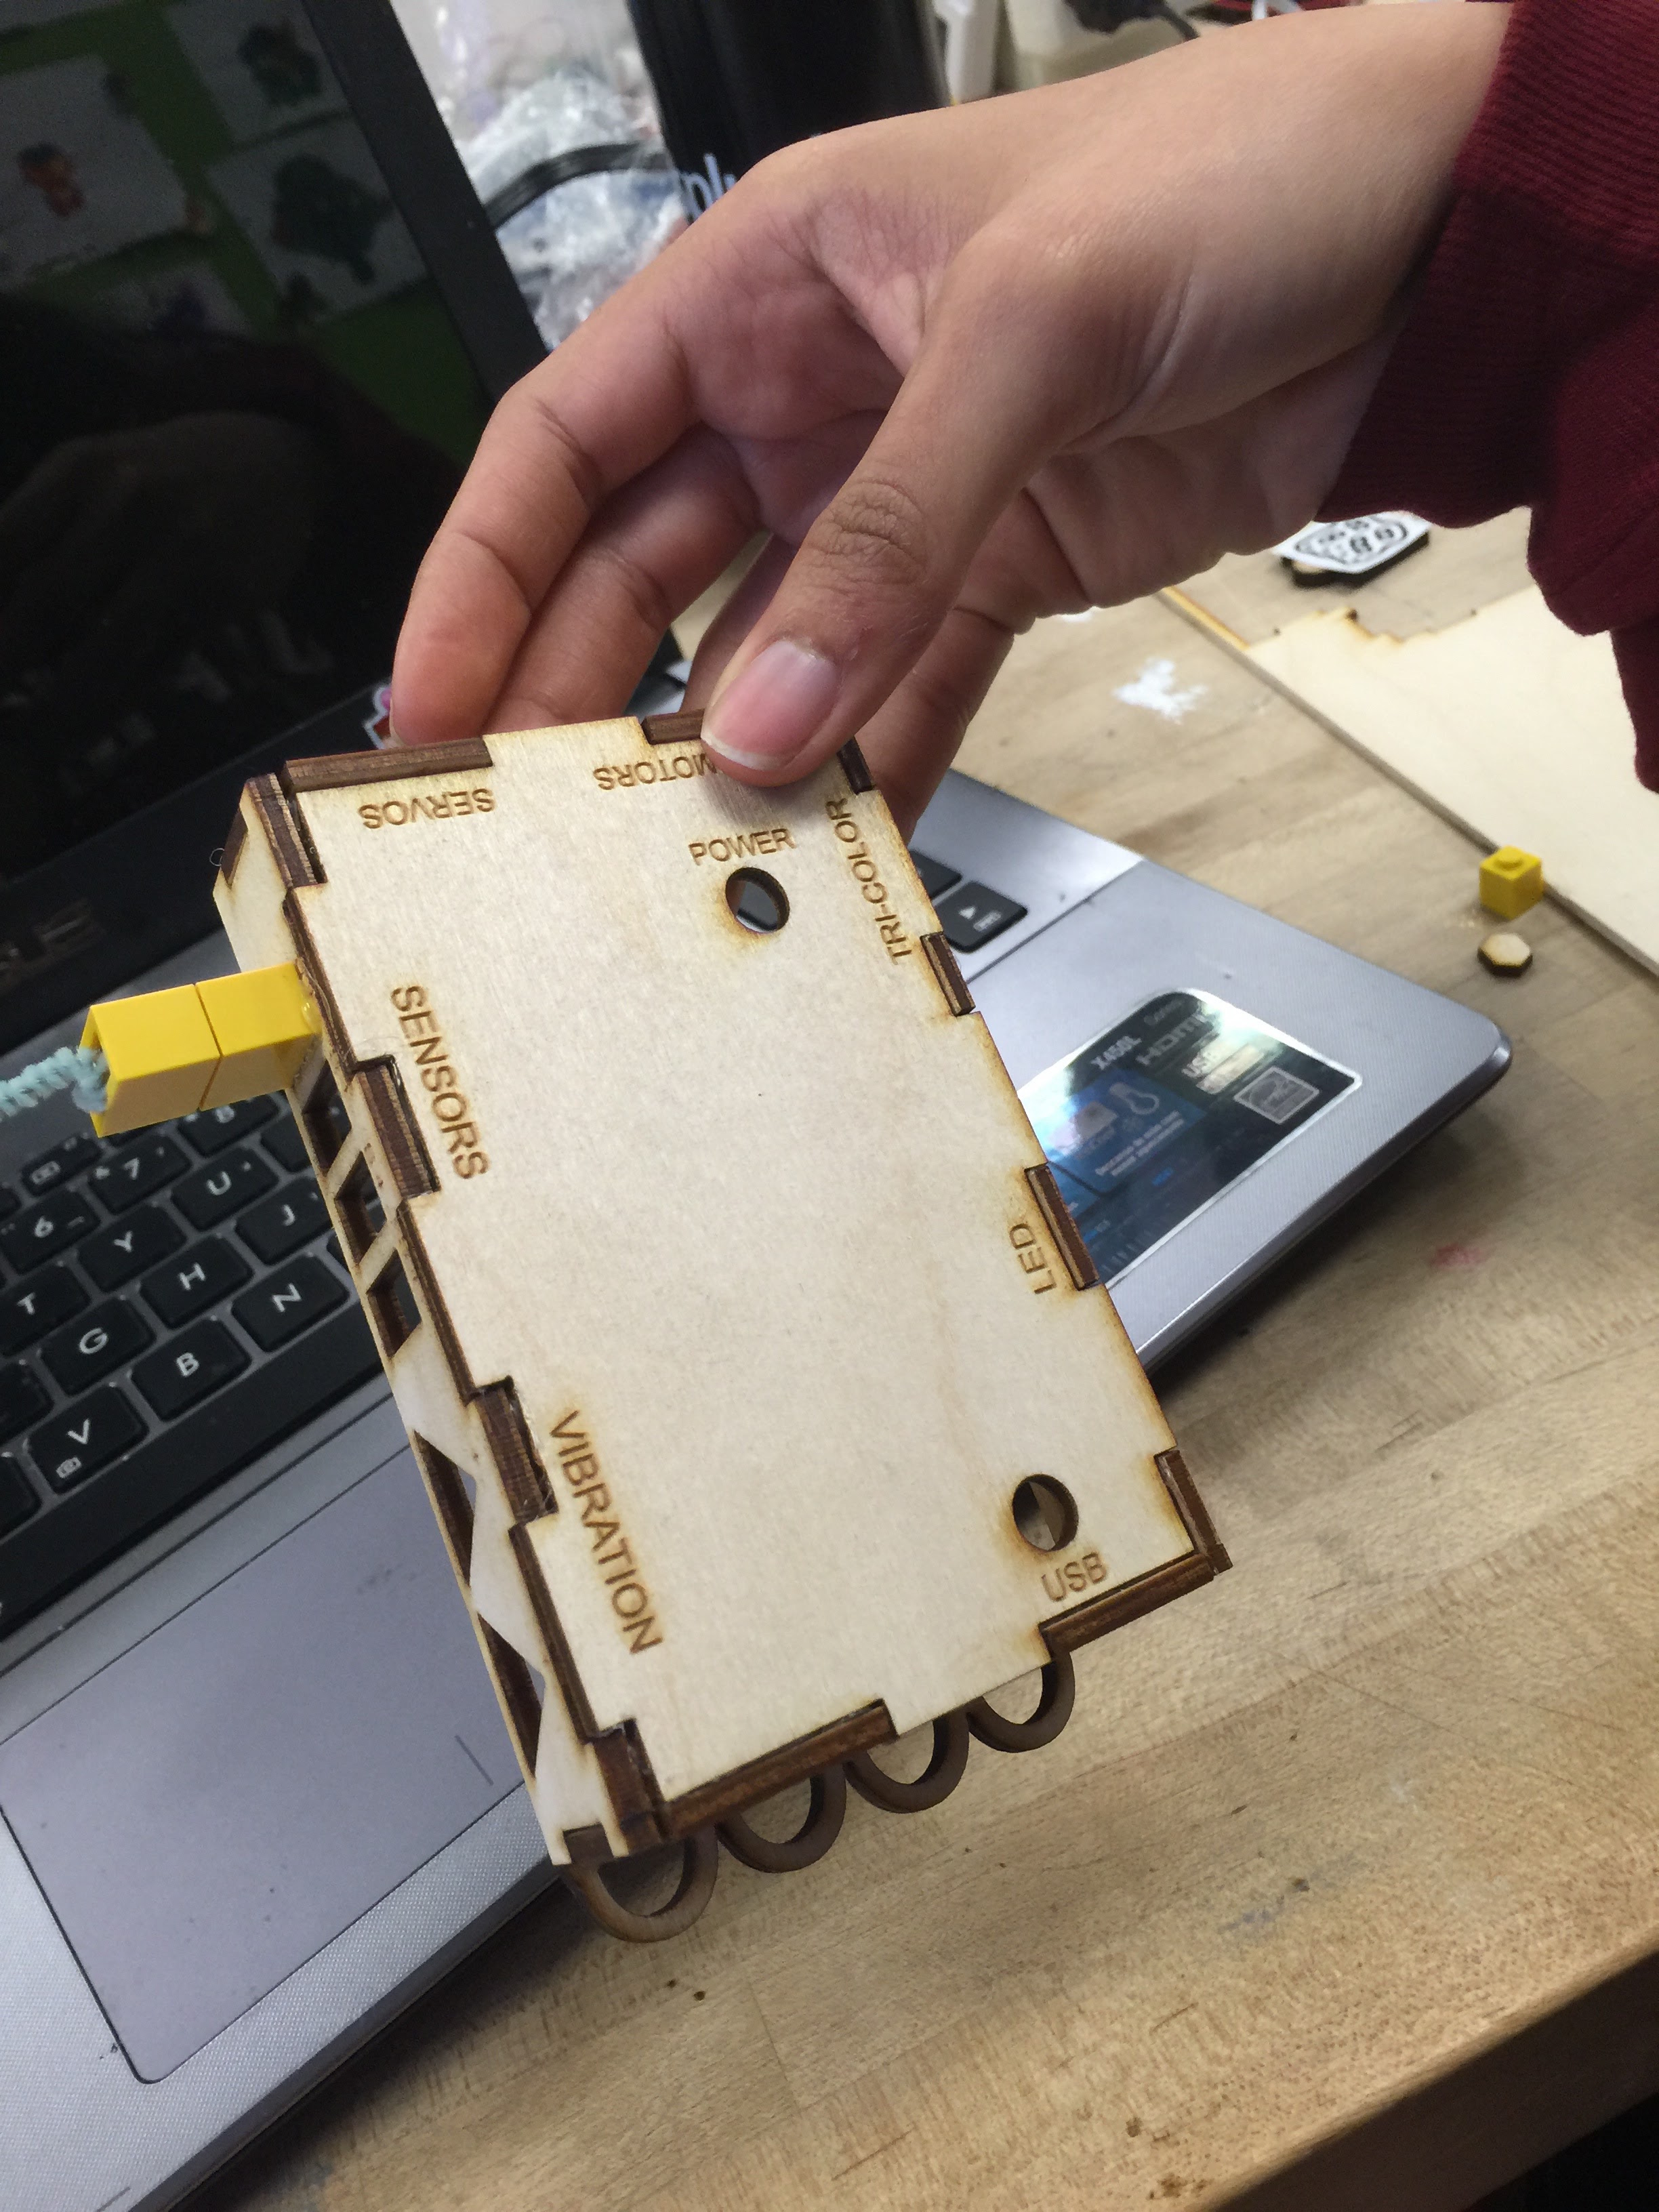
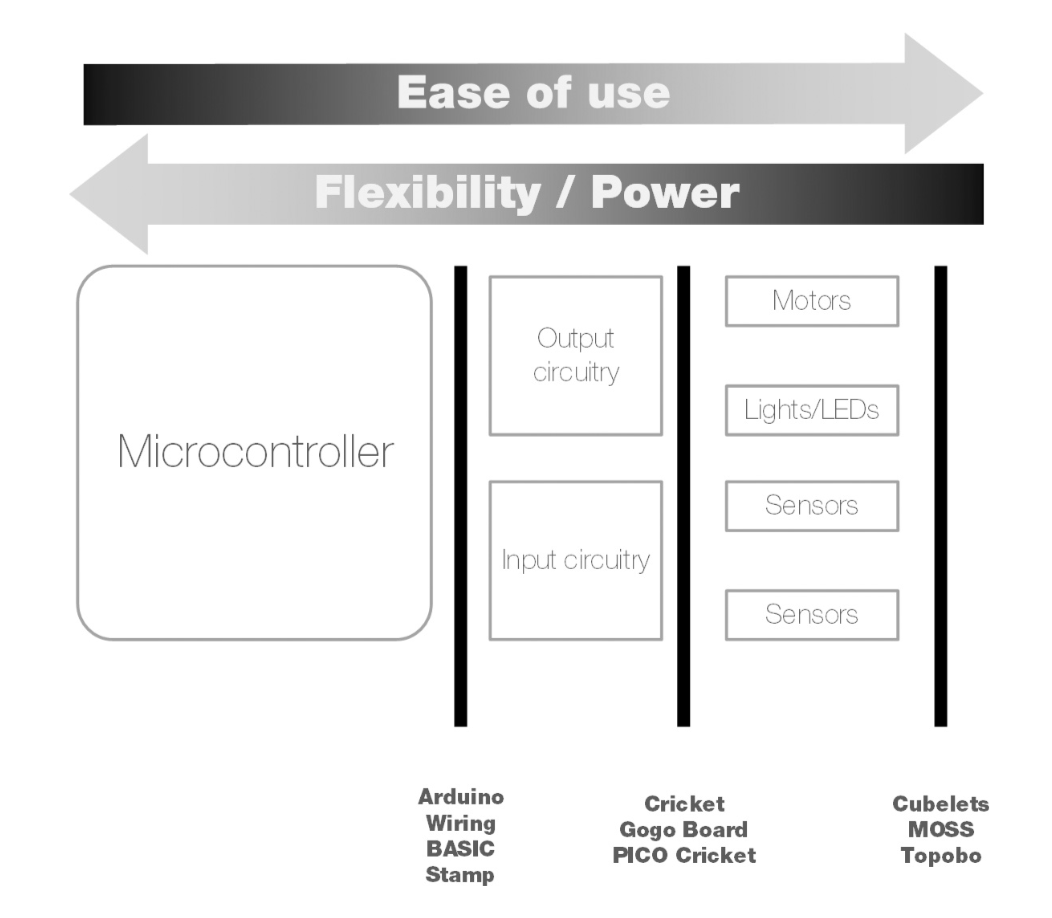
The microcontroller itself is very similar to the ‘industry standard’ Arduino board with the main difference of having color coded plastic connectors instead of exposed pins to facilitate connecting with the sensors, motors, and LEDs. Some of these ‘appendages’ come pre-wired to these connectors allowing for easy assembly as we can see on the image below:
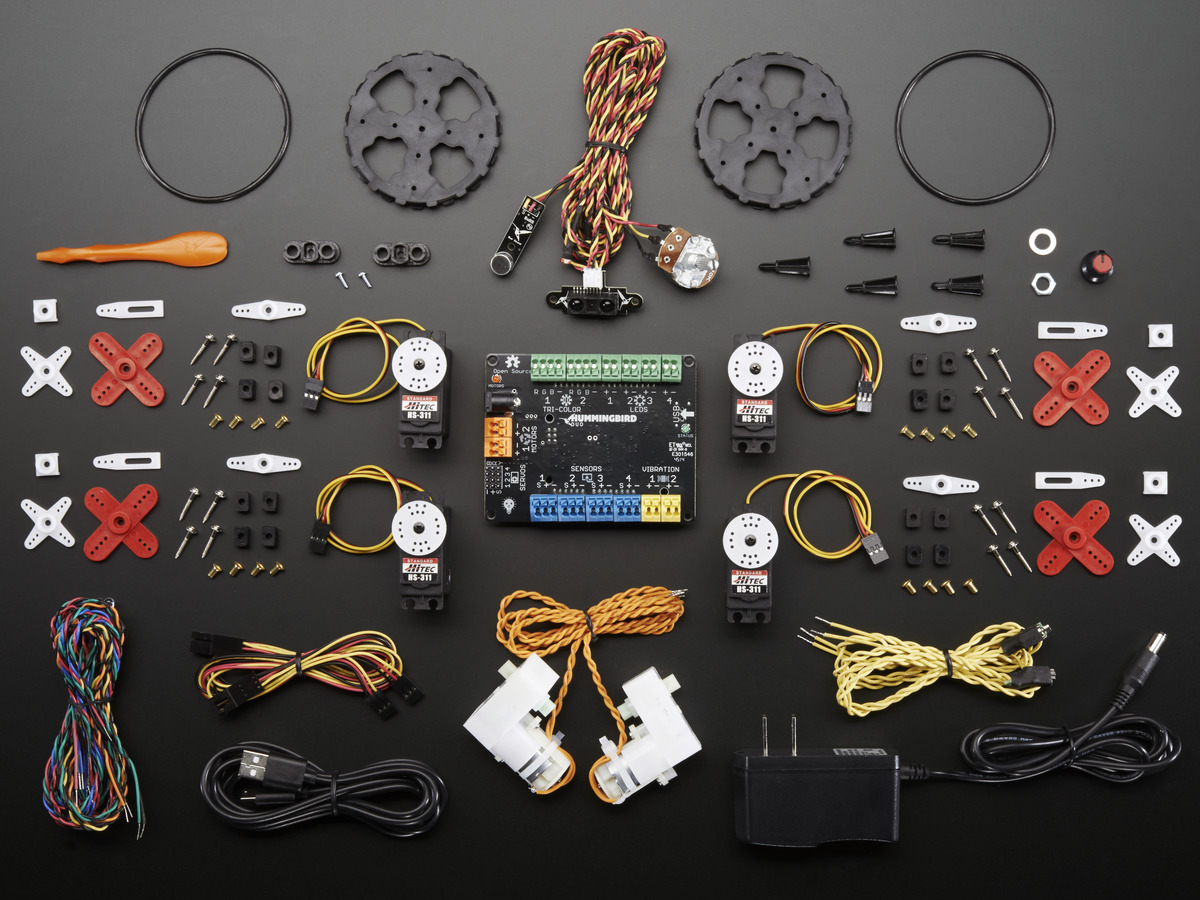 Hummingbird Robotics Kit
On the software side, you must download a driver software that handles the USB-microcontroller communication and the programming software. On top of that, you can use an array of programming packages starting with their own storyboard programming software called “CMU Create Lab”. You can also use third party tile-based programming software for beginners such as “Scratch” and “Snap!” as well as an intermediate level package called “Ardublock”. For more advanced users who are ready to use full programming languages, they offer integration to “Arduino Coding” and specific programming languages/frameworks: Python, Java, and Processing.
The educational philosophy of the Hummingbird Kit and its resources draw from Papert’s Constructionist approach where children learn by actively engaging the process of making and showing their results to an audience.
“Constructionism—the N word as opposed to the V word— shares constructivism’s view of learning as “building knowledge structures” through progressive internalization of actions… It then adds the idea that this happens especially felicitously in a context where the learner is consciously engaged in constructing a public entity, whether it’s a sand castle on the beach or a theory of the universe” ( Papert, 1991, p.1)
A common theme across the proposed curriculum, lesson plans, and tutorials is one of building a robot or device that performs actions (outputs) based on sensor readings and/or instructions created in the programing environment (inputs). The several project examples offered on the site provide ideas that teachers can readily deploy as challenges or suggestion for their students.
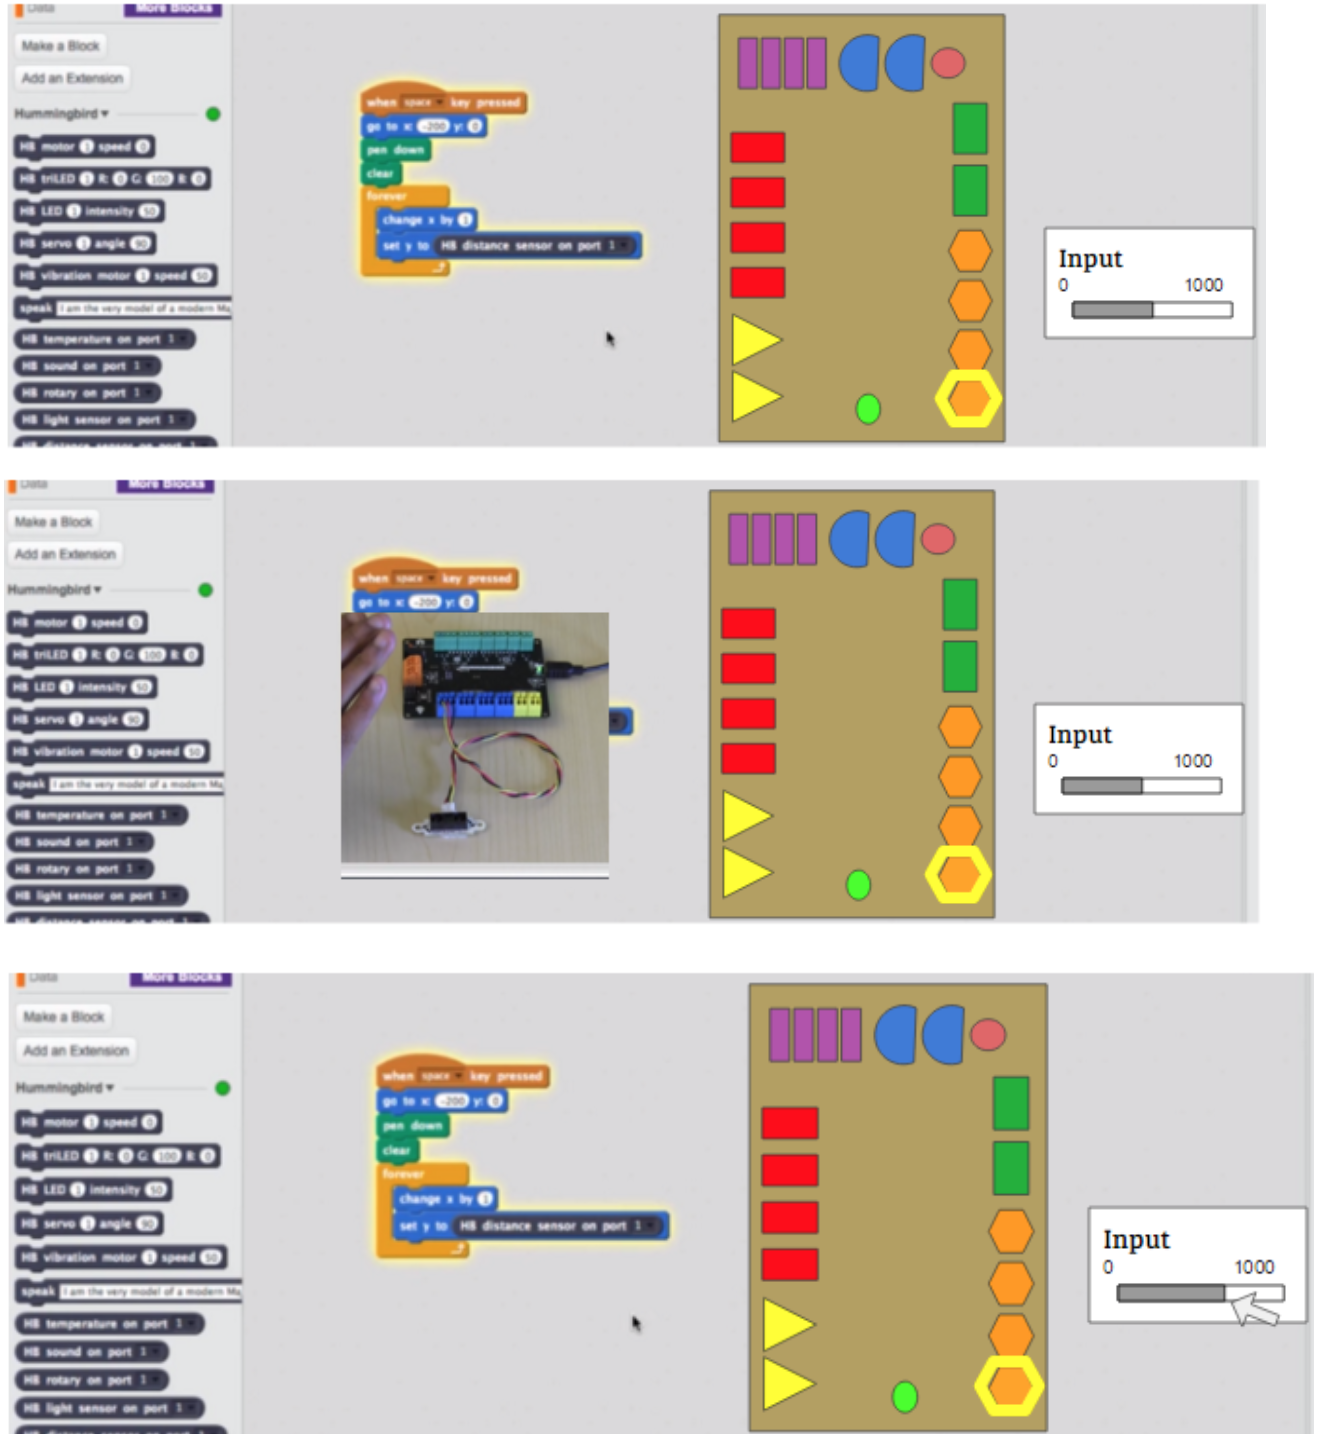
An important affordance of this approach where students are building their own artifacts is that they must engage deeply with the content. One good example project is the “Measuring the Hypotenuse”. It consists of a distance sensor mounted on a servo motor along with a program that controls the motor to point the sensor towards a first barrier, take a distance measurement, rotate 90 degrees to point to a second barrier where another distance is measured and finally output the result on the screen with the distance between the two barriers. To do so, the student will learn about creating the correct sequence of commands, gathering the data collected, and finally program a mathematical formula (hypotenuse) to display the result.

The Hummingbird kit, software tools, tutorials, and curriculum attend to several ages having a low threshold for entry yet offering very high ceilings. The board can be attached to a Raspberry Pi and programmed with Processing for example, making it limited only by the creator’s imagination, expertise, and budget. You can use the board and its sensors safely in a classroom environment since there is no soldering required. It also comes with manuals and instructions so that you can unpack and literally start building your project.
Following Blikstein’s framework for analysis of such platforms we find that in terms of “Selective Exposure”, the microcontroller has abstraction layers such as labels and color-coded connectors used to lower the exposure. Separate connectors are offered for motors, step-motors, LEDs, TriColor LEDs, and even vibrating motors. Direct access to microcontroller is also possible as is adding other breakout boards and a Raspberry Pi for example. As far as the embedded electronics go, they come pre-wired and ready to be used – no need for adding resistors or perform any soldering, for example. Again, higher level of exposure can be achieved if desired by adding external or non-kit components.
The “Selective Exposure” of the software will depend on the package you choose to use. Scratch will offer you block-based programming where you can easily identify the function of each of them. On the other end of the spectrum Java will require you to configure serial ports and write setup code just to get started for example. Here’s the list of software packages offered, ordered from low to high exposure levels: Scratch, Snap!, CMU Create Lab, Ardublock, Arduino Coding, Processing, Python, and Java.
In terms of “Selective Exposure for Usability: Embedded error correction”, even though the board has color-coded connectors, it seems to be possible to physically connect an LED on the Motor port for example. Yet compared to microcontrollers from previous generations, it attempts to provide some level of orientation for the user, but it is certainly intimidating at first for a novice we imagine. There is room for wrong connections or even failure if wires are stuck directly into it causing a short-circuit.
If we look at the “Selective exposure for power: Tangibility mapping” the kit offers little other than the connectors that have snap-on capabilities. There are no physical traits or affordances that help the user with learning or figuring out how the kit works. In this sense, the hardware is still more of adults’ technology for children than a children’s technology for children. On the other hand, the entry level software packages such as Scratch were designed specifically for children, and the Hummingbird add-on blocks make it simple enough to be integrated. We also classified the product according to additional dimensions, charted on the following link: https://goo.gl/1aS0mY
The Hummingbird Robotics Kit is extremely similar to other products such as the Gogo board but distinguishes itself by having a well organized and content-rich website that includes curricula, tutorials, data sheets, example projects, FAQs, and a store, among other things. Their integration with several software packages is also very attractive since it gives it a very high-ceiling for those who desire to explore deeper and a very low barrier to start. This progression does not require any upgrades to the hardware kits sold, it is only a matter of learning and transitioning to next software – which are all free, as is all the content on their website.
The cost of the kits is on par with other similar packages, which are still relatively high if you consider that you have some ‘hidden’ or ‘implementation’ costs. One must still purchase material to build whatever these electronics are going to be embedded in, even if it is simply cardboard, glue, and scissors. Teachers must learn the basics themselves, become comfortable, and prepare lessons to use these kits. Furthermore, the classroom must be equipped with computers and in the Hummingbird’s kit case specifically, power outlets for the motors. This is one of the main disappointments with this kit – the motors require external power. Understandably this allows for a higher powered motor yet why not use lower powered motors, which are cheaper and has the same educational function.
Finally, the kit as a whole package of the microcontroller, the input and output hardware, content, curricula, and software offers a solid base for schools to use. It allows for starters to quickly engage with the electronics and program their own sequences. It also allows for students to reach advanced levels and create much more complex projects and code using it as a base. That said, it does not offer any compelling innovation at this point in time, other than than the richness and organization of the content of their web-site. Yet one can argue that this is a wide enough base platform that is actually encouraging the students to be innovative using it, instead of it being what is innovative.
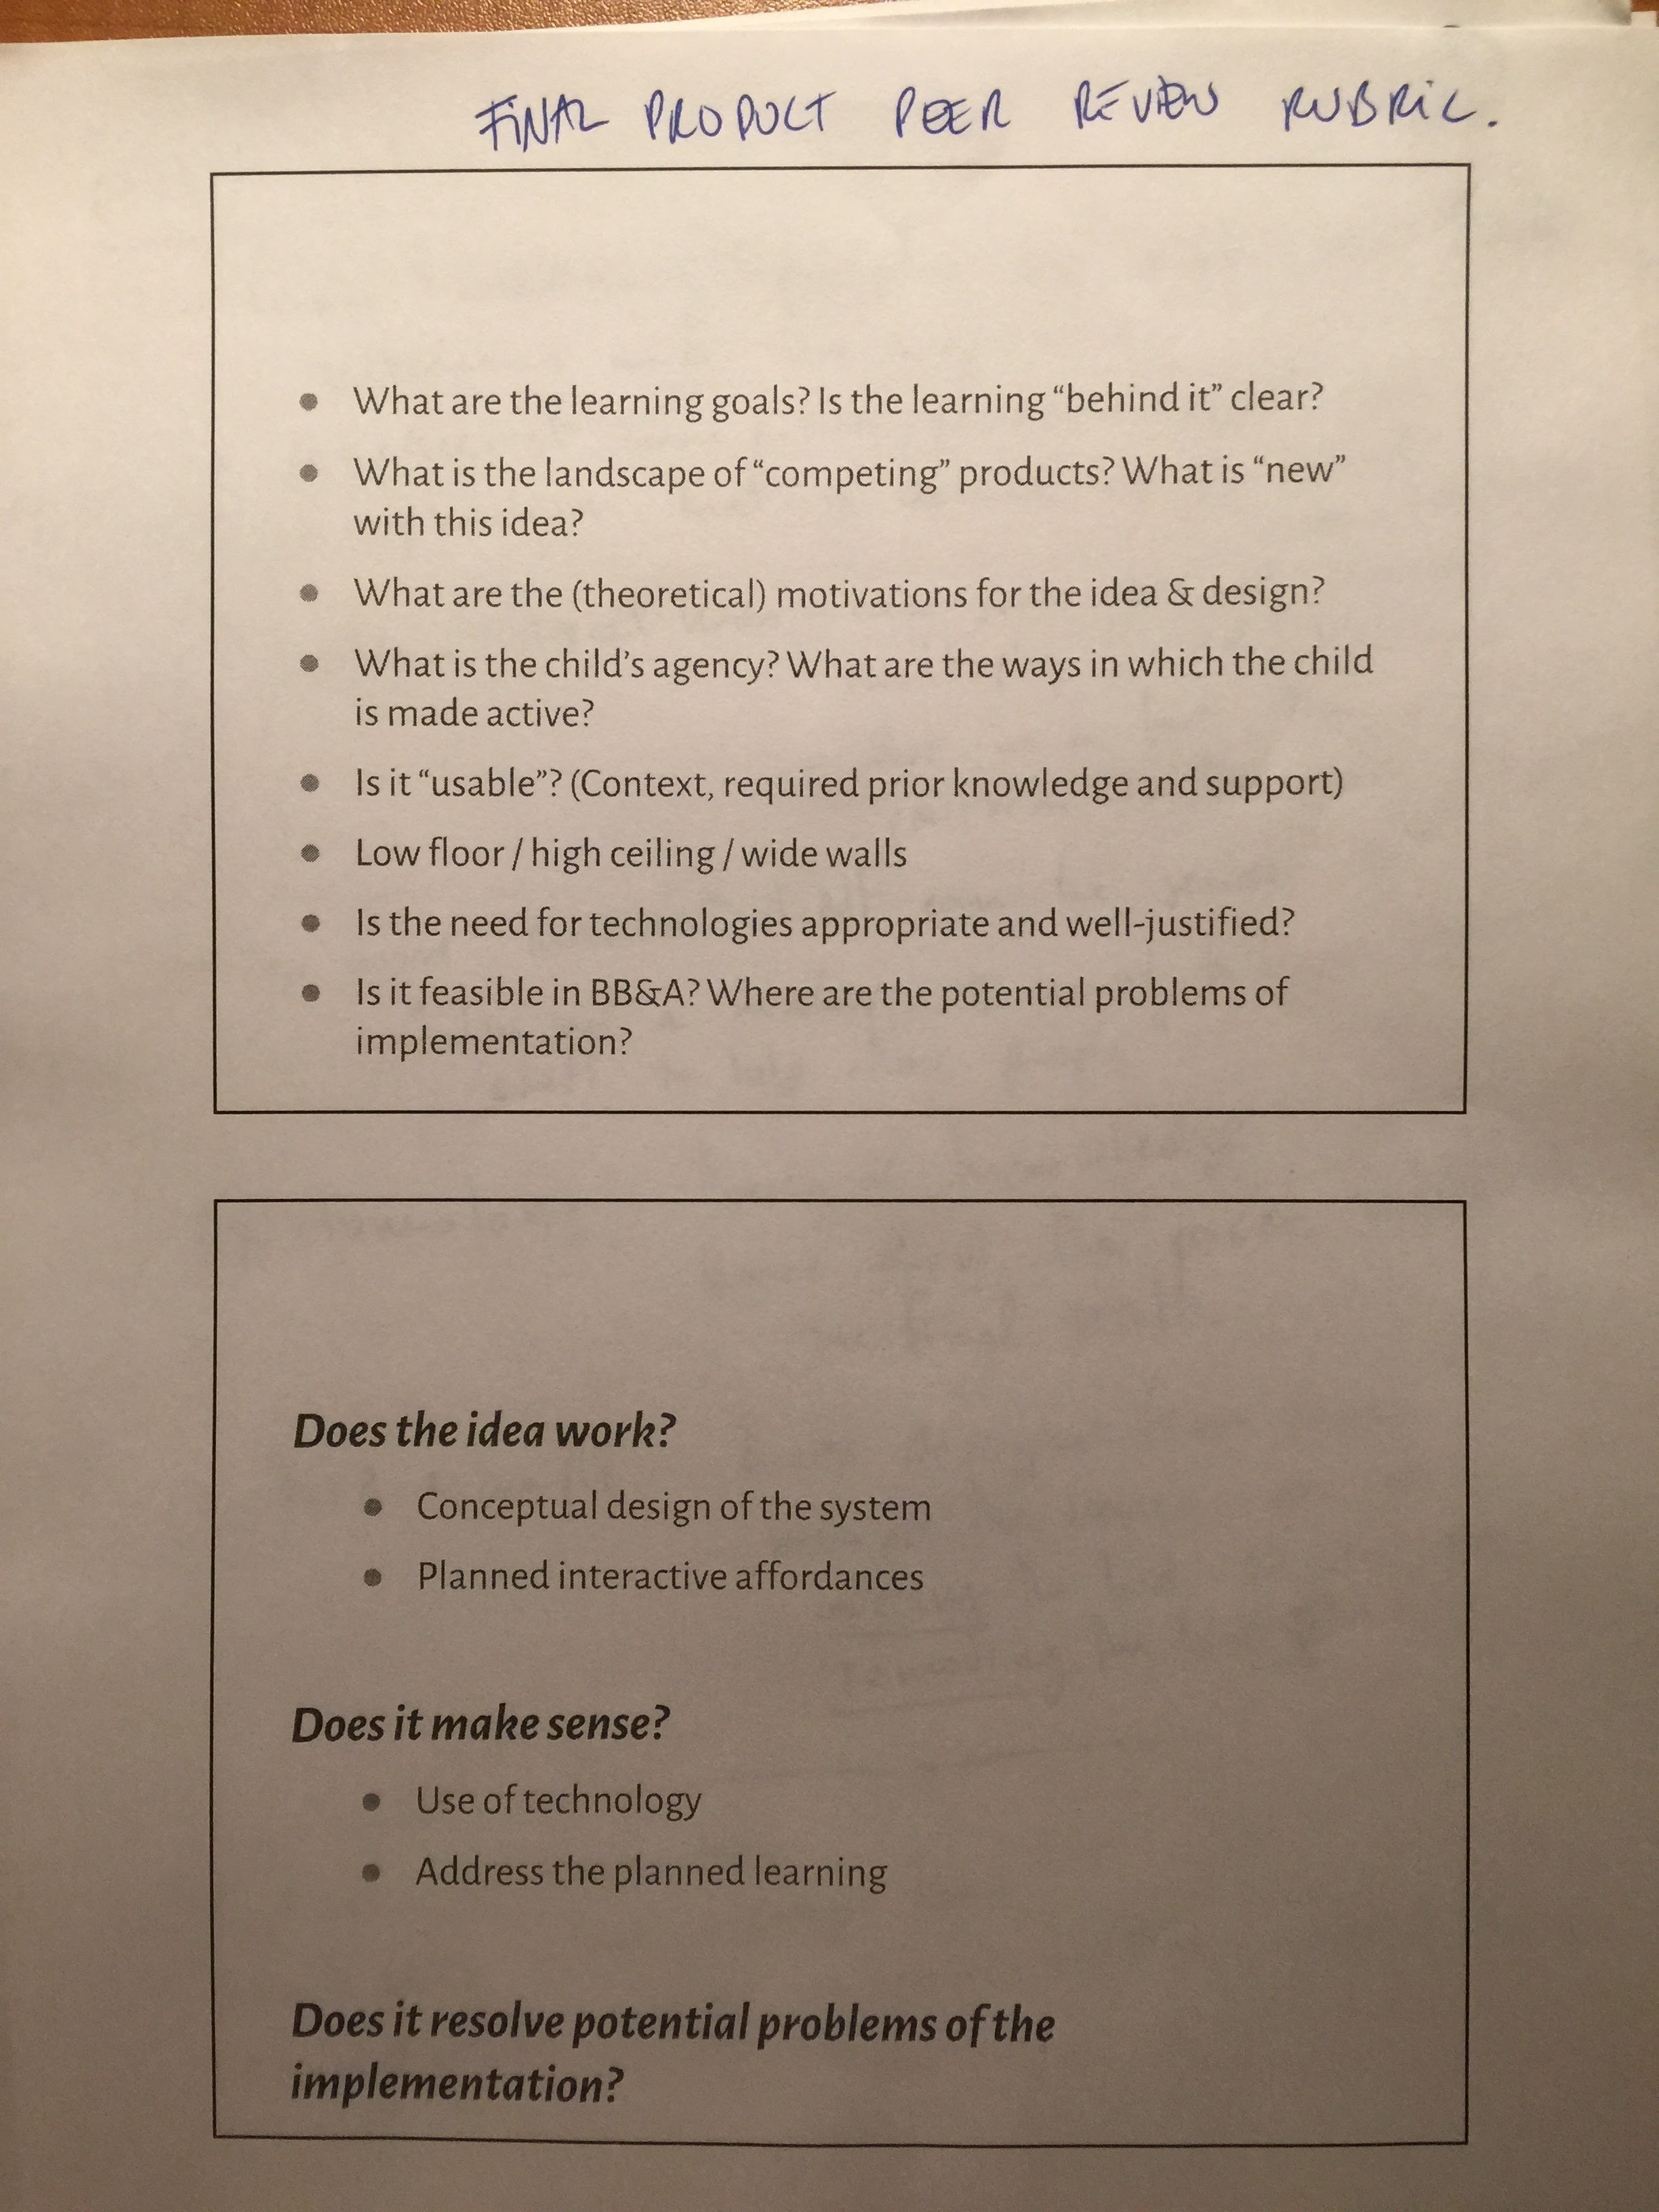
We addressed two dimensions of the tool to be redesigned: software and hardware. Our goal is to avoid errors and make it less intimidating for novices, or even teachers who don’t have electronics knowledge.
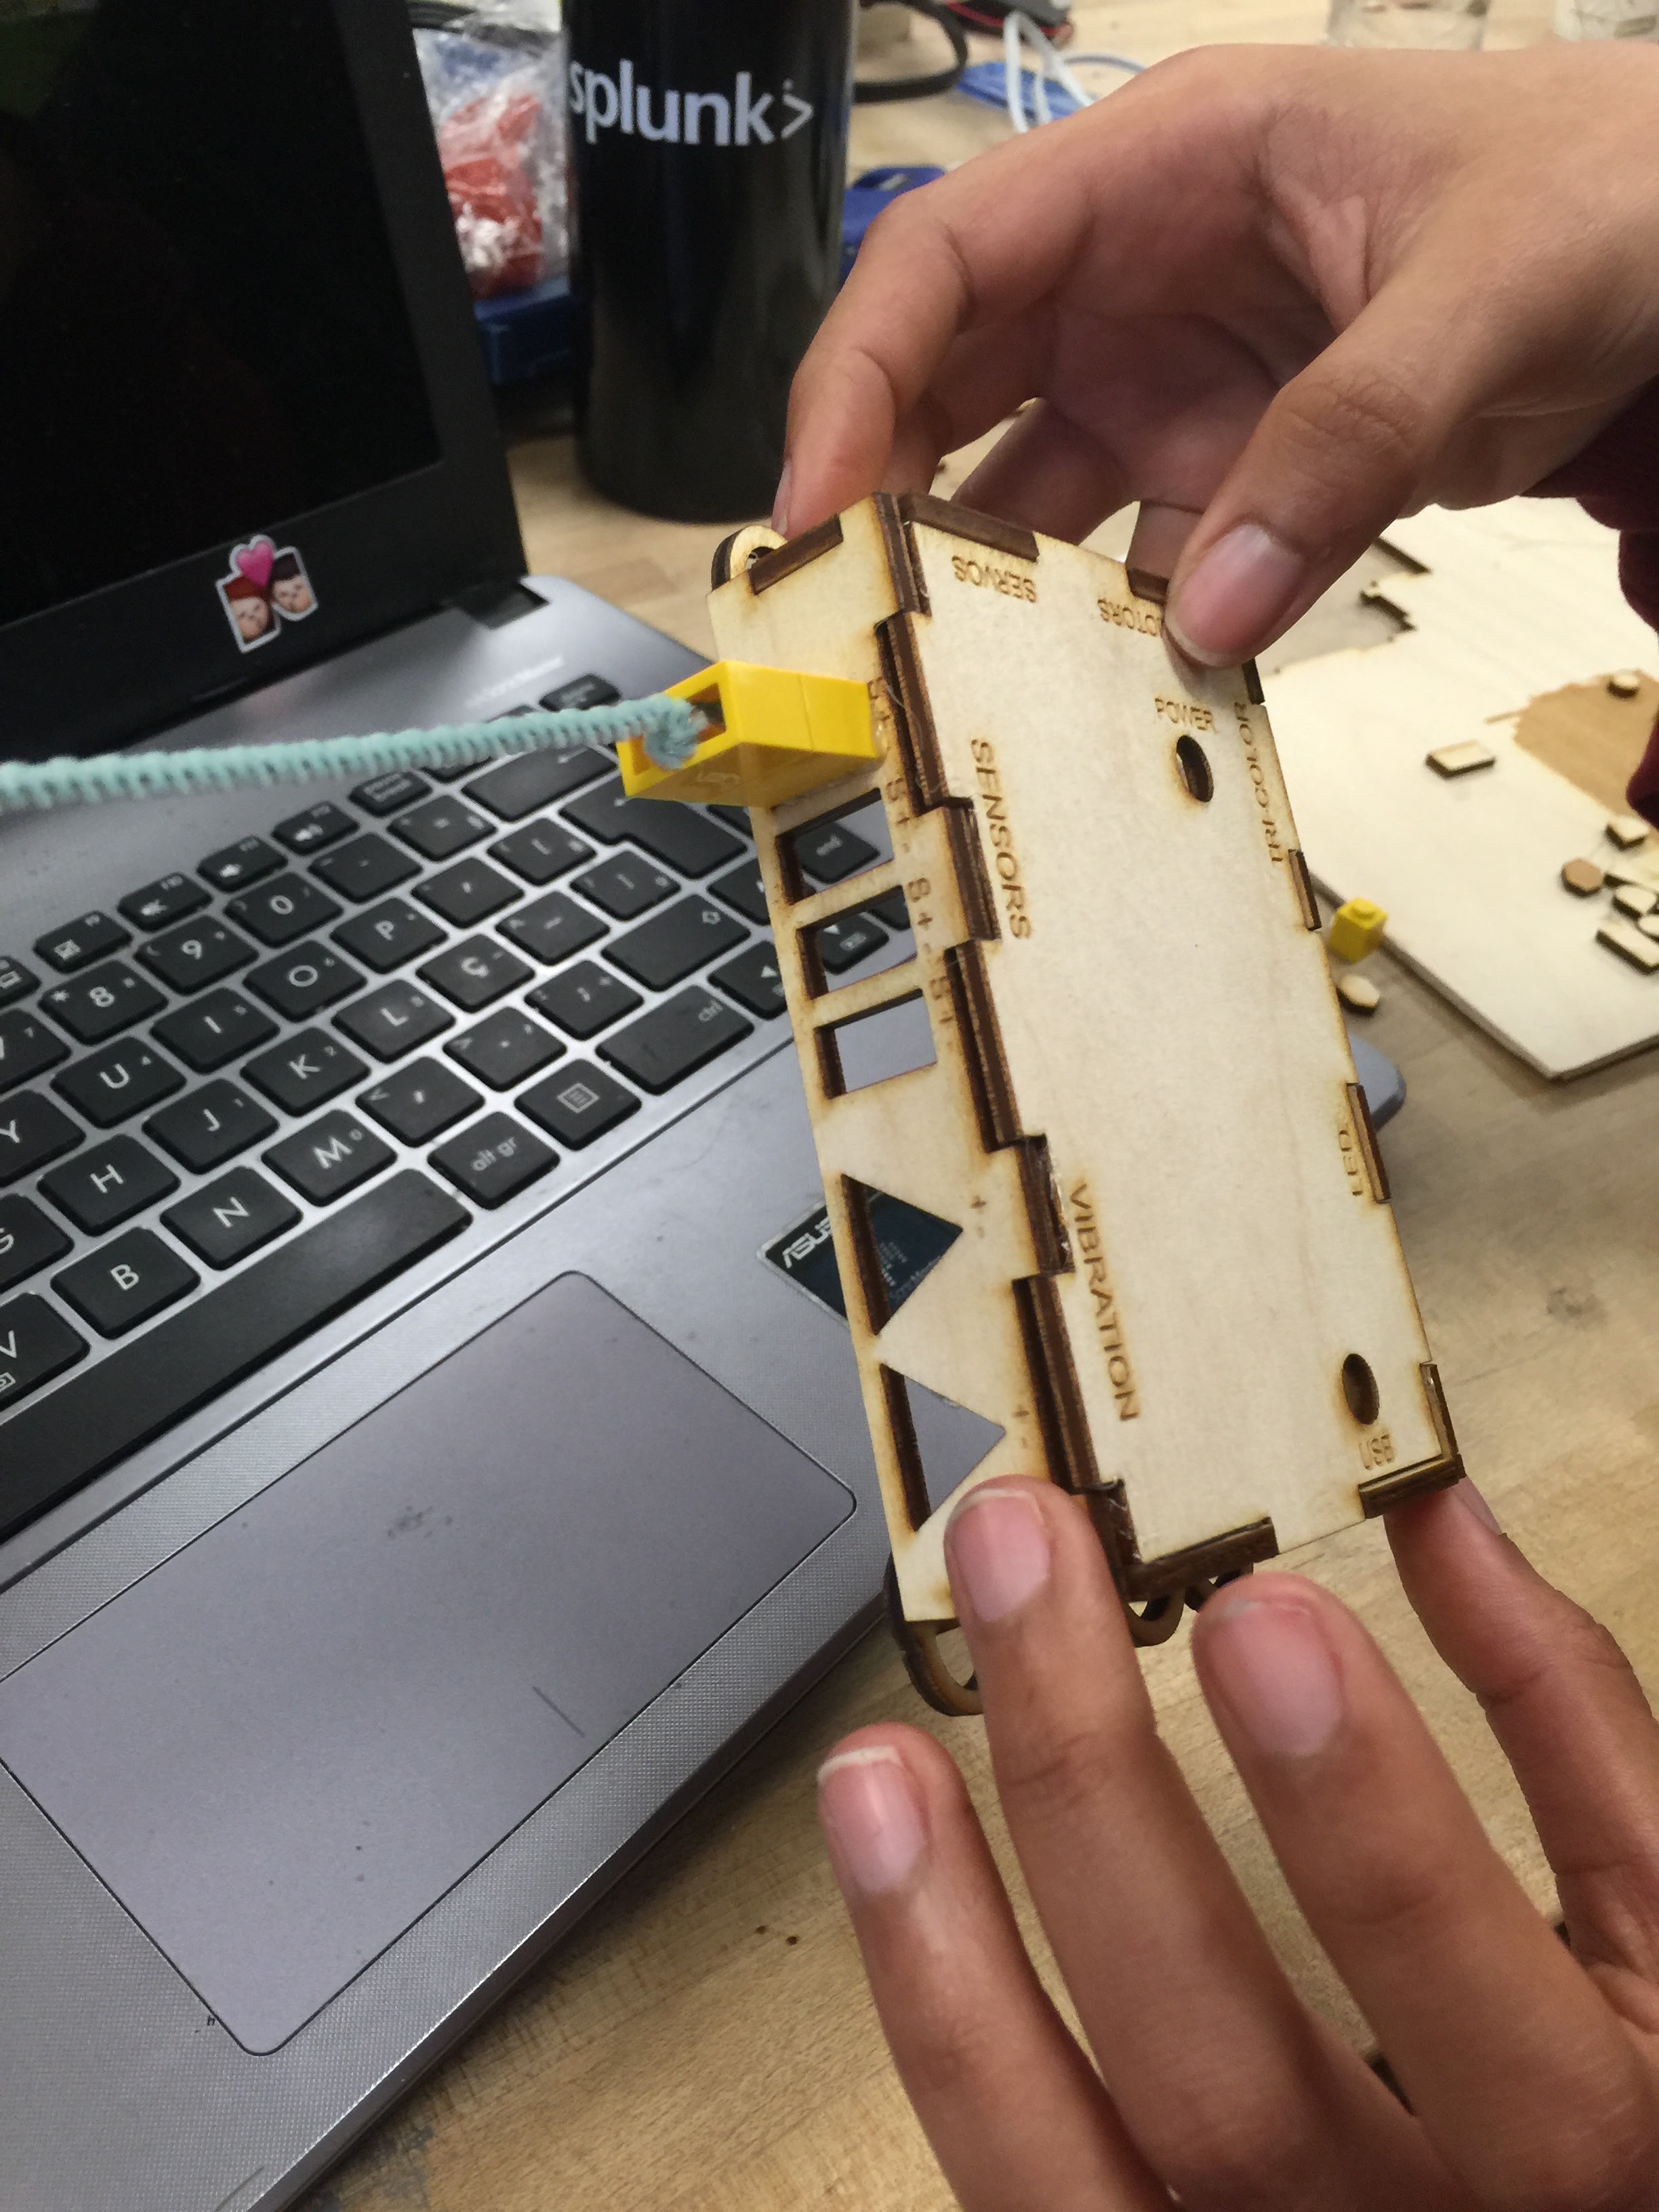
We designed a case for the the Hummingbird board, where all the ports are connected to entries that allow only one kind of connector. The shape also only allows for the correct configuration of entries for “+”, “-” and “s” (signal). Besides avoiding errors, it reduces the initial time required to start using the kit to build projects, focusing in the problem-solving. Avoiding errors also makes the process less frustrating.
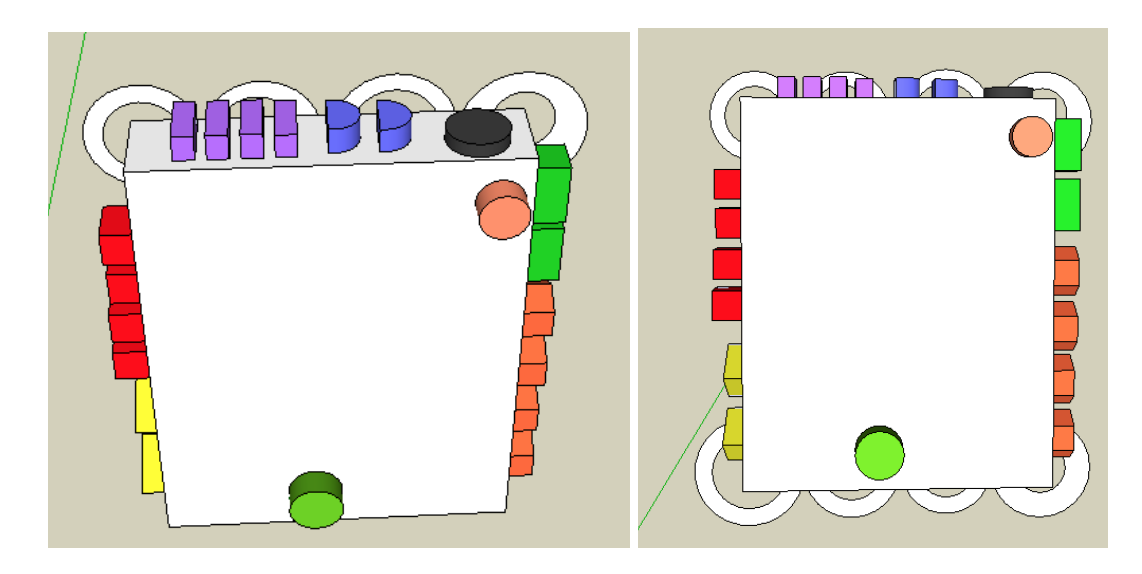
Another aspect of the Hummingbird kit is the purpose of being integrated in craft projects, being attractive for publics that are usualLy not interested in robotics. Therefore, we designed the case in a way that it would allow to be integrated in craft projects more easily: it has appendages that can be used to sew or stick in the project, given more freedom to use the board.
We also recommend to add to the kit items for mounting projects: velcro; double-sided tape; sewing kit; stickers for decoration. It would make it easier for the users to understand the purposes
Our second recommendation is a plugin that simulates the reactions on the board for scratch program, like the input and output effects on the ports. It will have a format that simulates the actual board – applying the UI principle of matching the system and the real world.
A monitor also is displayed in the screen, showing the quantitative effects of the program on the system, like the voltage being applied to an output. It could be manipulated to test the results of different values, besides simulate the code without the physical devices. It would make prototyping easier, reducing the cost of errors and allowing the students to be more creative.
References
Blikstein, P. (2013, June). Gears of our childhood: constructionist toolkits, robotics, and physical computing, past and future. In Proceedings of the 12th International Conference on Interaction Design and Children (pp. 173-182). ACM.
Blikstein, P. (2015). Computationally Enhanced Toolkits for Children: Historical Review and a Framework for Future Design, Stanford University, USA
Blikstein, 2015. Computationally Enhanced Toolkits for Children: Historical Review and a Framework for Future Design, Stanford University, USA
The generations of microcontrollers
Horn, M. S. (2013, February). The role of cultural forms in tangible interaction design. InProceedings of the 7th International Conference on Tangible, Embedded and Embodied Interaction(pp. 117-124). ACM.
“In this paper I have proposed an approach to tangible interaction design that looks beyond physical analogies and universal sensorimotor experiences. Specifically, I have argued that designers can purposefully evoke cultural forms as a means to activate existing patterns of social activity along with associated cognitive, physical, and emotional resources. This approach to design was inspired by the notion of social and cultural funds of knowledge [8, 18] and by Saxe’s form-function shift framework [30, 31]. Using three examples I demonstrated what this might look like in action.”
Worked on the Dream Toy assignment some more today – TRTL – and the Turtle Habitat.
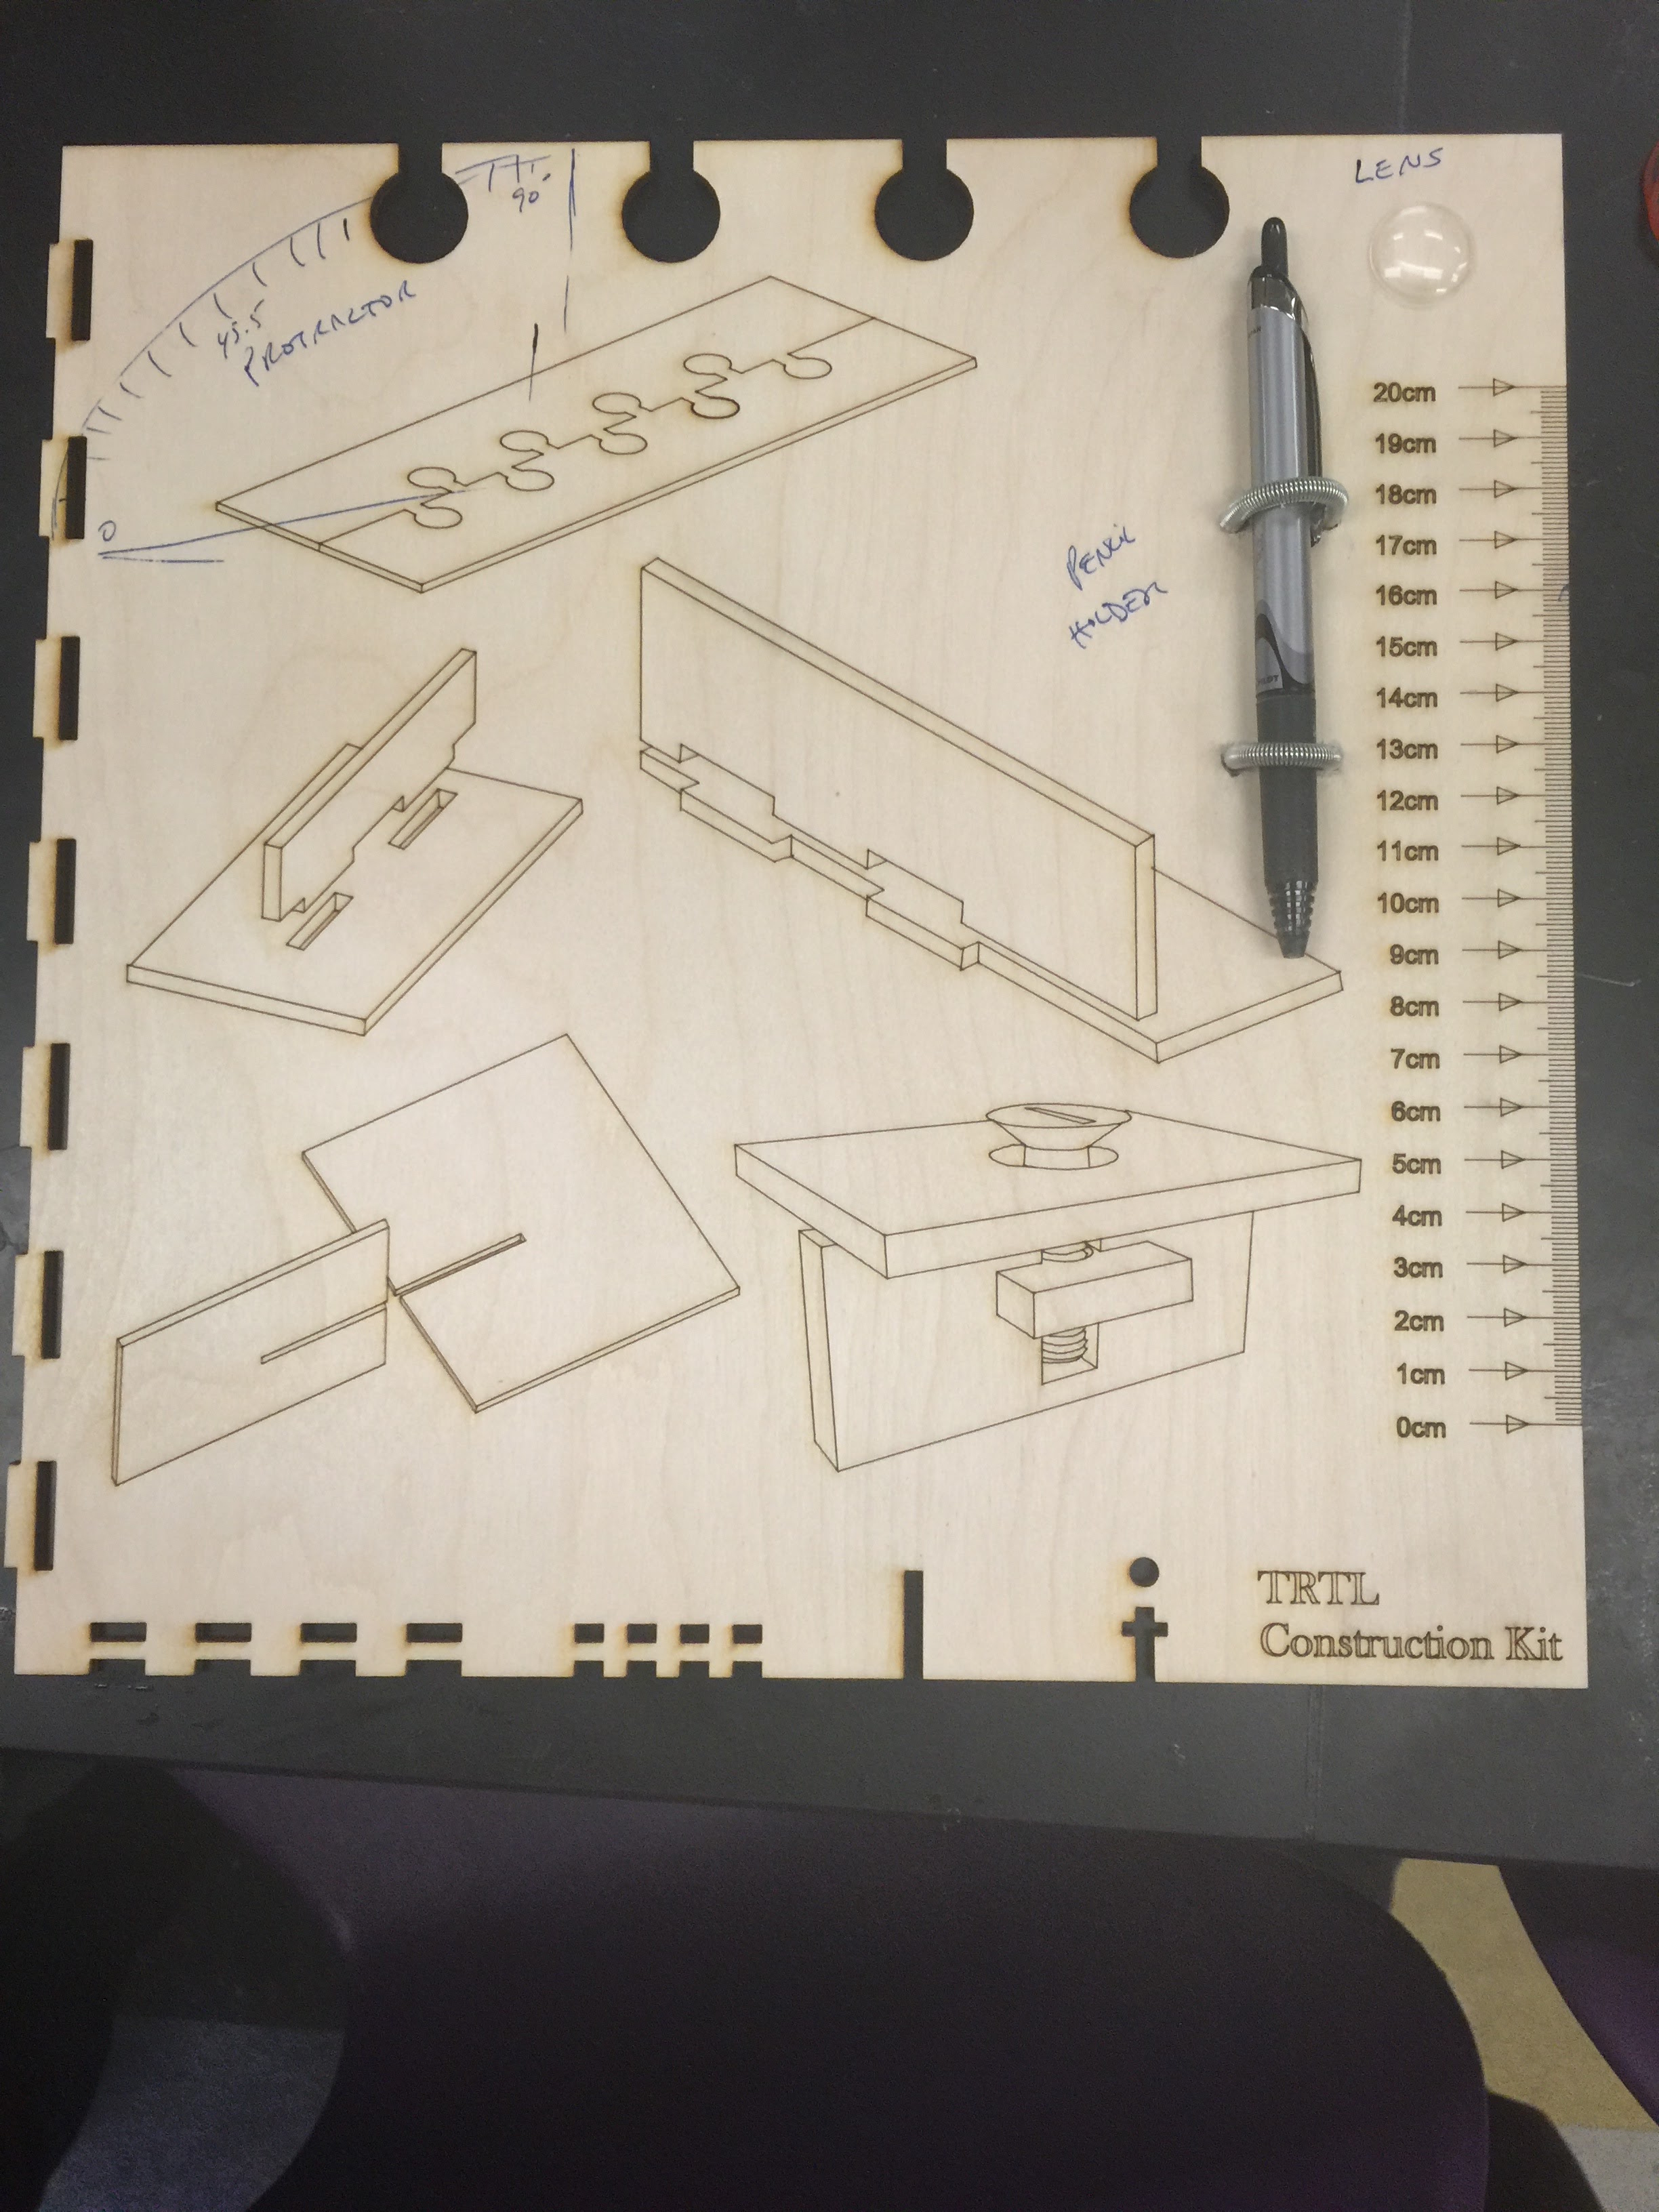
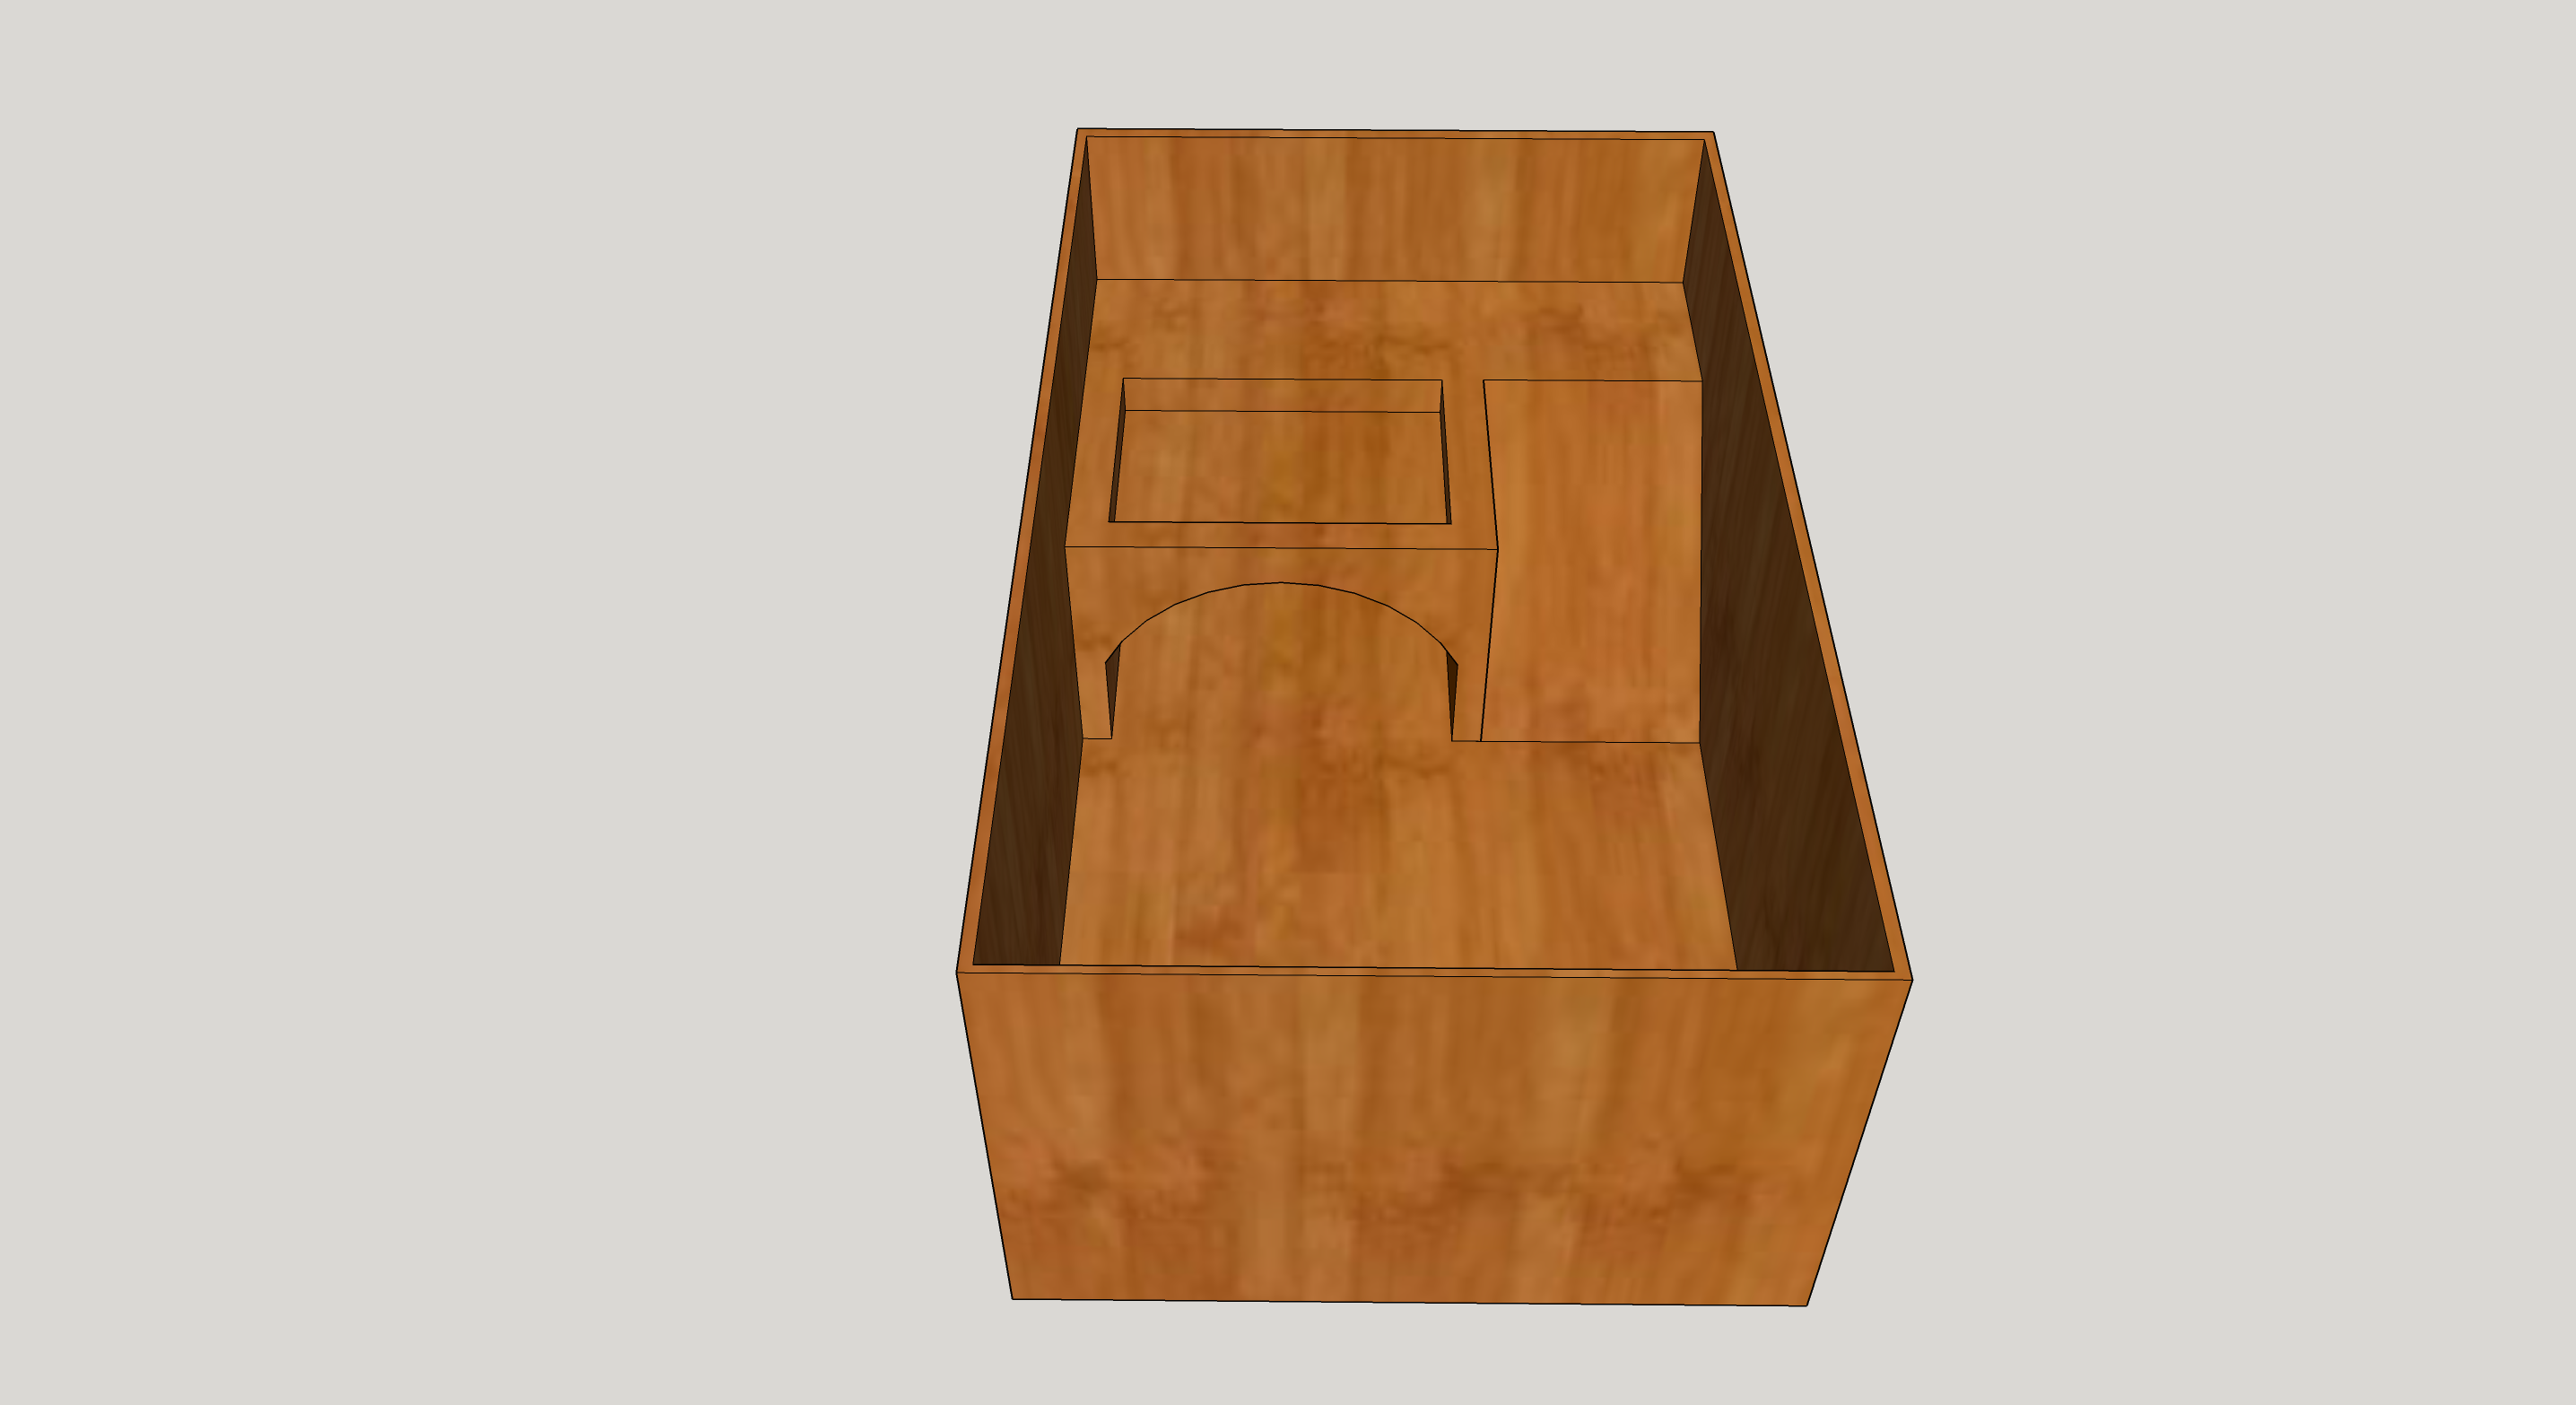
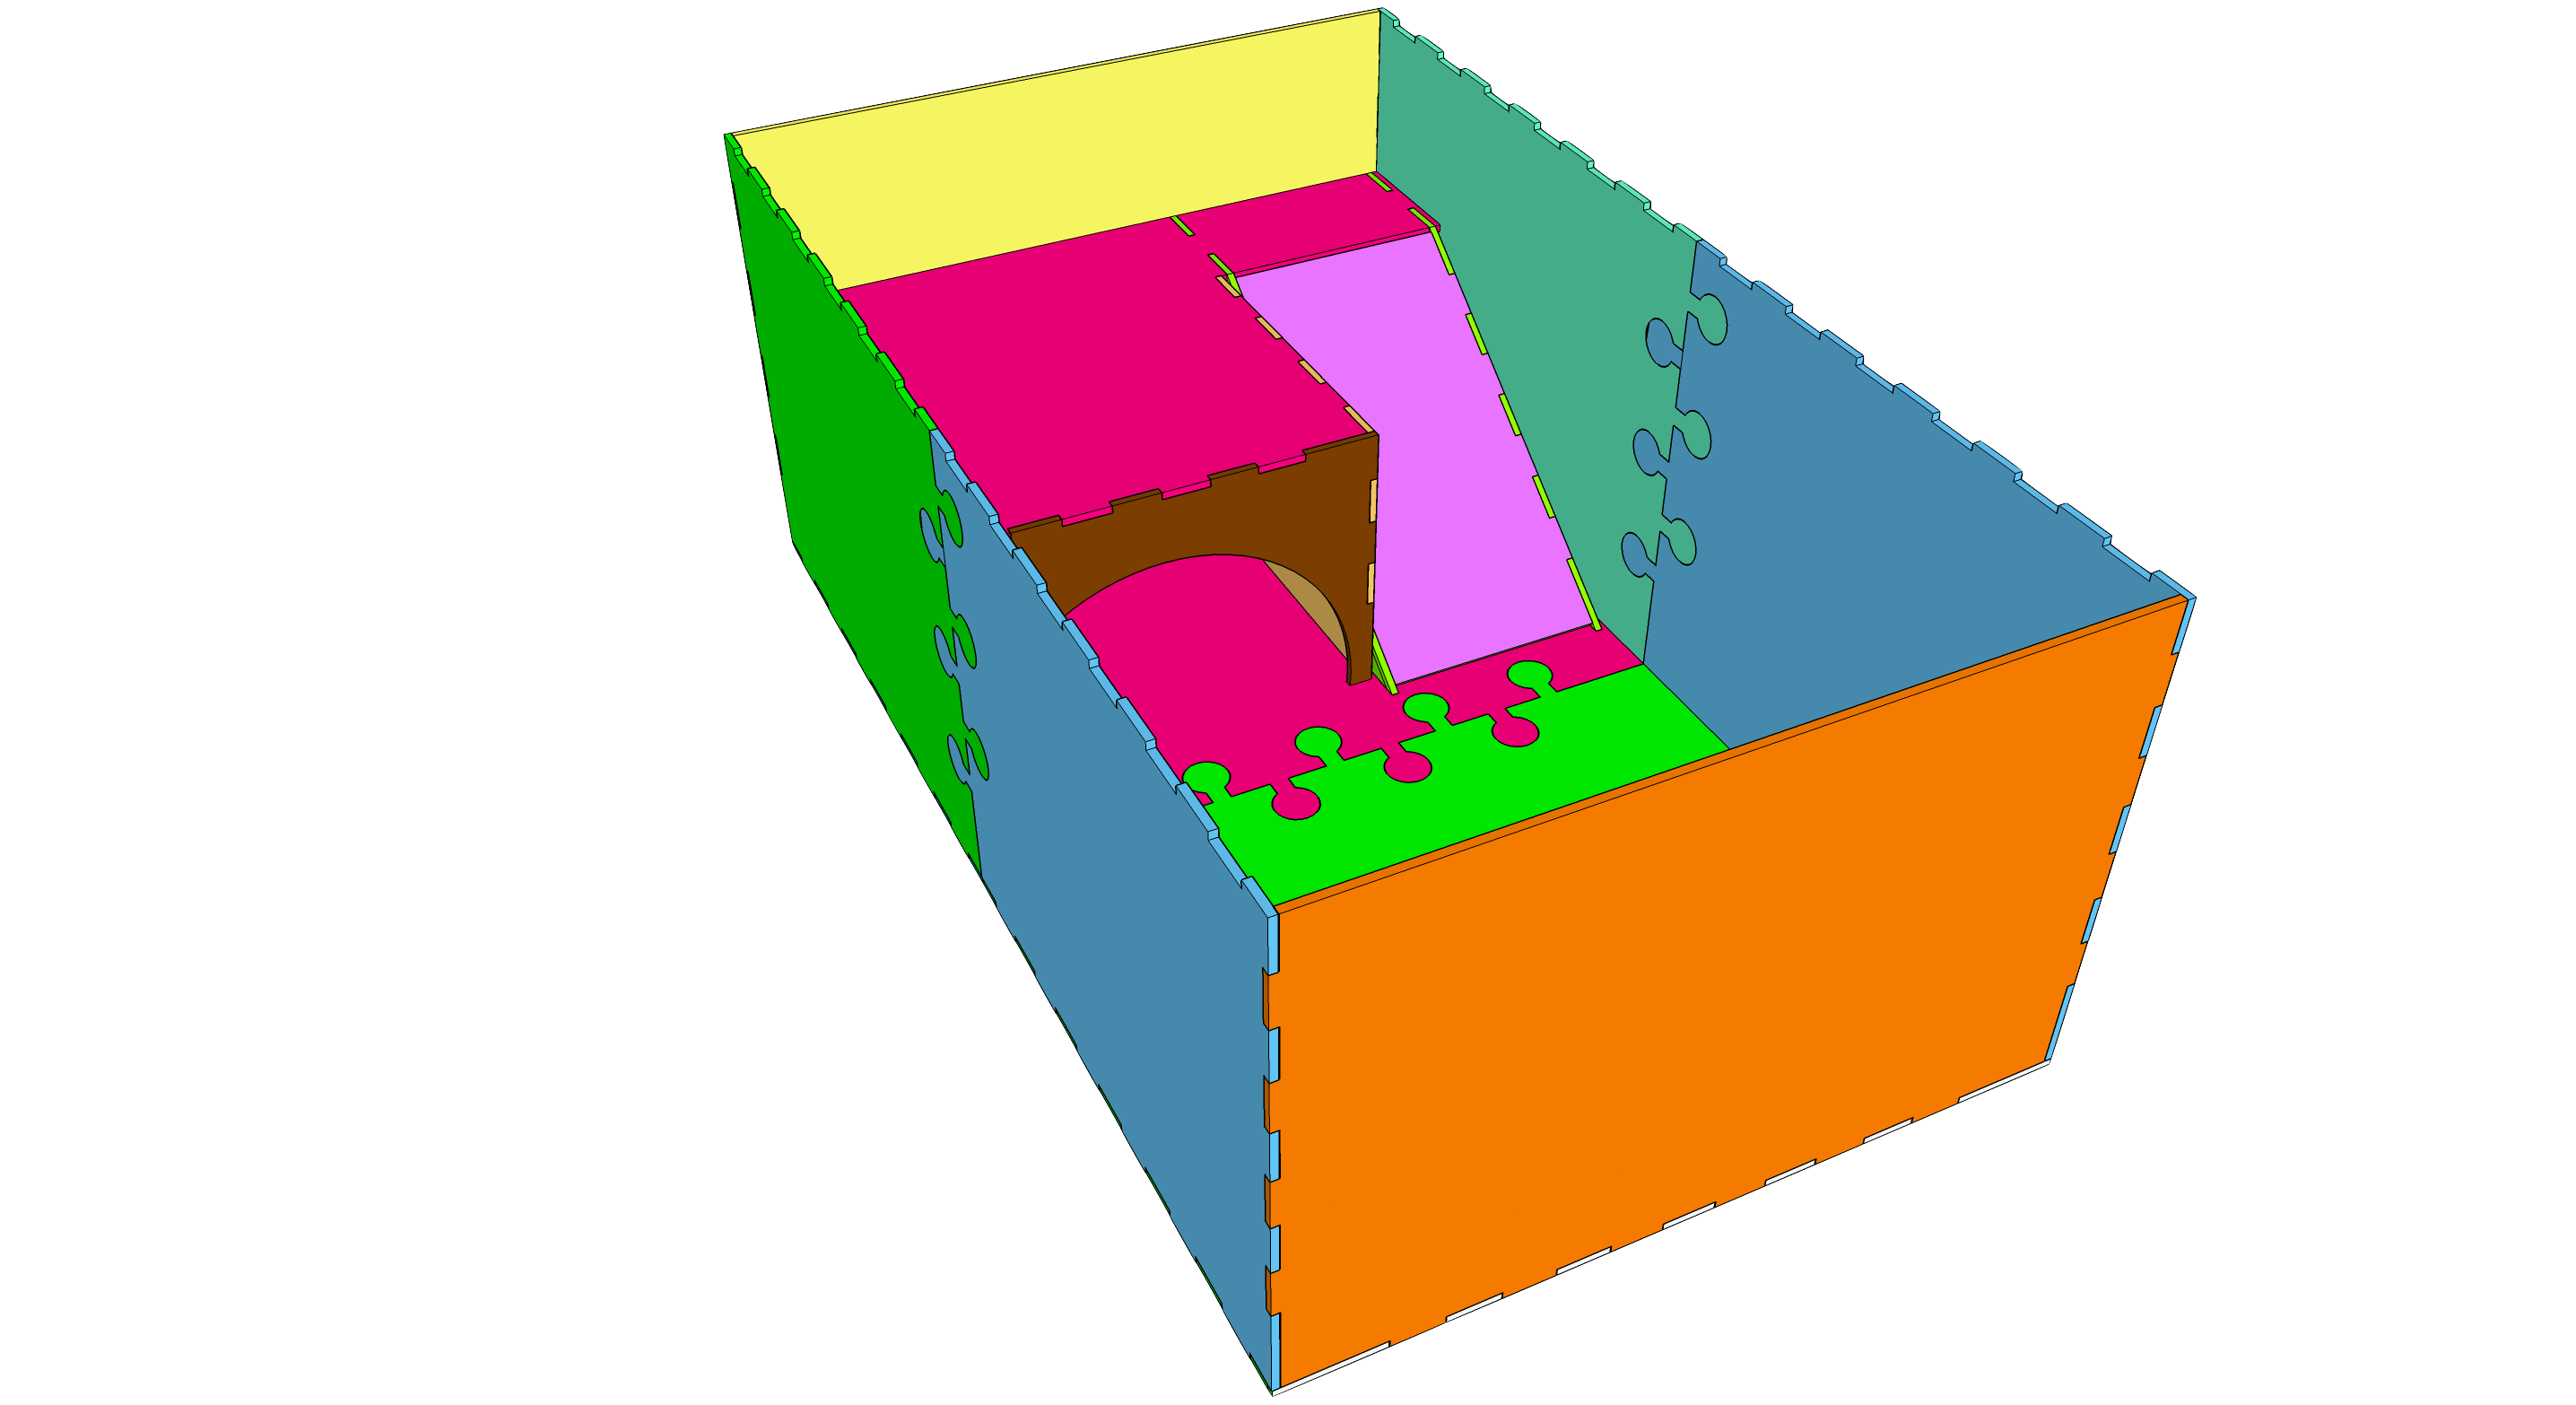
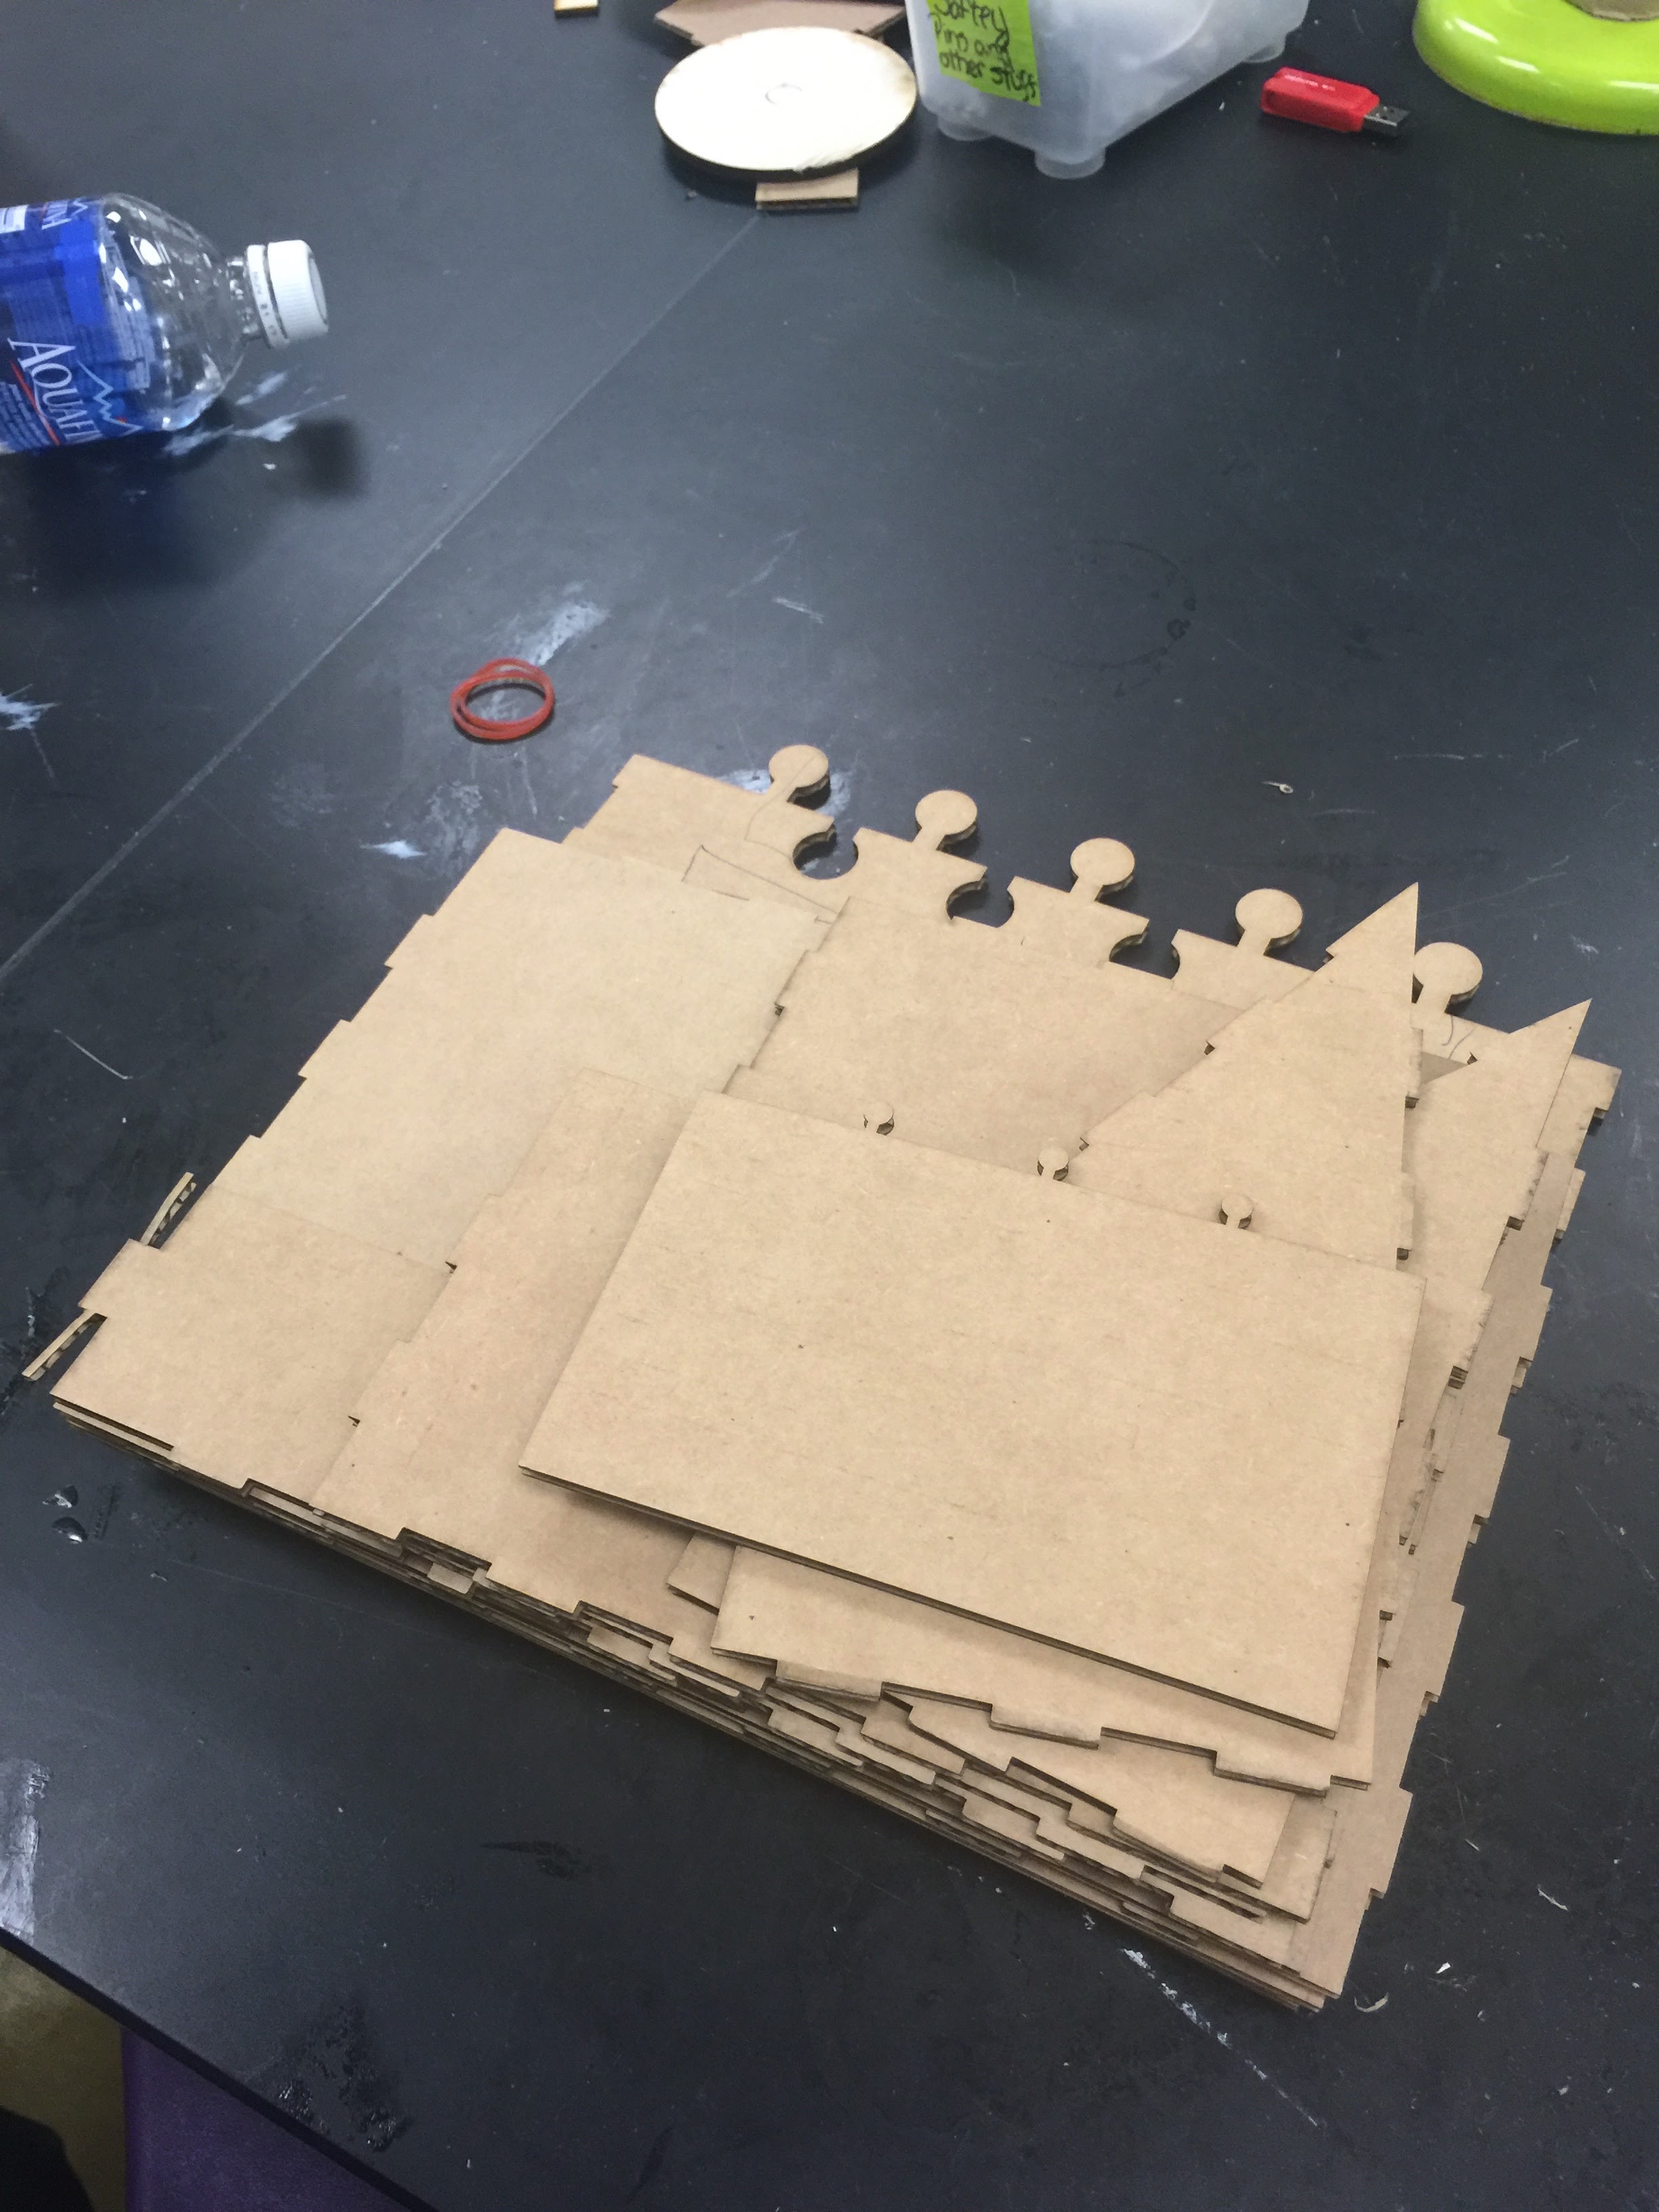
Final revision of previous assignment.
Link to Google Docs with proper formatting
Makerspace for Classroom Teachers
Lucas Longo – 2016
Introduction
Makerspaces in schools provide an unique opportunity for teacher professional development, in all disciplines. They may provide a situated learning experience where teachers can recall the difficulties students have in the process of learning and thus reflect upon their own teaching practices. Given that the majority of teachers are not familiar with fabrication and electronics, they are put back into the beginner’s seat, providing the possibility of reflecting metacognitively about learning and teaching. Accompanied with engaging discussions and activities of grounded on the affordances the activities provide, teachers learn about the best practices of teaching through modeling and engagement in practice.
The nature of the activities in makerspaces range from exploring, designing, building, and asking questions – all traits considered desirable in today’s research in education. What if we could apply these features into an English Poetry class? How can we promote transfer from the teachers experiences in the makerspace into their everyday classroom activities? I propose a PD curriculum that through engaging in makerspace, teachers are provided the opportunity to reflect on how learning happens, how to transfer these ideas into their own practice, and ultimately affect learning outcomes of their students in their own disciplines.
“In fact, the richness of makerspaces comes not from the fact that the abstract is left out, but that it is brought in together with new ways to build relationships with and between objects and concepts. ” (Blikstein & Worsley, 2001, p.5)
The Space
To explore this idea of using makerspaces as a learning environment for teachers I went to a public elementary school in Palo Alto where I interviewed the lab coordinator, who I shall call Jane. She walked us through the stations, described the activities students engage with in the space, and how she actively helps classroom teachers use this space as a learning environment in their disciplines. She used to be a science teacher and ran computer programming workshops after school before she created the maker space at the school. Her digital literacy and technical knowledge were surmount in her appointment for the task and as I see it, essential to be able to design the space, choose the tools, and use them for didactical purposes.
The space itself was a regular classroom converted into an open space with the working stations along the wall and low tables covered with paper where the students plan and work on their iPads. An outside area is also used for larger projects and is where all the Lego bricks are stored. Jane transformed it into a Makerspace by getting rid of all the closed cabinets along the walls, cutting the table’s legs making them more accessible to the students, and installing shelves to store material and student’s work. This was the first makerspace in Palo Alto’s District created around one and a half years ago, and now is being used as a model for other schools. An interesting concept that arose from the conversation was that some schools who do not have a full classroom for a makerspace are using karts with equipment and material that is circulated amongst the teachers allowing them to use the tools in their classroom.
Jane also mentioned that she has worked at the richest school in Palo Alto where they still do not have a Makerspace. ‘They are still thinking about the color of the furniture that will go there’ and ‘the teachers are not aware that the administration is even thinking about or planning to create a makerspace.’ ‘Teachers are not bought into it yet – they have the money but nothing happens. Let the kids do it – figure it out what is needed – put in action – do it.’ Her maker mentality needs to be somehow transmitted to the other schools. Freire would appreciate her statements in the sense that she is providing an open space for dialogue and relinquishing control over the experiences the students have in the space. She embraces the notion that the students are responsible for their own projects and that the teachers learn as much from them as they might from the teacher.
This transformative approach to teaching is promoted by her not only at her school but also in more formal PD sessions she holds at the space. At the district level she teaches “iPad in the Classroom”, “How to use Google Docs”, and “Schoology”. Every year she creates new courses to match the current software needs the teachers might have. Her drive and content knowledge applied to ‘spreading the word’ seems to be the key factors in this space’s success, and ultimately its sustainability. Any learning environment needs someone who will skilfully become a caretaker, curator, facilitator, and enthusiast.
The following pages contain some photos of the space and a floor plan to situate the tools. I also recorded the interview and transcribed it loosely, categorizing by topic what was said. Please refer to the Raw Data for the full transcript of the interview.
Documentation
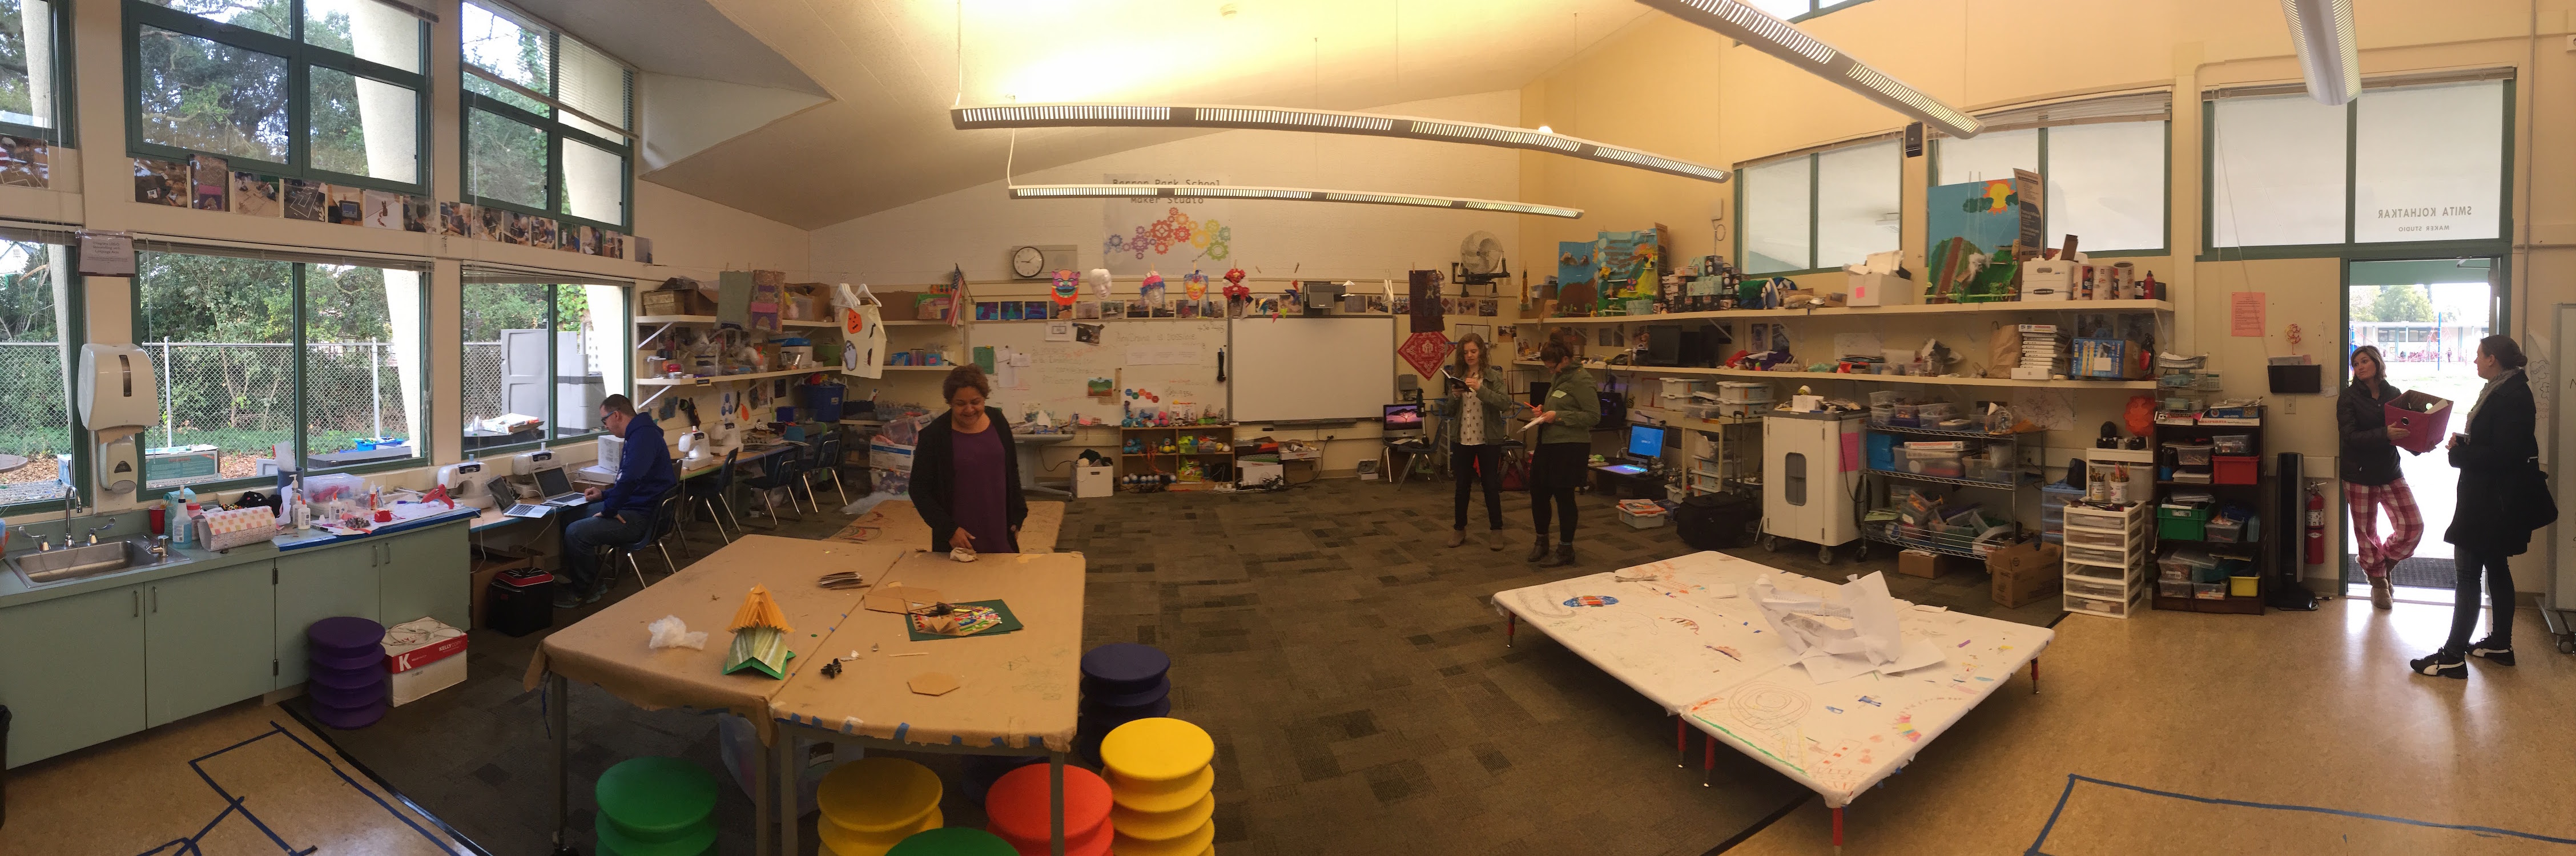 General view of the maker space
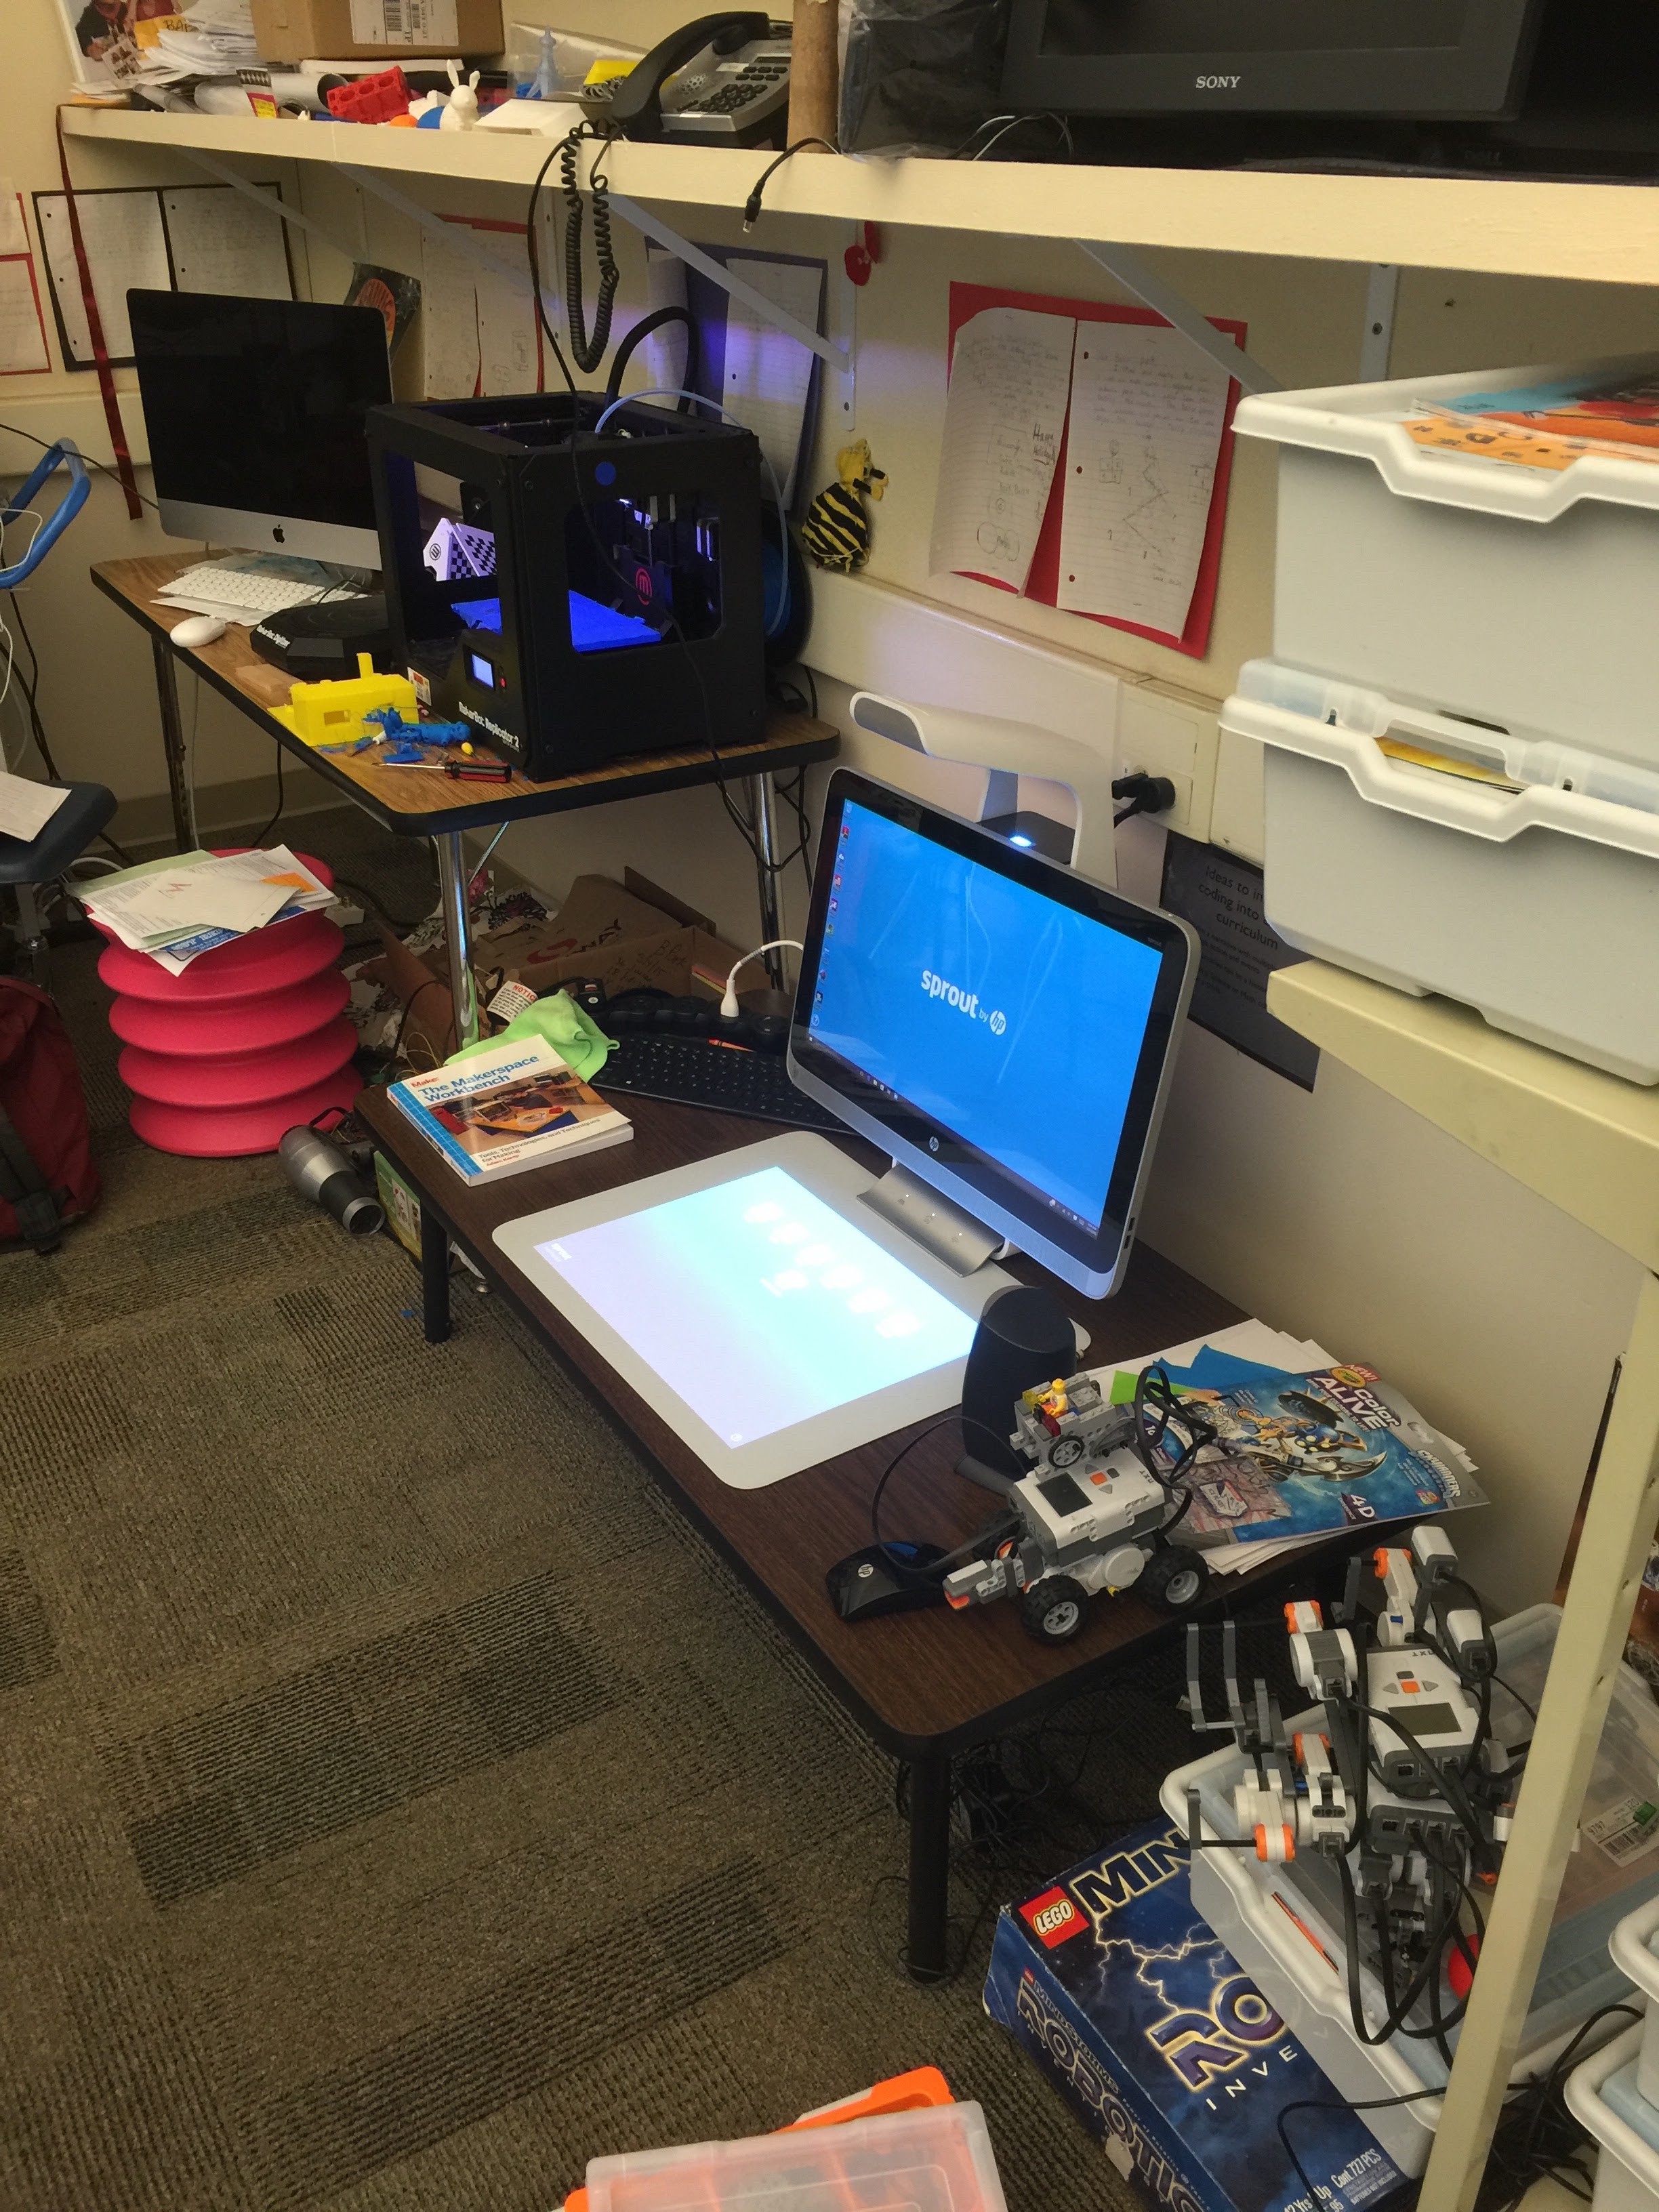 3D printer, object scanner, Lego Mindstorms
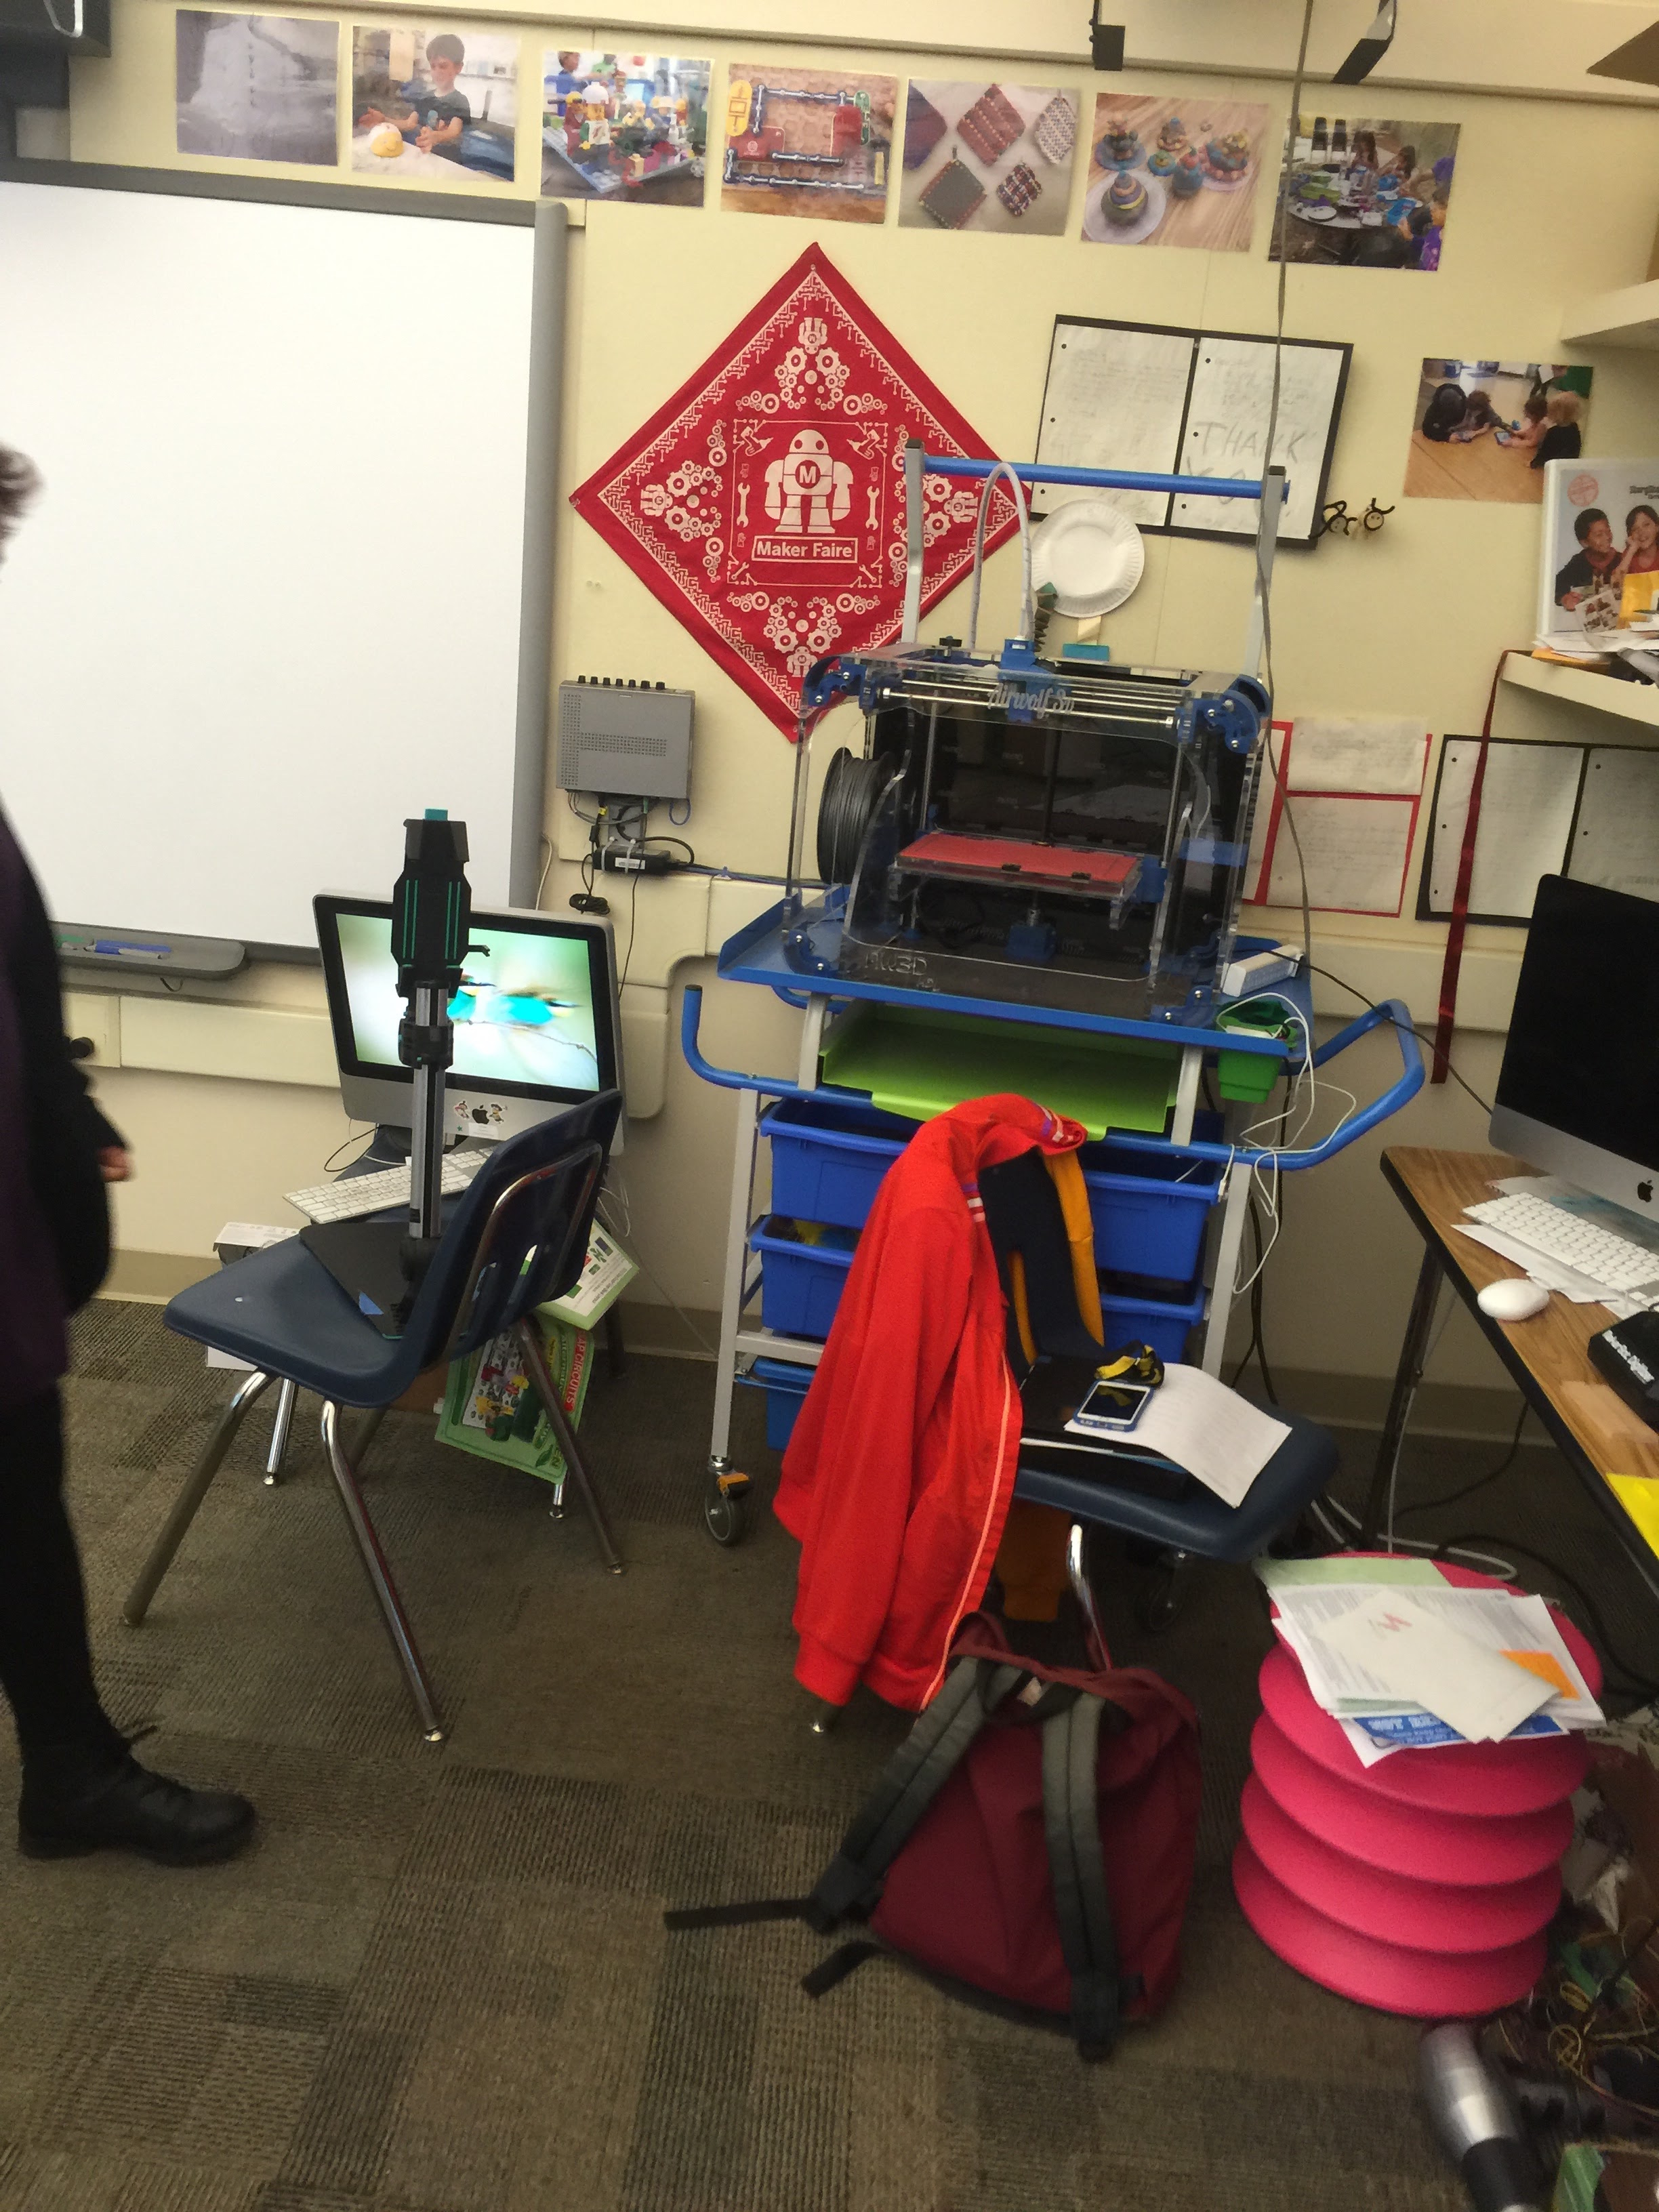 Smartboard, document camera, 3D printer
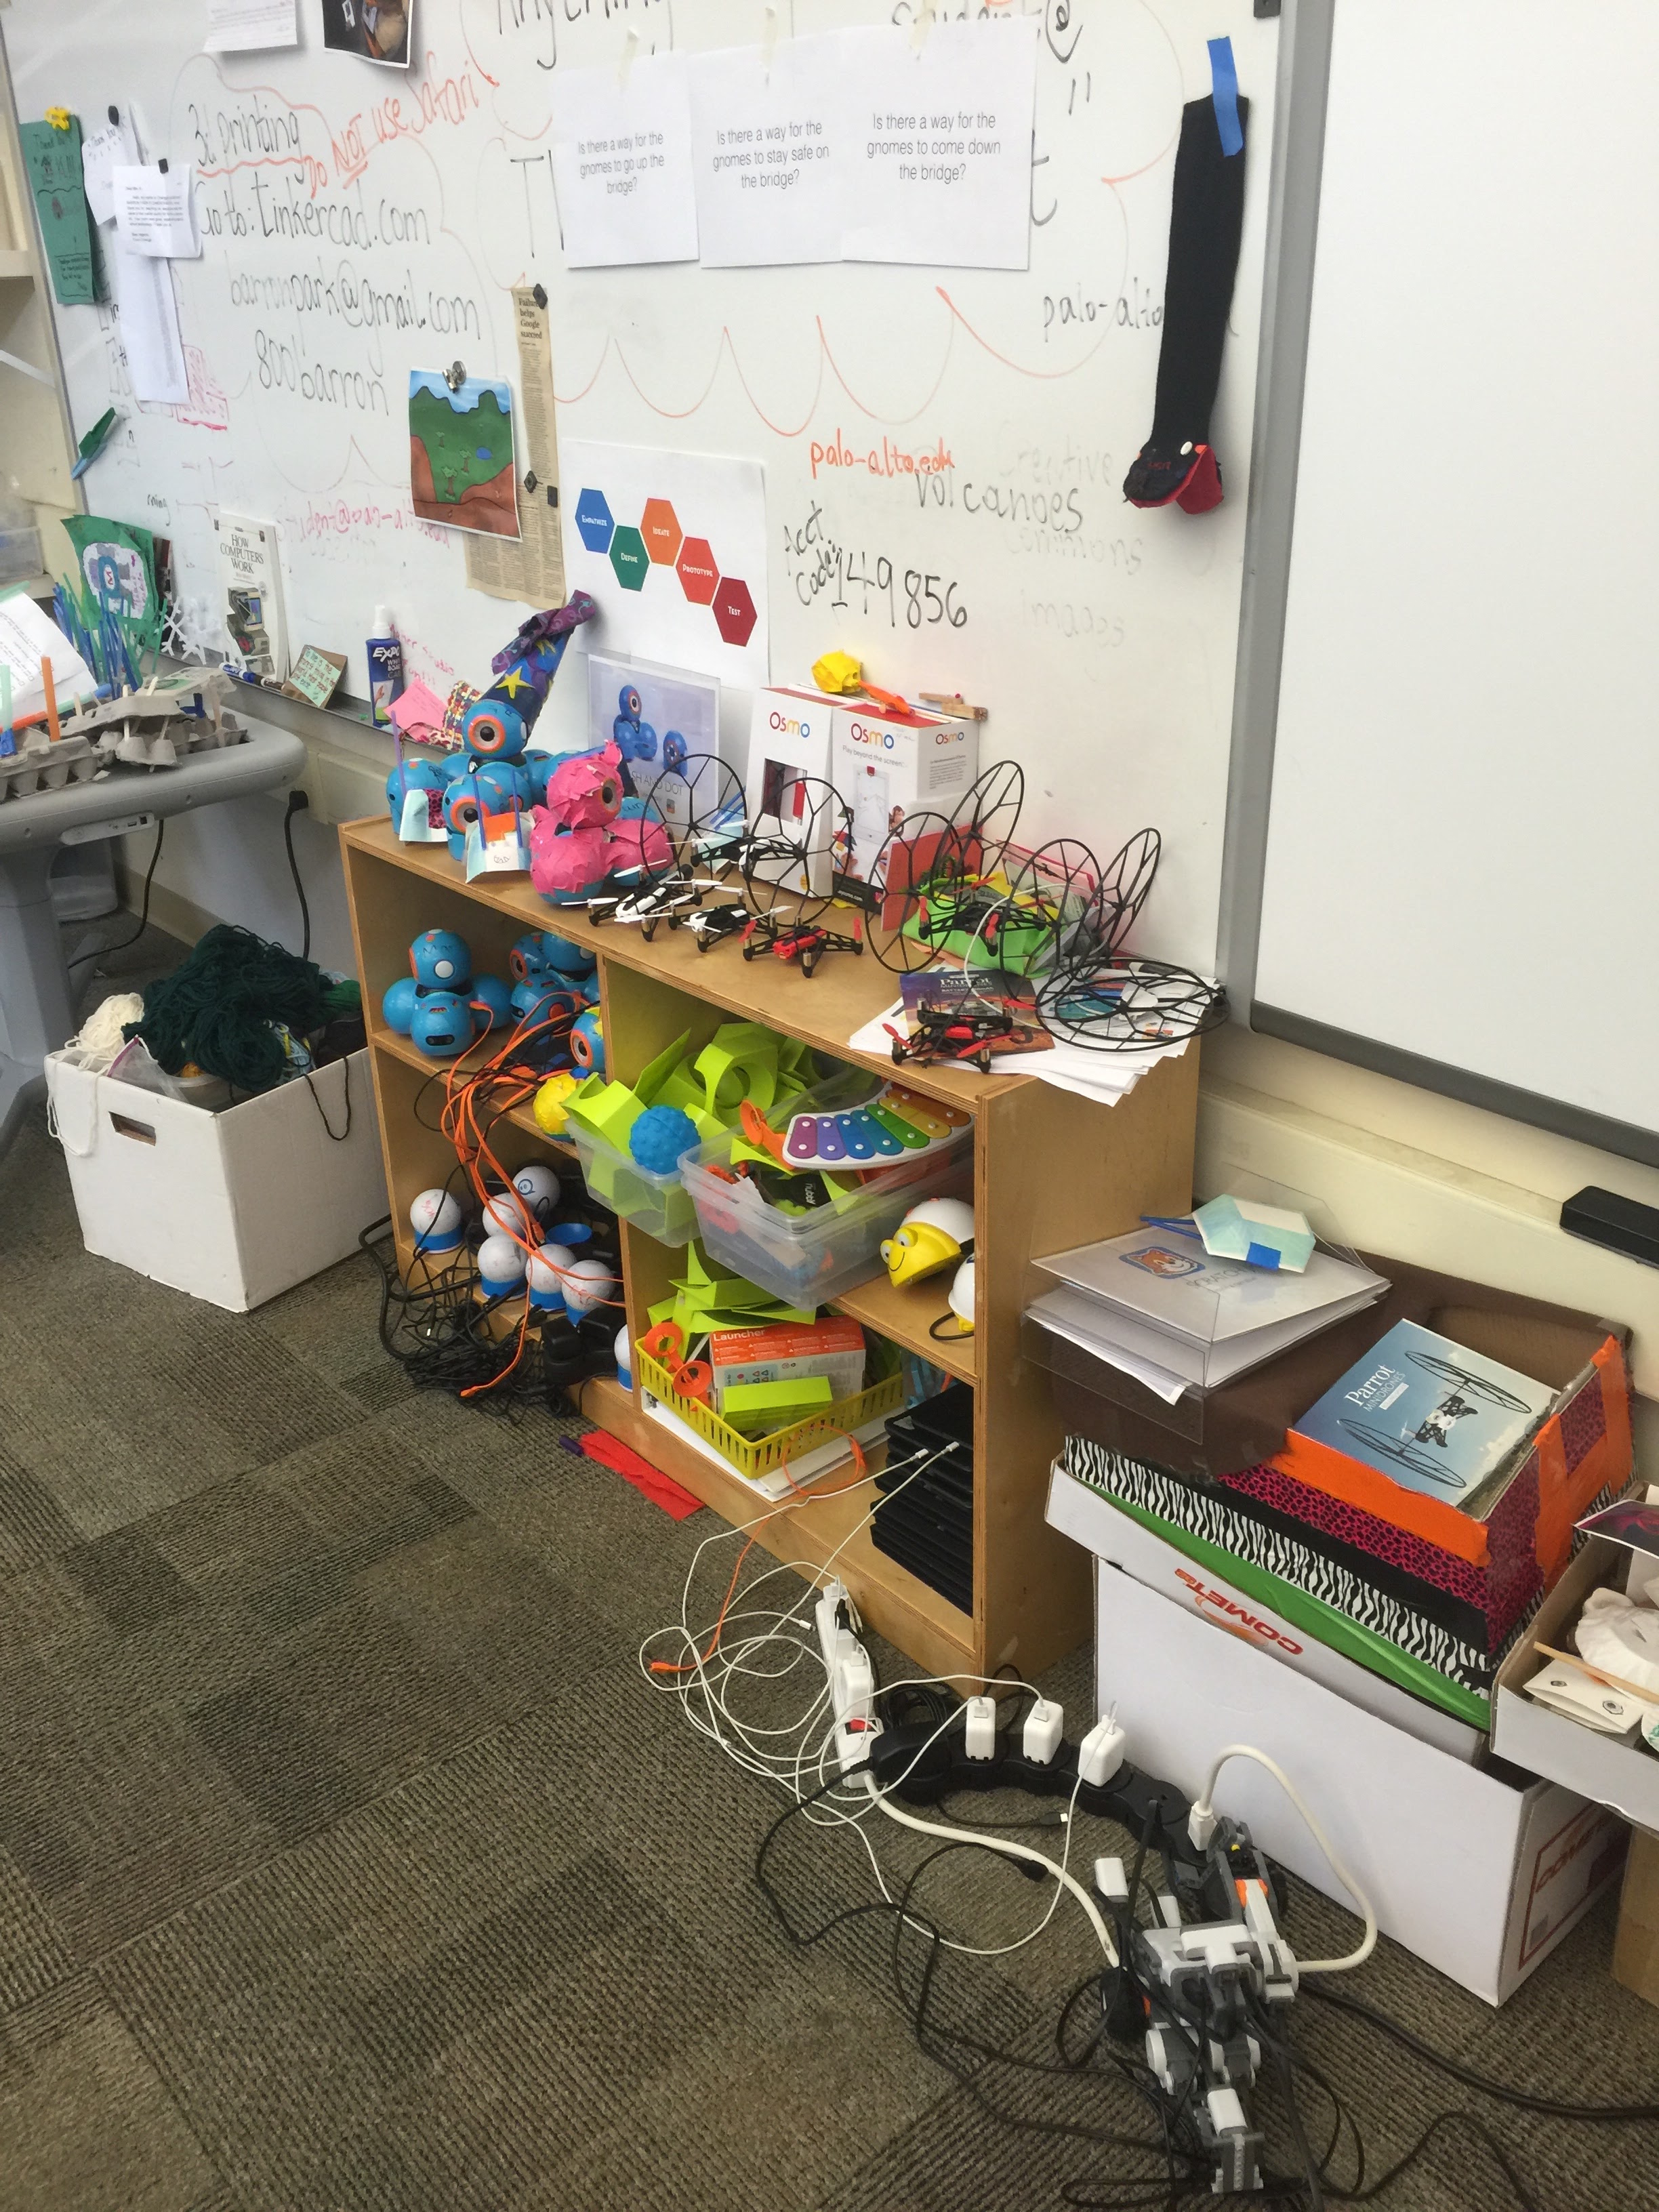 Robots, Lego Mindstorm, and mini-drones
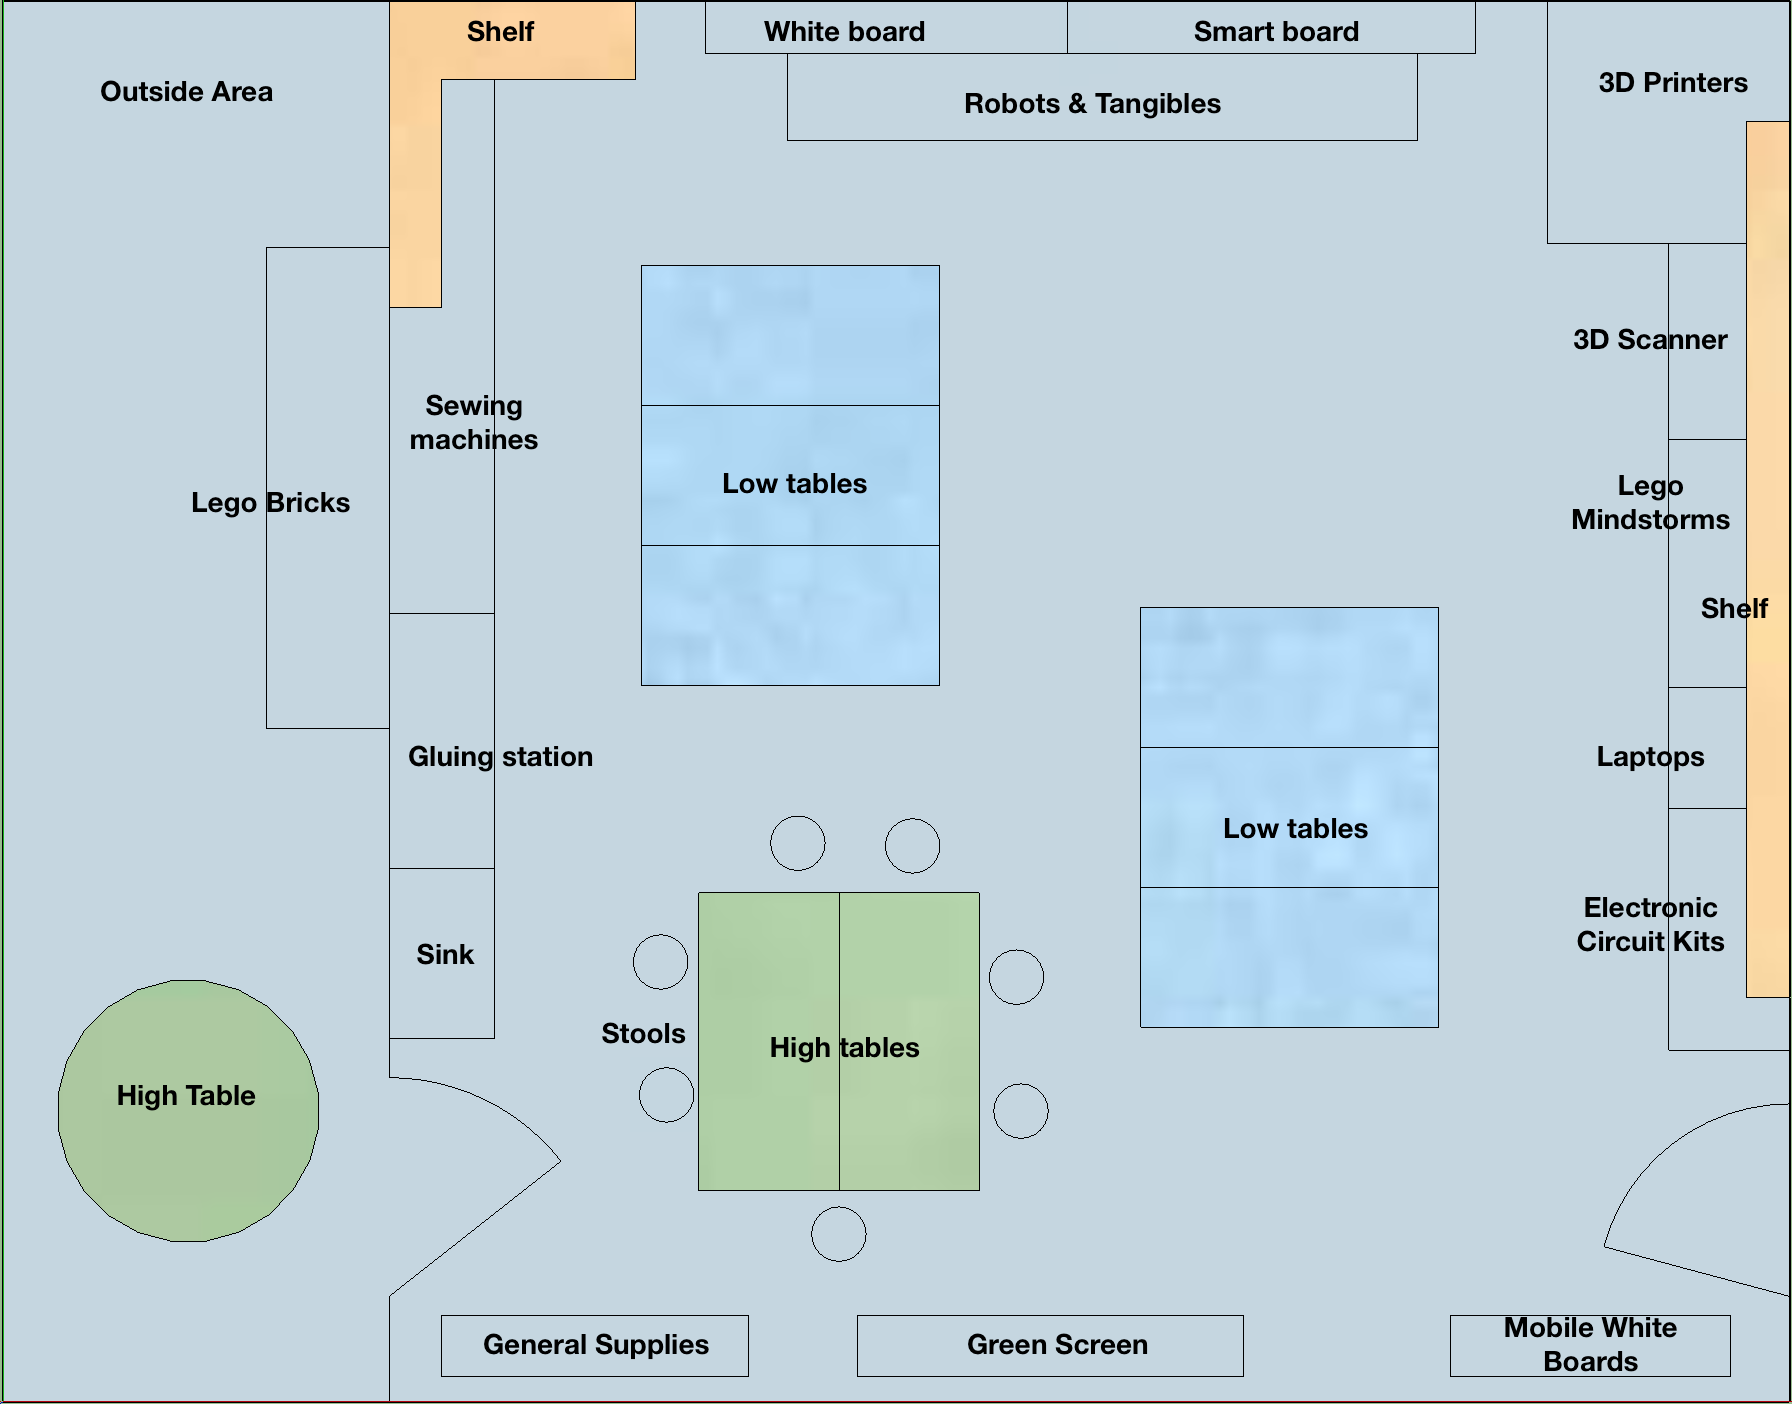 Makerspace floorplan
The arrangement of the space is divided into tool stations along the perimeter and working stations in the central area. Even though the space might look ‘messy’ it conveys a message of open exploration where all the tools and supplies are readily available for use. There is no check-out sheet of any kind or locked cabinets to which students need to request access to. The space itself is open to students during lunch time and after school promoting the idea of free access and empowers the students to decide when to work on their projects.
Curricula Integration
Jane uses the space as a learning environment for the classroom teachers at the school. She actively engages with the classroom teachers to create learning experiences in the makerspace. At Grade level meetings, she occasionally pops in and gives them ideas of activities and projects they could do in the makerspace that would enhance the learner’s experience with the subject matter. Understanding the affordances provided by the space and the teacher’s current topic of study provides a rich collaboration and an even richer experience for the students. Students for example, are encouraged to document their entire process, from design to final product. With these pictures, notes, and videos the students can ‘reflect back and see how they could do it differently next time.’
We could transfer this concept into PD by stressing the importance and value of formative assessment techniques the teachers could use in their own practice. Another example of this kind of transfer can be extracted from the fact that at lunch time all age groups are together in the space, where peer-to-peer teaching is evident. ‘They observe each other and learn from each other – even the older kids learn from the younger kids.’ A teacher PD designed in a makerspace would facilitate and demonstrate the value of collaboration and group work.
Before the space was built, the teachers ‘apprehensive and did not know about expect’ but they now see the student’s ‘excitement and learning’.
‘They all get on-board once they see this happening. Classroom teachers think that they have to learn it all themselves. The mindset has changed. Now they know that the kids know more about the apps and the space than they do so they are willing to relinquish control and let them figure it out.’
I found it particularly interesting to note the teacher’s fear of not knowing how to use the makerspace’s tools. Implicitly, this hints towards a ‘banking model’ (Freire, 1970) of education where the teacher believes they are the holder of all knowledge that must be deposited into the student’s mind. In the makerspace, teachers have to dive into to the tools and learn with the students to enable them to progress with their projects. Suddenly the students know more than the teacher about a particular tool and more importantly, about their own project, intentions, and goals. The teacher becomes a facilitator instead of a fact presenter.
I am not suggesting that all of the English Poetry class should be taught in a makerspace or that we have to throw away the current method of teaching that class. The central idea is to use the makerspace as yet another possible affordance in the engagement of students with the content. The challenge is to demonstrate to classroom teachers that it is possible to learn not only from books, lectures, and in-class in-control situations. It is also ‘more work’ to think about lesson plans, design activities, and ultimately integrate the traditional and known curricula to lesser known methods, tools, and environment.
Conclusion
Creating a makerspace in a school must be accompanied with a proficient leader who will be able to talk-the-talk and walk-the-walk. Not only this person must be fluent in the lingo of the technological tools, they must also see that sewing machines, cardboard, wood block, glue, and other low-tech materials provide excellent resources in a makerspace. In that sense, the makerspace can very well be thought of as an “arts and crafts” space with some new tools for creative expression and active learning. The driver must be to facilitate the guided creation of projects students engage in related to the content and learning goals required in a classroom teacher’s discipline.
Along with understanding these core drivers that sustain the children’s interest in the space, this person must also engage classroom teachers in this experience actively promoting experimentation. This role involves exposing teachers to the possibilities the space offers in terms of types of projects, activities, and processes. Initially the teachers might need help with coming up with ideas of integrating their discipline with these possibilities and designing learning experiences to achieve existing learning objectives.
Jane’s pragmatic personality, hands-on approach, and technological know-how are essential characteristics for creating a sustainable makerspace. She is continuously making efforts to spread the word and to help teachers figure out how to best use the space with integrated constructivist activities encouraged in makerspaces. It is a process that takes time, determination, and enthusiasm.
Even though a direct link between the makerspace experience and an improvement in academic performance may be hard to be measured precisely, the effort seems to be rewarding and promote growth beyond test results. It teaches both the children and the teachers to co-create, explore, investigate, and ‘make’ their own learning happen.
Raw Data:
Interview Transcript – Smita Kolhatkar – Barron Park Elementary School – Jan 2016
Physical environment
The learning task
Tools
The students
The teacher
Maker Studio Initial Equipment List by Smita Kolhakatar
References:
Ackermann, E. (2001). Piaget’s constructivism, Papert’s constructionism: What’s the difference. Future of learning group publication, 5(3), 438.
Blikstein, P. & Worsley, M. (2014?) Children Are Not Hackers.
Freire, P. (2000). Pedagogy of the oppressed. Bloomsbury Publishing.